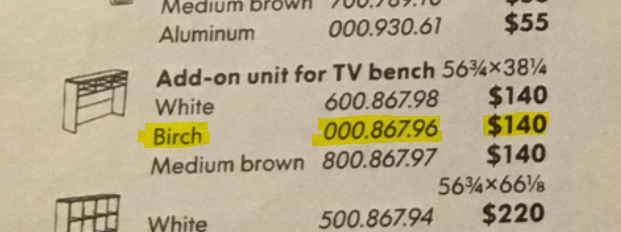
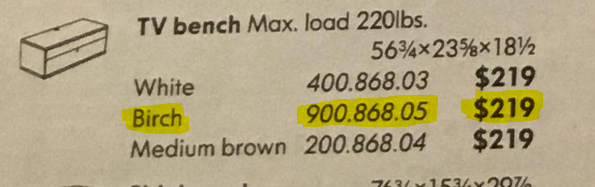
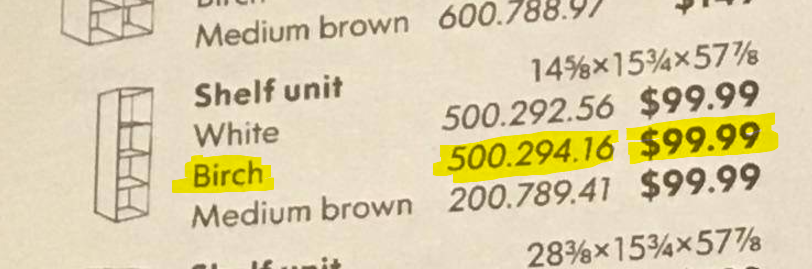
I decided to repurpose my old Ikea Bonde TV shelf and add-on unit to be less of a TV bench and more of a media center. I don’t have any before pictures, so this old Ikea catalog photo will have to do:
I previously used it with a Sony WEGA CRT television for ages, then, about 20 years ago, moving to a Vizio 40″ TV (just fit). Thanks to the magic of Reddit, I found the original part numbers/listings:
Now I plan on upgrading to a 55″+ TV so this can’t be used for its intended purpose. I still wanted to have a place for all of my stereo equipment, turntable, etc along with a myriad of old video game consoles. This unit has tons of spaces for such things, so I decided to reimagine it as just a media center.
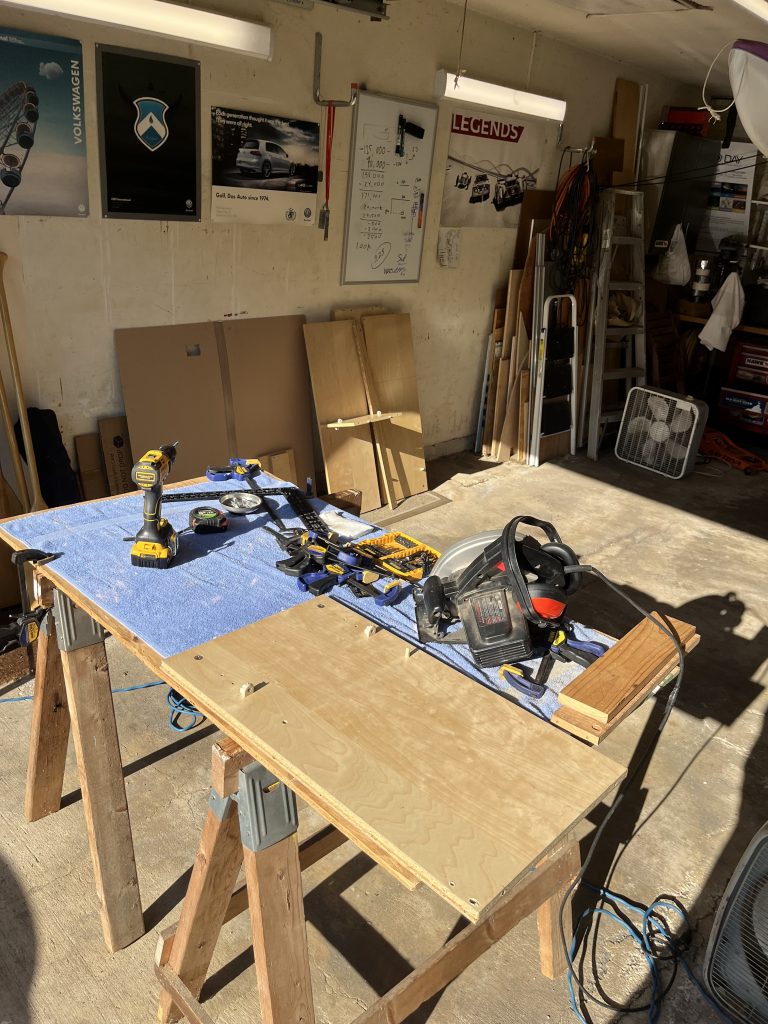
After disassembling the unit I carefully measured and cut the sides. I then transferred all of the various holes for the OEM hardware, being careful not to penetrate the sidewall of the unit with the drill and get the correct depth for each hole. I used an aluminum cutting guide as a straight edge to get a clean cut. A new Diablo fine finish blade in the saw made nice clean cuts. I did a test cut first to be sure. The whole job took about 4-5 hours including setup and cleanup.
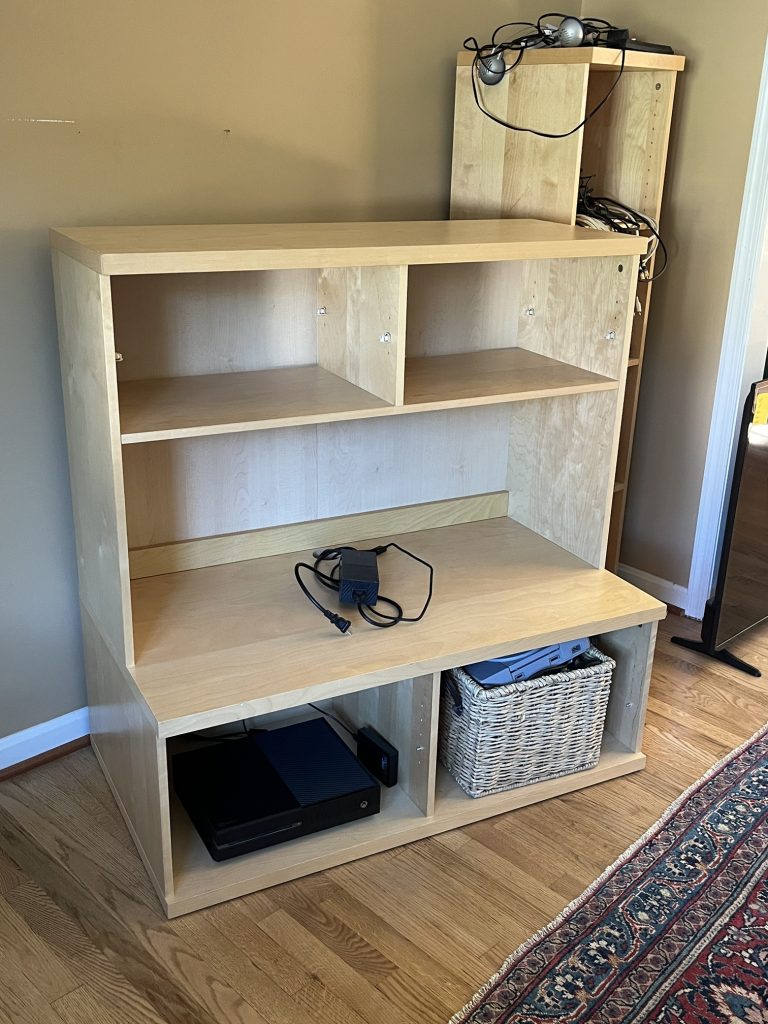
Here’s the finished unit. It’s not set up at all, just doing a test fit to be sure things work. And they do. It all lines up perfectly, sits nicely and will do the job. Now comes the fun part, hooking up all of those components! And out of curiosity, the shelves in the background are this part:
Kicking off a new series on my personal blog highlighting freight cars that I am seeking models of. The models could be resin, plastic, brass or other. Many of these prototypes appear in photos from my Georgetown Branch collection and I would like to represent them on my layout.
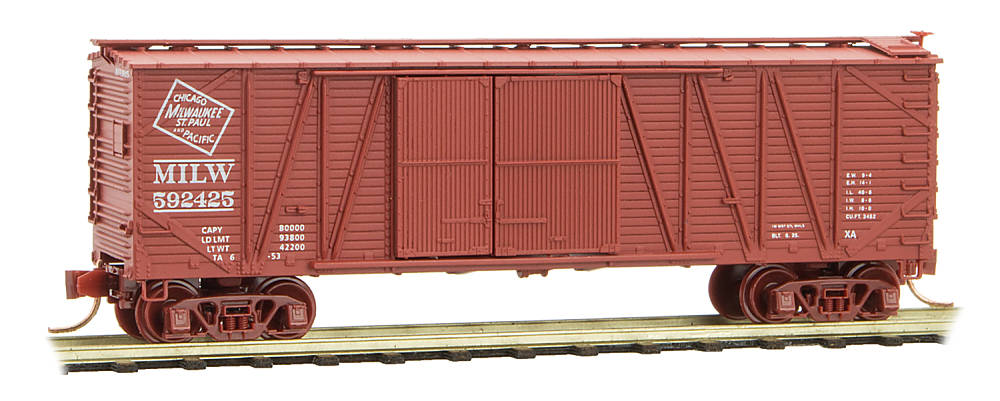
First up is this Milwaukee Road boxcar:
Georgetown Branch, B&O RR. Near Bethesda, MD. James L. Martin photo, B&O RR Historical Society collection.
Car number is 592602.
The 1943 ORER lists: Automobile, steel underframe, composite body, single sheathed, staggered side doors. #’s 592025-593024, 40’6″ IL, 8’6″ W, 10′ H, 10′ W x 9’8″ H door opening, 1’2″ W x 8″ H end doors. 3452 cu ft capacity, 80,000 lb capacity, 983 cars on roster.
The 1953 ORER: Boxcar, steel underframe, composite body, single sheathed, staggered side doors. #’s 592025-593024, 40’6″ IL, 8’6″ W, 10′ H, 10′ W x 9’8″ H door opening, 1’2″ W x 8″ H end doors. 3452 cu ft capacity, 80,000 lb capacity, 939 cars on roster.
I have yet to find a model of this car in HO scale. Apparently Micro-Trains produced a RTR version of this car in 2018 in N Scale, item 040 00 040. It looks pretty good. If only it was in HO!
So I’m putting out an APB for HO scale models of this boxcar. If you know of a potential source for this model, please let me know!
A hobby of mine is searching out and finding locations in old photos. I’m fascinated by the past and how we view it in the present. So often those that came before us are forgotten. Memories fade, people pass away or move on. But these photos stay. They capture a moment in time. I find a lot of them are mundane or formal. Often times railroads took photos to document their equipment or structures. These valuation photos were often throwaways to most folks. Boring images of a railroad track and a structure. But to fans like me, they are treasure troves of context. Figuring out how the railroad was arranged and what was there in that time frame is wonderful to discover. Here is an example. This image popped up on the Railfan.net Erie Lackawanna Email List Photo Archive:
The photo shows a street running down to a railroad yard and mainline. There are some buildings scattered about and more railroad cars in the distance. A station can be seen and some other structures. There’s a few more images here: http://lists.railfan.net/erielack-photo/?erielack-photo&year=19 in the 12/12/2019 section. Check them out.
I was interested to see if I could find this spot. I’m unfamiliar with the location but that didn’t stop me. I did some Googling to find out where the Lehigh Valley passed through Phillipsburg, NJ. East to West. Ok. And there was a sort of bottleneck area here the river where a few RR’s met. Got it. And in the photo is a tiny little sign on the structure to the left “Market St”. Now I knew where to look. A little bit of poking around and I found it. Amazingly, the house on the right is a match for the one in the photo. It still stands! I be if you peeled back all the siding you’d have some original woodwork. Brilliant. Here is the current view:
Quick note – this is a long, long post. I get it.. “GIMME THE TL:DR”. If you want the meat, go to the end sections where you’ll find downloads of my annotated shop manual snippets, parts list and other goodies. Hope you enjoy.
To say my journey in rebuilding this transmission was an odyssey is accurate. Merriam-Webster defines it as “a long wandering or voyage usually marked by many changes of fortune” or “an intellectual or spiritual wandering or quest.” Both of these definitions concurrently describe the entirety of this project and give hope to my own personal struggles as a result of such endeavor. As such, and with hope that it will help others on the same path (or considering it), I decided to write up some thoughts, a list of parts (as best I can), hints, pointers, war stories, the lot. So here goes.
Bought my 2014 Fiesta ST used with ~23k miles on the odometer in Jan 2015, replacing my beloved 2005 Audi B6 S4 Avant. (Beloved is just a word I used to describe my love-hate relationship with this V8 beast. Aside from the beautiful sound emitted by the Miltek exhaust, the most common thing I would hear, as I read the service manual: “Place the car in the Service Position.” B6 folks know what I am talking about.) I work 34 miles from home. I wanted something fun to drive, good gas mileage, cheap to operate and relatively utilitarian. I enjoy small cars (my first car was a 1981 VW Rabbit Diesel) and when my friend Nick found the FiST on a local car dealer site, I jumped on it.
Since owning the car, it has been fantastic. The odometer recently turned over 105k and since purchase the car has been fairly trouble-free. I replaced the throttle body after it failed a few years ago, but otherwise, nothing has gone wrong. I love this car. I had hoped to get a car that I could also take to HPDE/track days throughout the year with friends and the Fiesta has delivered. It’s been a total blast on the track and, again, performs wonderfully. Upgrades include a Mishimoto radiator and trunk brace, Boomba roll restrictor (rear motor mount), a mild Cobb stage 1 93 octane OTS tune, and when on-track; brake pads (Hawk DTC-60 front, HP+ rear) and tires (Yokohama Advan Neova AD08-R). Otherwise, the car is stock. And it’s tons of fun.
Which brings me to where I am now. The car does have a few random noises. The brakes grind a bit, and always have. Nothing bad, and I inspect them frequently, but I suspect it has to do with the somewhat aggressive OEM pads. The transmission had some whine to it. And many FiST folks complain of clunking when shifting. (I think that has more to do with a lower-end transmission than a big mechanical problem.) The whine in the trans is something that was nearly inaudible for the first couple years but got worse over time. But not bad, just worse. It was an ever-so-slight whirring noise. Sounded like faint gear noise to me. It never really bothered me and the car drove great. Over the years I did about 10-14 track days, daily drove the car, and never had any issue.
In early May I went out to PittRace with the Audi/Porsche clubs for a 3-day HPDE. This was my first time out there and I was very excited. I first noticed the transmission noise getting a bit more audible on the trip out there from home in Maryland. But, again, no real issues driving it. At the track, things progressively got worse. The first day there wasn’t that much change but on the second day it got louder and by the third day, I bailed out after only two sessions because I was worried I wouldn’t be able to drive the car home. (Spoiler alert: I made it.) The noise at this point was really loud. It was a sort of whirring/grinding/spinning noise and it was *only* under load. If I coasted, it made no sound. If I coasted where I was able to have some load on it, it would appear briefly, quieter. I also noticed another sound – a sort of rattle. The rattle was only evident when I depressed the clutch pedal (taking pressure off of the clutch) and it was different than the whirring/whine. It would be evident at idle. As you will see, in the end, I believe the two are related. Here is a video that shows what the car was doing:
Video of the noise the transmission was making.
I had to make a decision. Do I:
Take the car to Ford and ask them to diagnose and fix it. Would it be a warranty claim? The 2014 FiST has a 3 yr/36,000 mi basic, 5 yr/60,000 mi powertrain warranty. I did not buy an extended warranty. There were some folks on forums and YouTube who had mentioned that Ford repaired their trans due to faulty output/input shaft bearings, and it was a “common” problem. This seemed iffy to me and I worried about dealing with the dealer on things like modifications I’d done to the car, the labor cost and the potential down time. (as we will see, this wouldn’t have been an issue.)
Take the car to an independent shop and have them repair it? I struggled with this, as it was hard for me to find a shop that I would trust and felt comfortable with. Fewer and fewer shops nowadays specialize. Most are “total car care” because they need to be to survive. As such, much of the technical work (like rebuilding a modern manual transmission) is outsourced. I have the means to remove the transmission; why pay someone to do it?
Have the transmission rebuilt by a shop? I figured the cost would be about the same or more than buying a used transmission IF I could find a shop that would even do it. They are not easy to find.
Buy a used trans from a wrecking/recycling/junk yard? This option crossed my mind and I shopped around a bit. Prices range from $800-$1,300 and there are units available all over the country. I figured “why not spend the money on my own parts and tools to get the job done myself?”
Buy a rebuilt, race-ready transmission from a place like Clarke Transmissions? This was my dream choice. I’d LOVE to have something like this in my FiST and maybe some day I will! But at prices around $3,600+, it’s outside of the scope of the car build right now. Maybe some day!
Sell the car? No.
Pull the trans myself, rebuild it, and see if I can fix it?I have wanted to rebuild a transmission for a very long time. It’s on my bucket list. I figured this was a good chance for me to get my hands dirty and do the job myself. I do have a copy of the OEM manual, a good selection of tools, friends with more tools, a nearby Harbor Freight, a garage, and a third car that I could use in the interim. Why not?
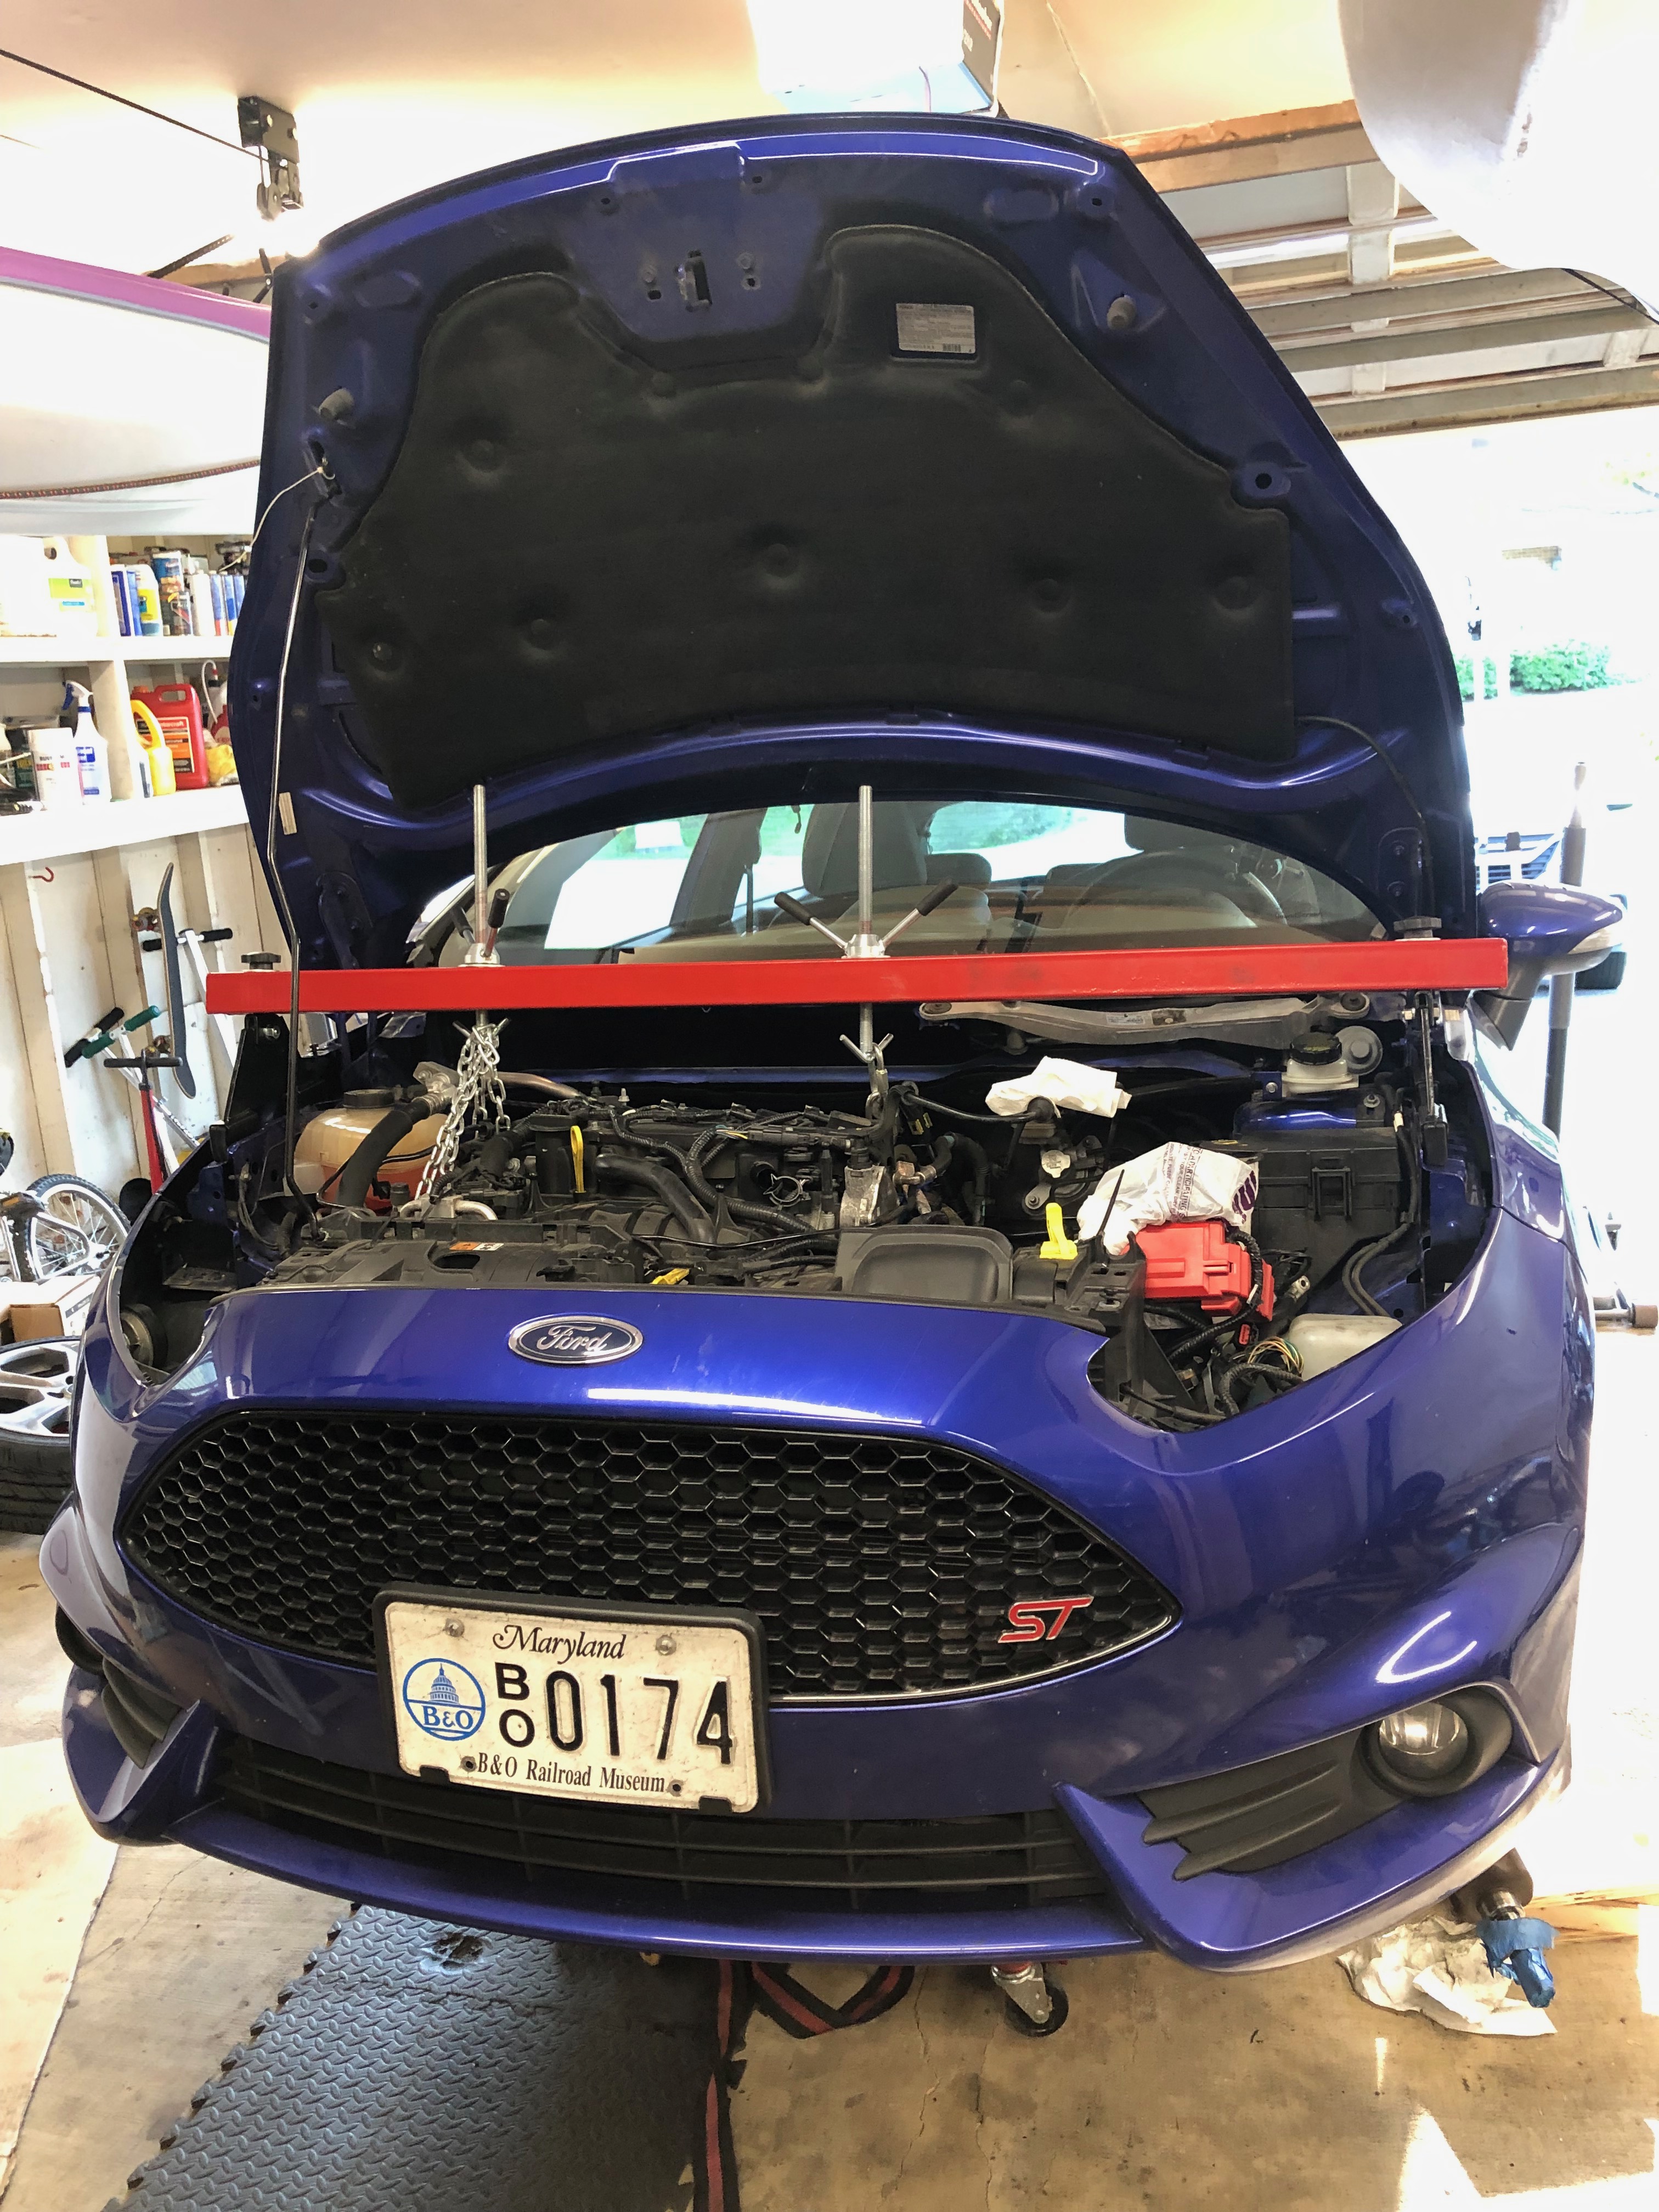
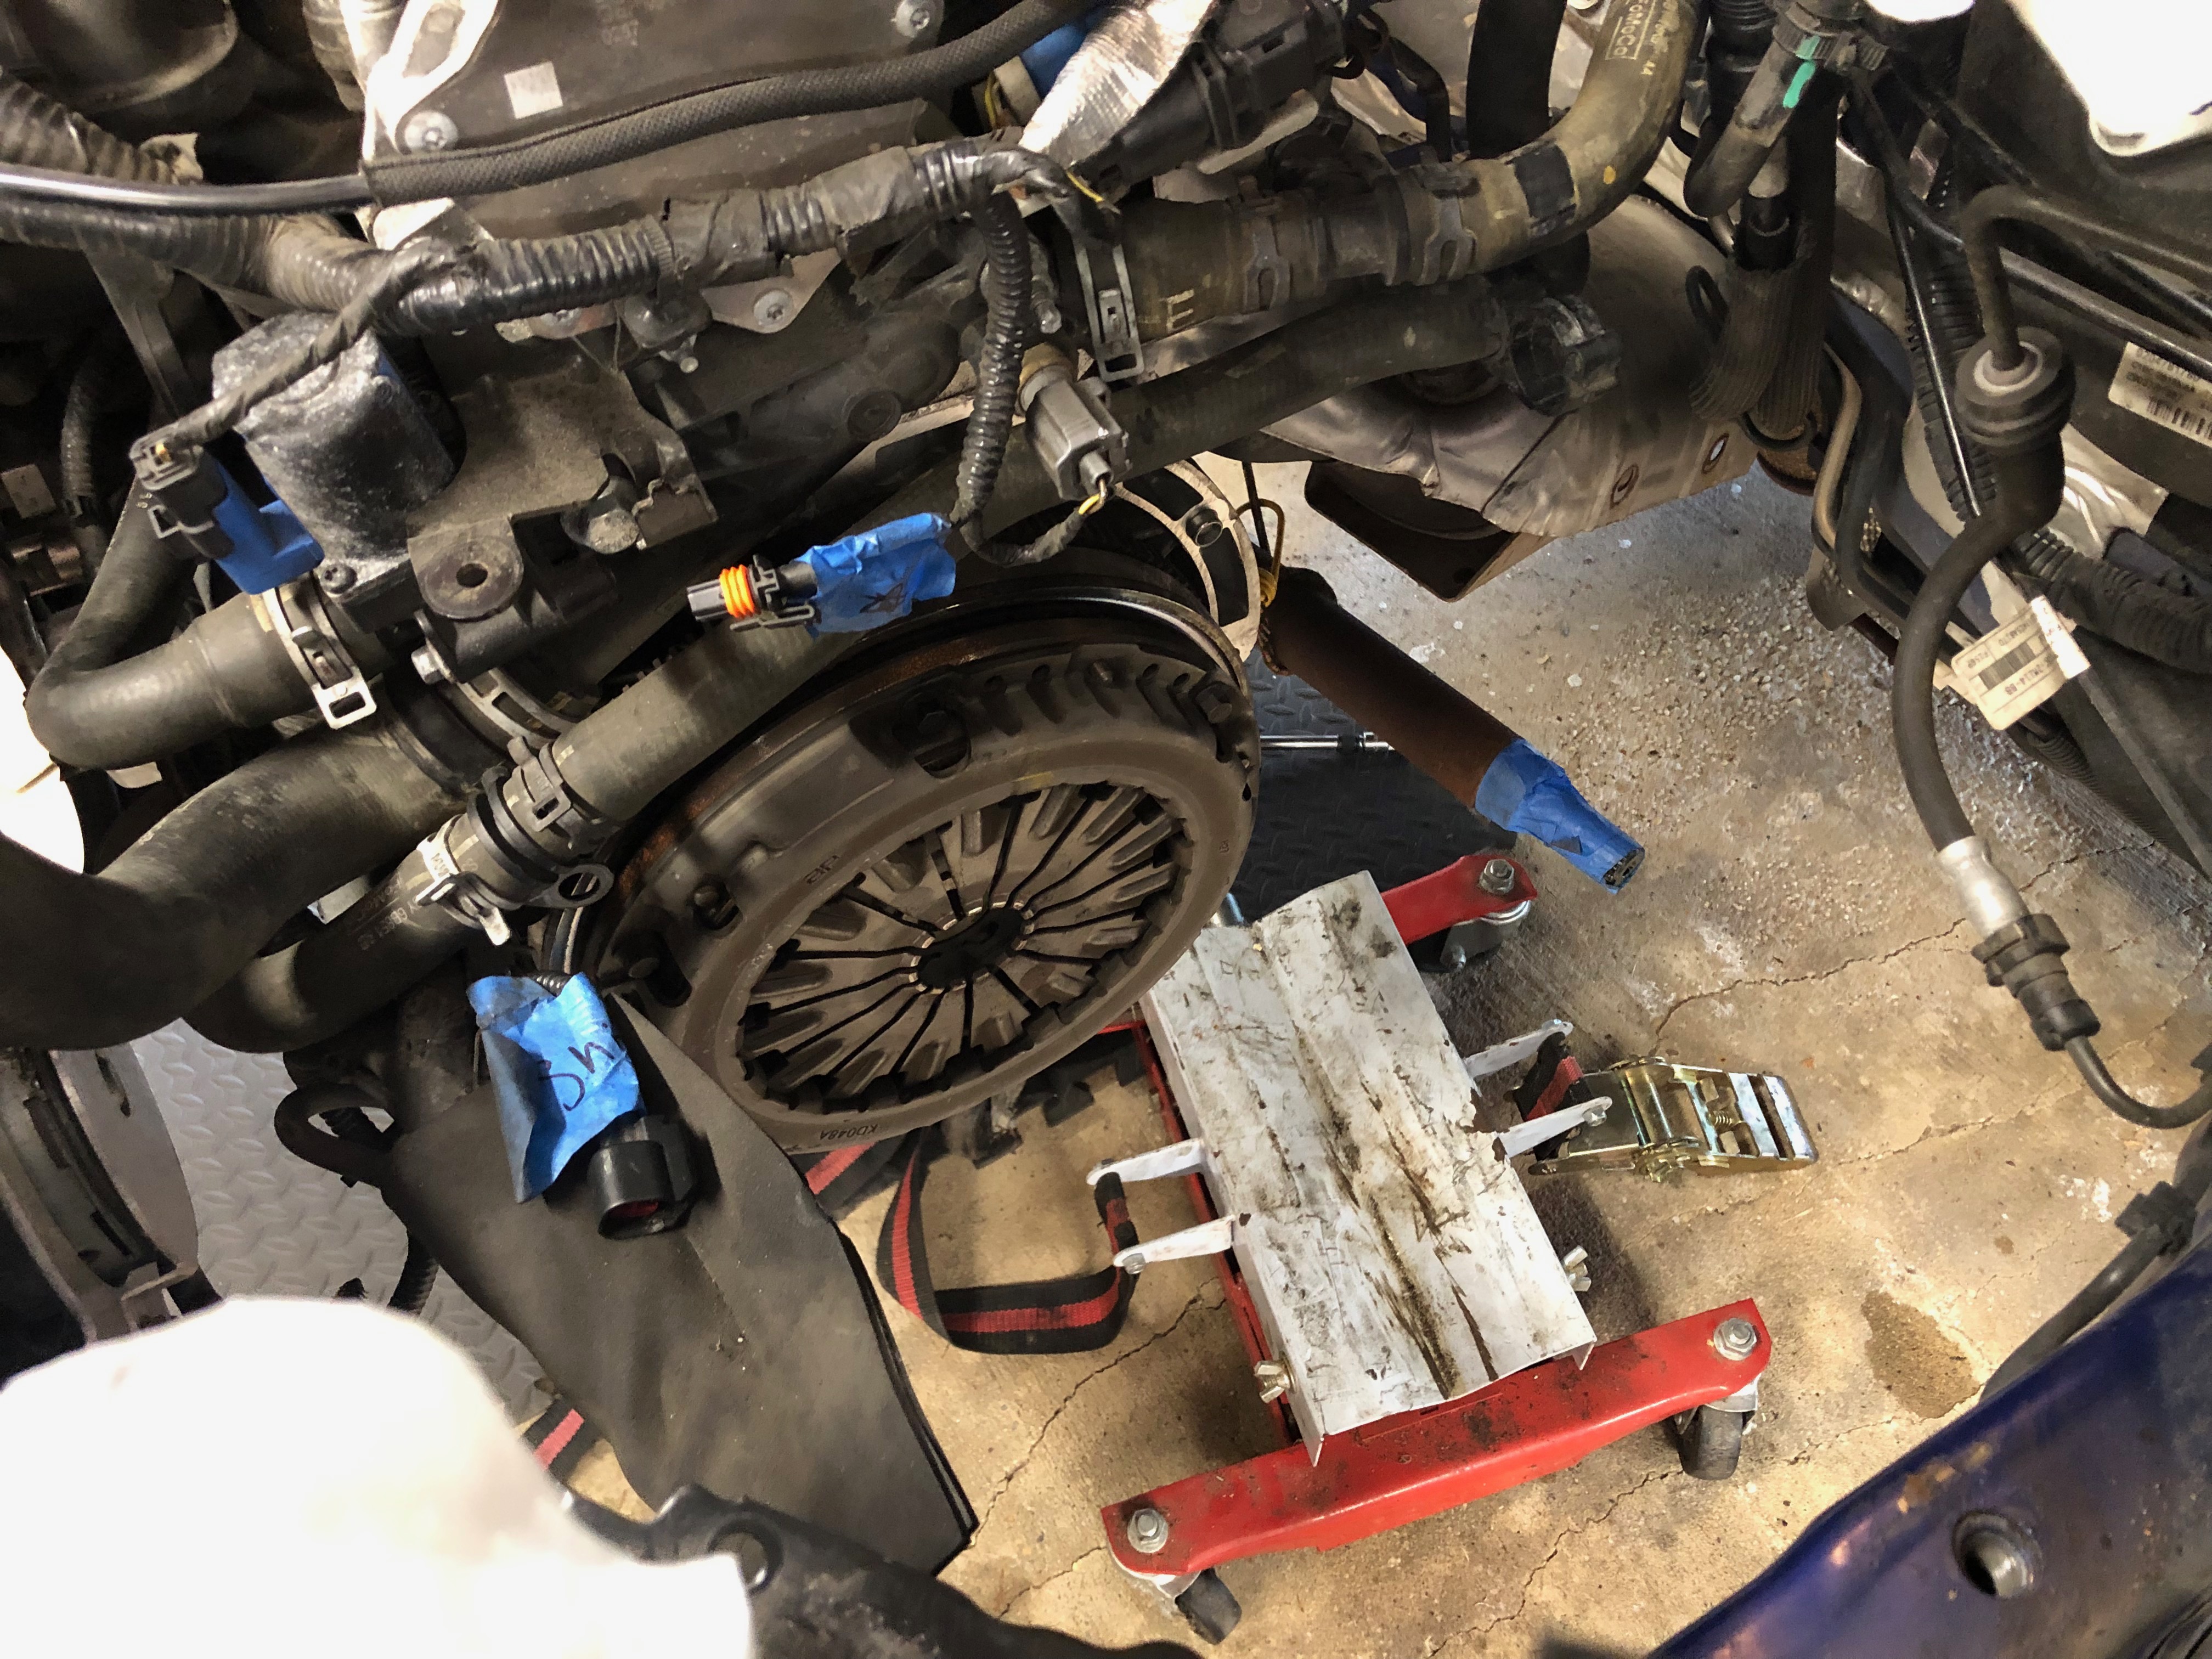
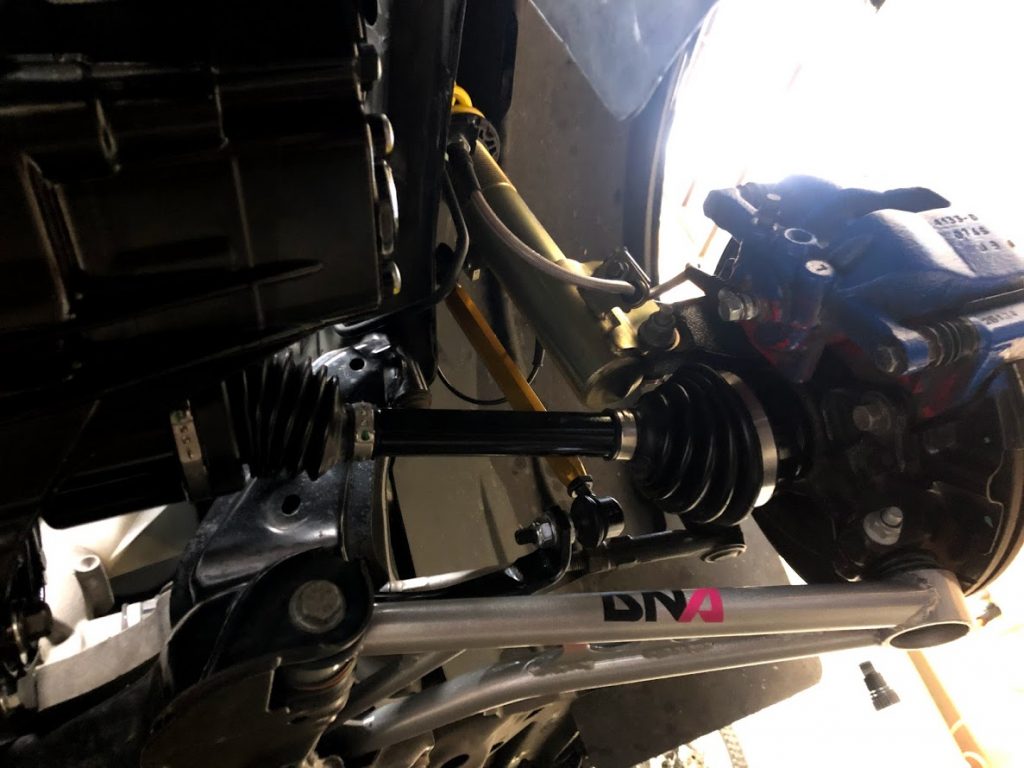
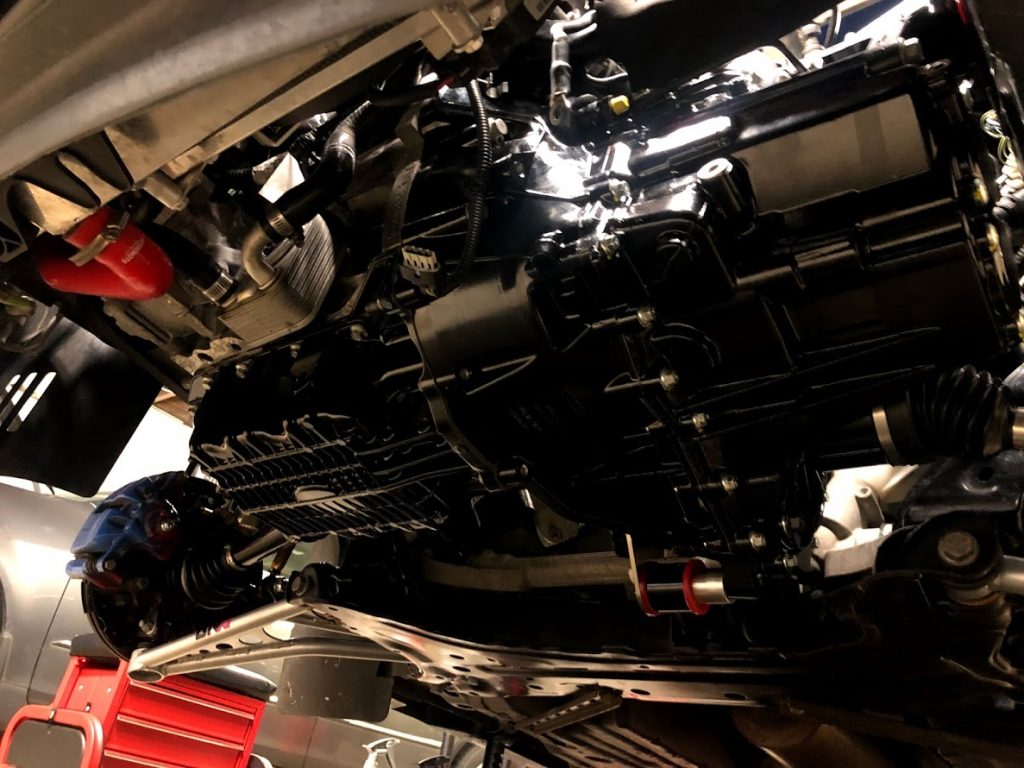
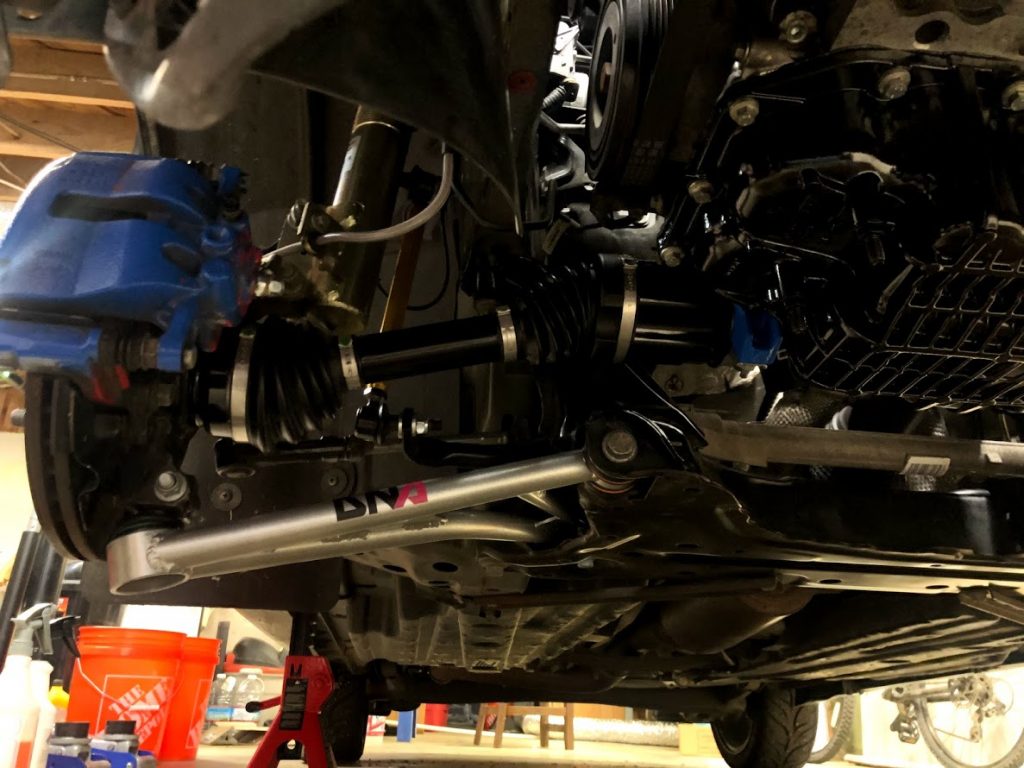
I chose #7. I figured I would recruit as much help as I could, I could source parts online and at local dealerships, buy tools I needed as I went along and if I failed completely, the worst case scenario is that I would need to buy a replacement transmission. So on I went. The first real work day wasn’t until June 9th when a couple friends came over to start the tear-down. The Ford manual tells you to remove the sub-frame, so we followed along. (Spoiler alert: the sub-frame does not need to come out in order to remove the transmission, but it does make it significantly easier. You might say “how would you know? You already said you removed the sub-frame to take the trans out!” A-HA – yes – well, see, spoiler alert #2, I had to take the transmission out a SECOND TIME. More on this later.) Jason lent me his trans jack, Randy brought some air tools, pry bars and large socket set, Ryan brought an engine support, pullers and other specialized tools (he had recently rebuild his trans). On this first day, parts were flying off the car. We got the trans out and called it a day.
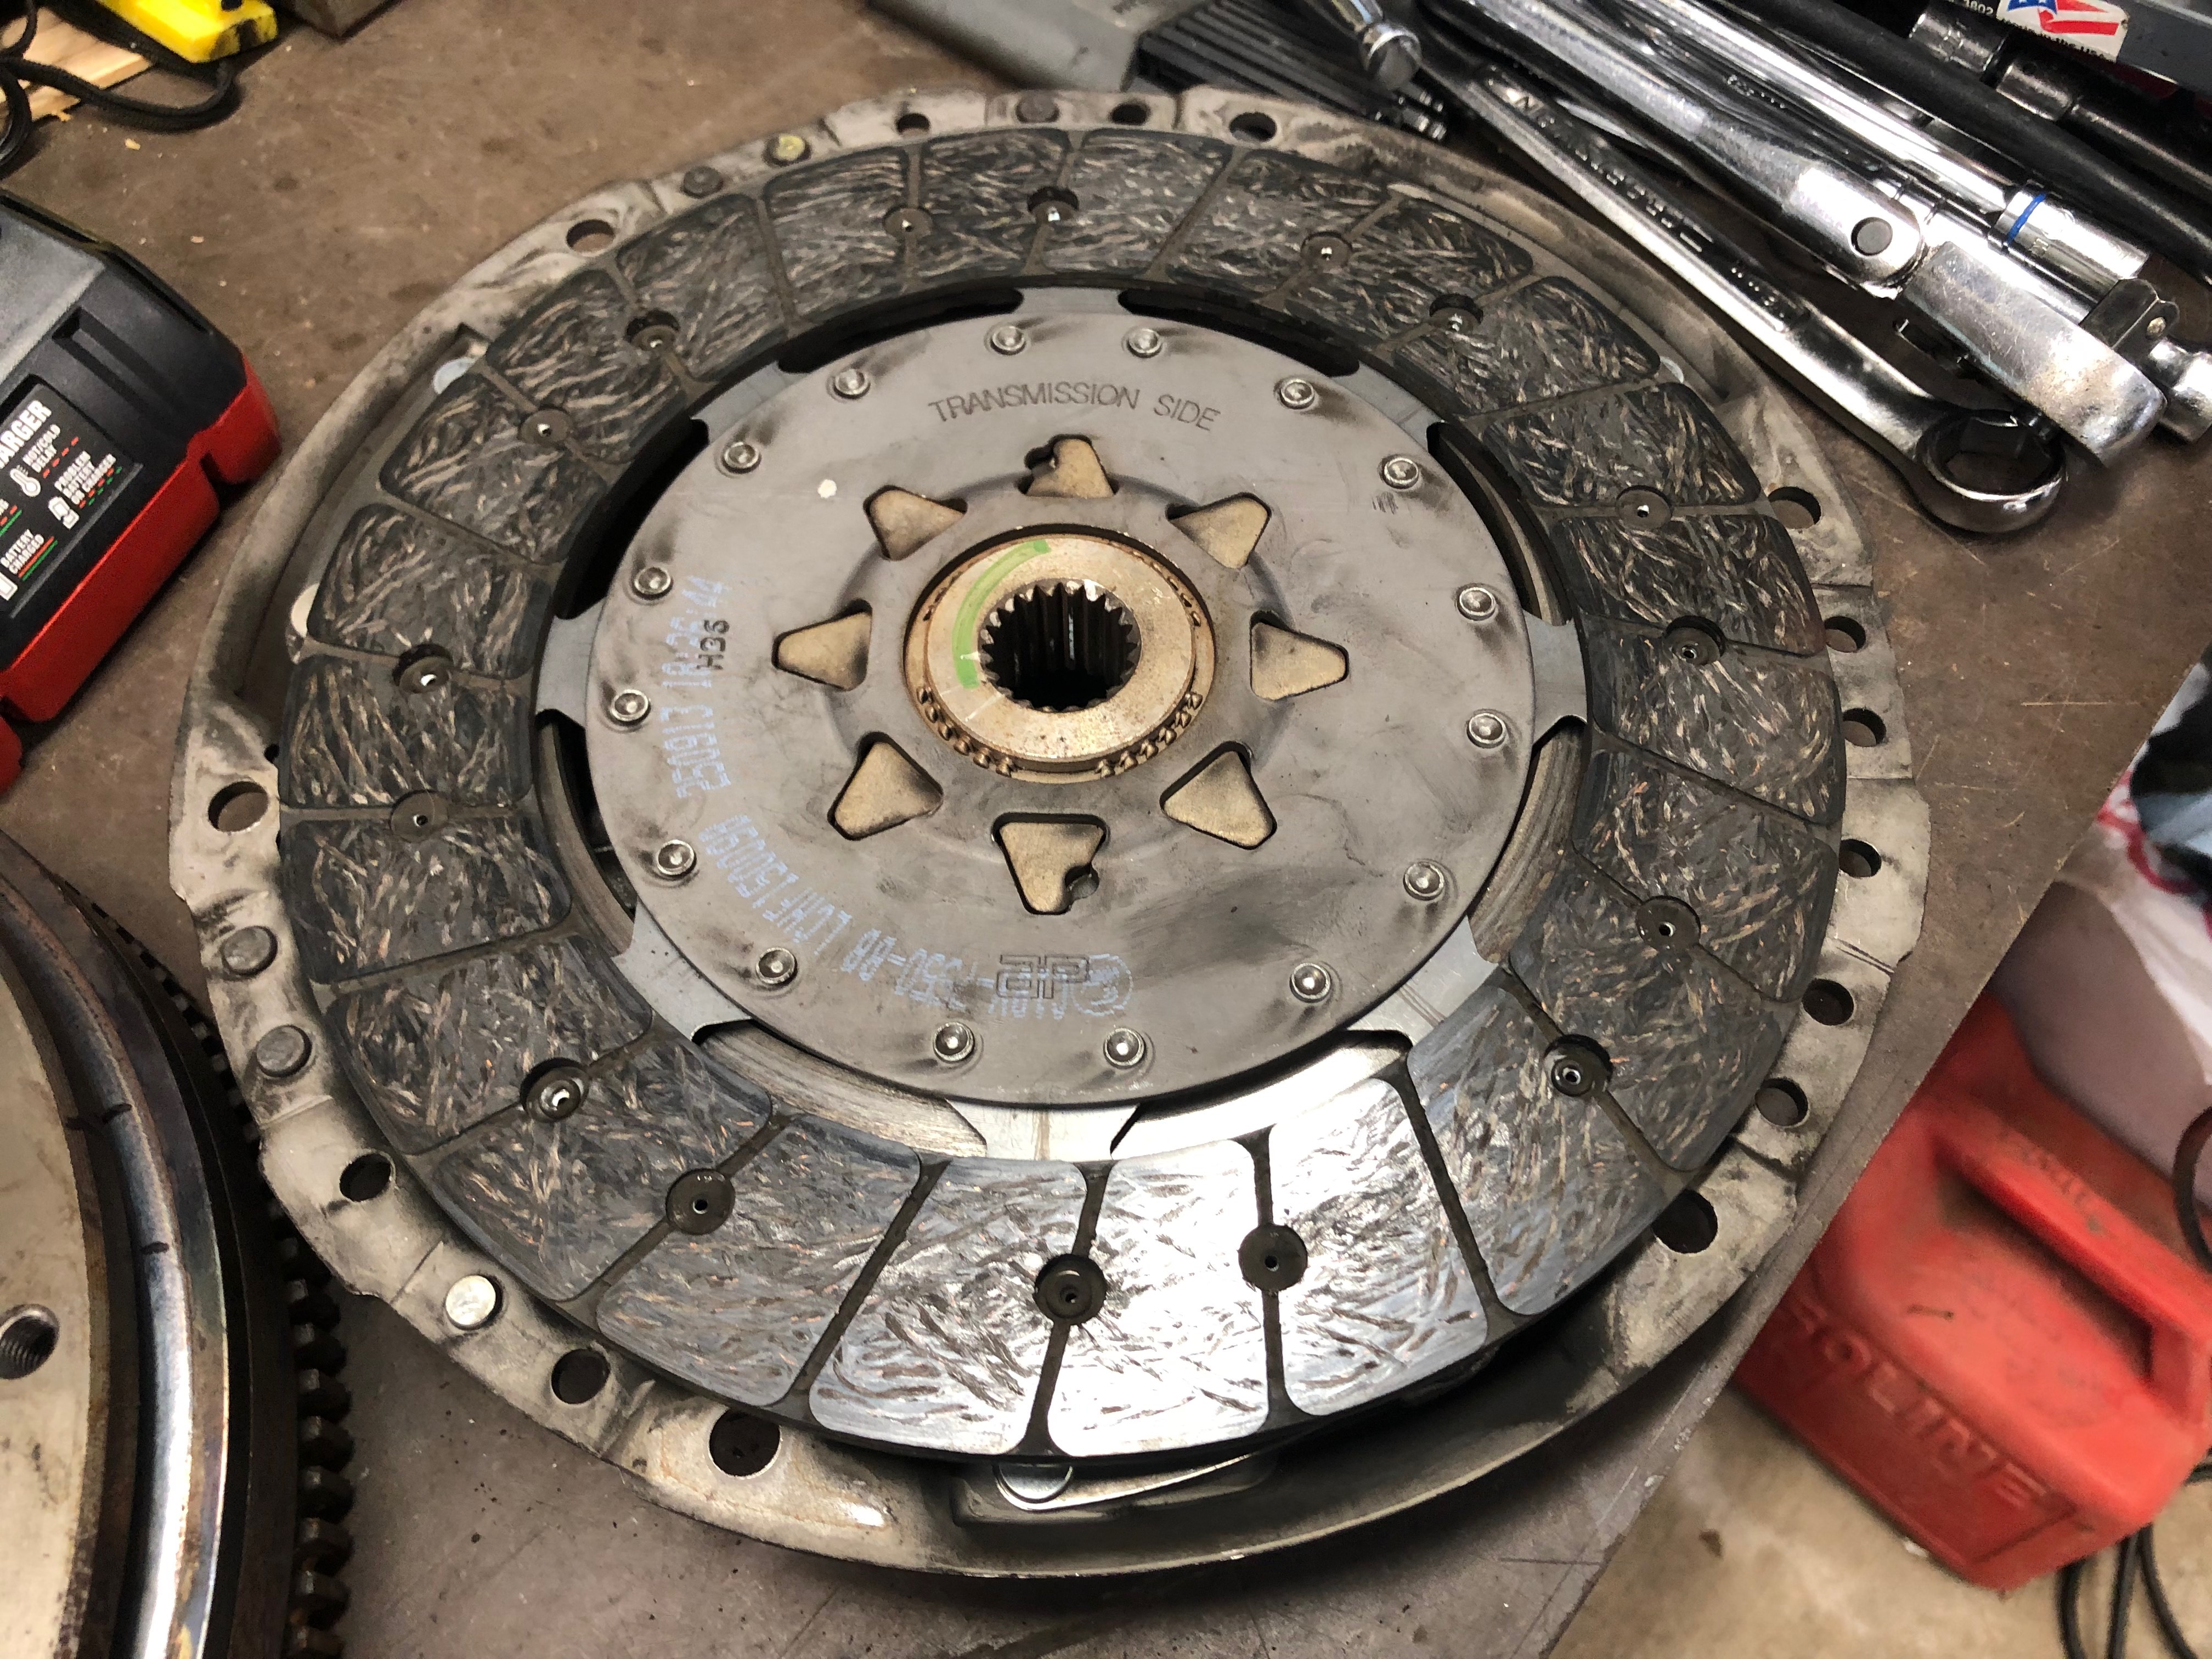
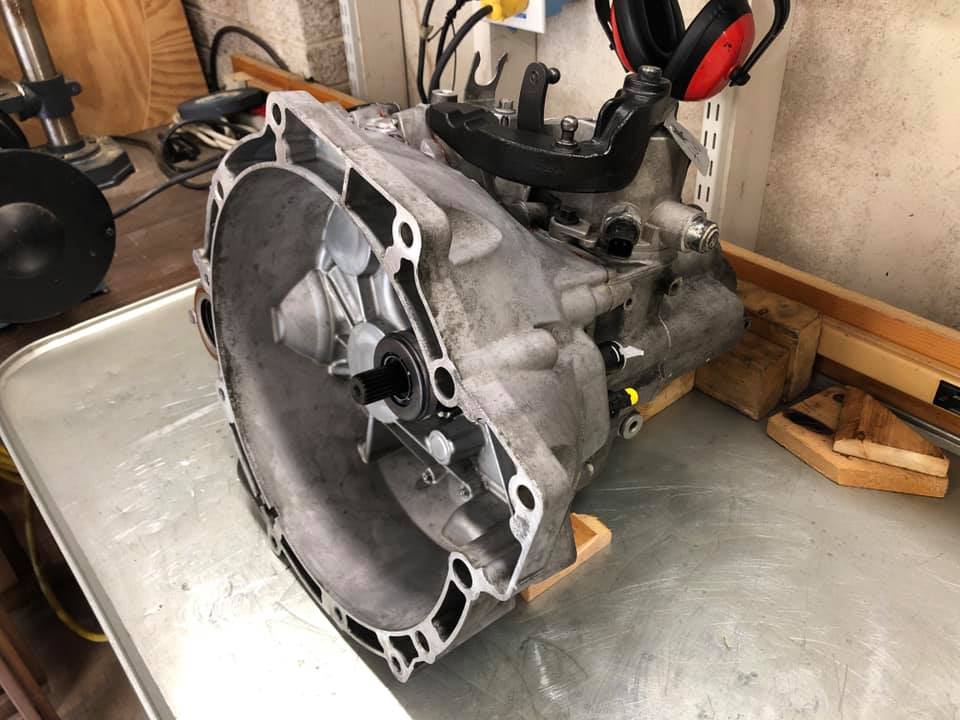
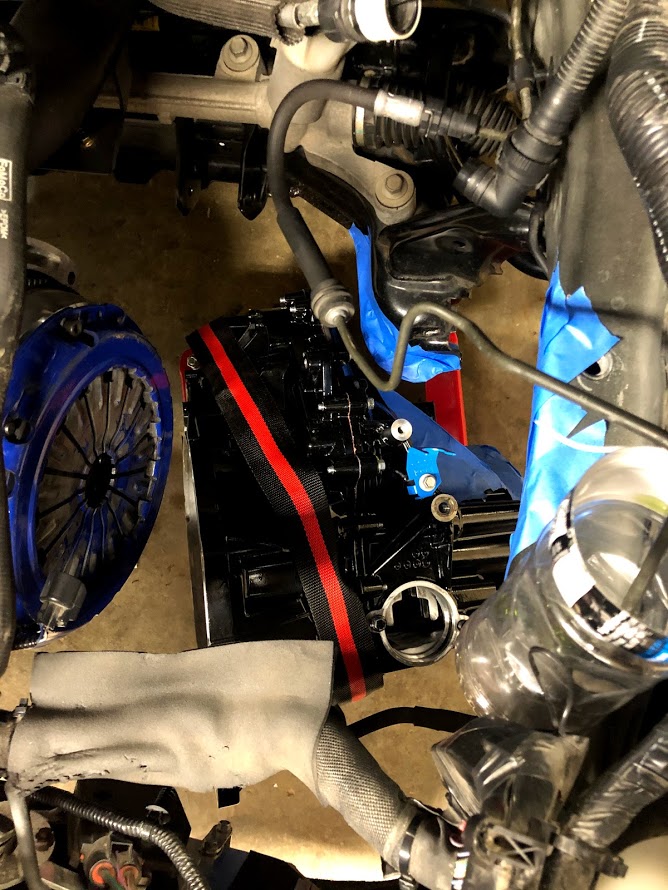
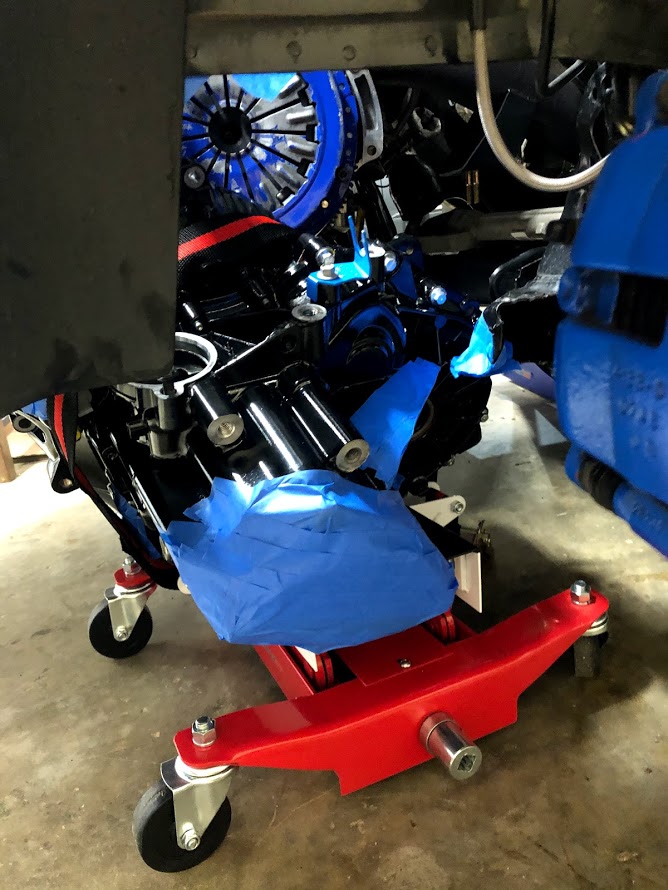
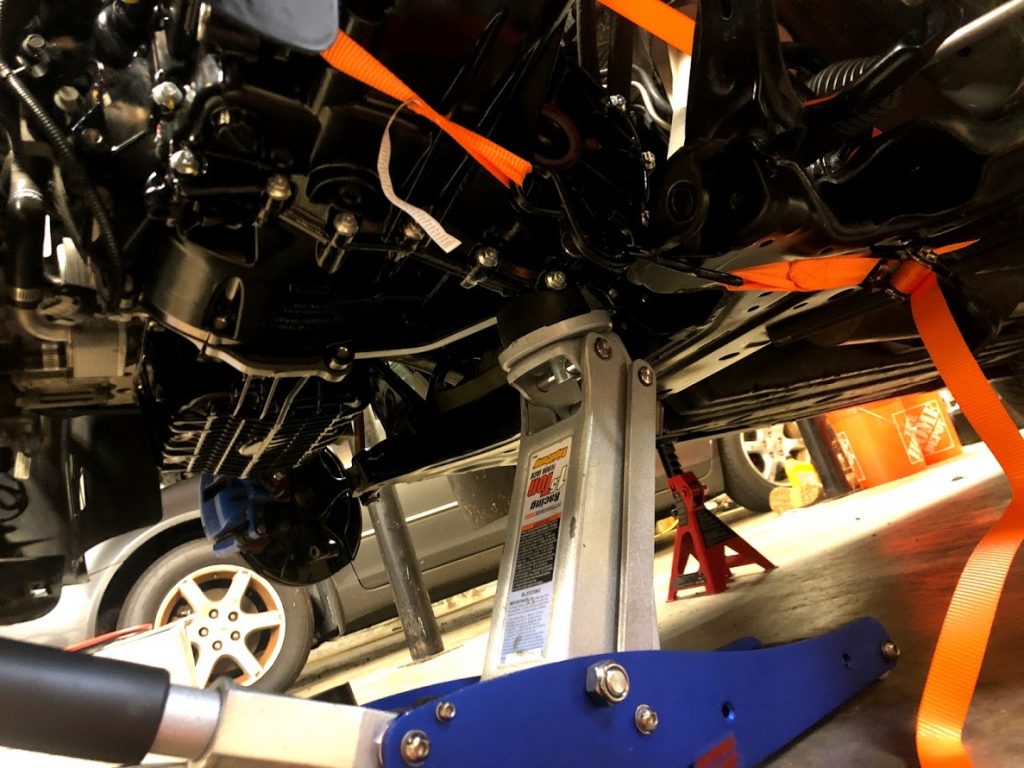
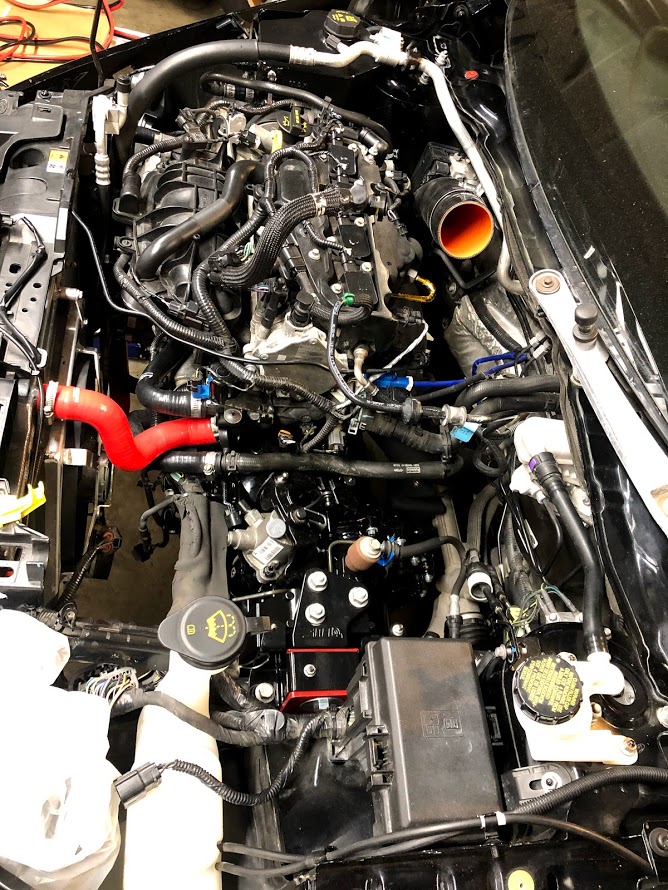
Step one, jack the car up and put it on jack stands.Because the left side trans/engine mount is removed, supporting the engine is necessary.View from below with sub-frame removed.From up top. Trans is out, view of the pressure plate.Old Clutch and pressure plate. Clutch has a tiny bit of play at the center spline.
Over the next week or two I opened up the trans for an inspection.
My prize.
I had been hoping that once I opened the trans case I would be met with an “AH-HA” moment; something like a bearing that was obviously failed, or something loose and rattling around. I was let down. To my semi-trained ears, the bearings all seemed “fine”. Nothing glaring. Some of the bearings showed signs of wear; what I could consider normal.
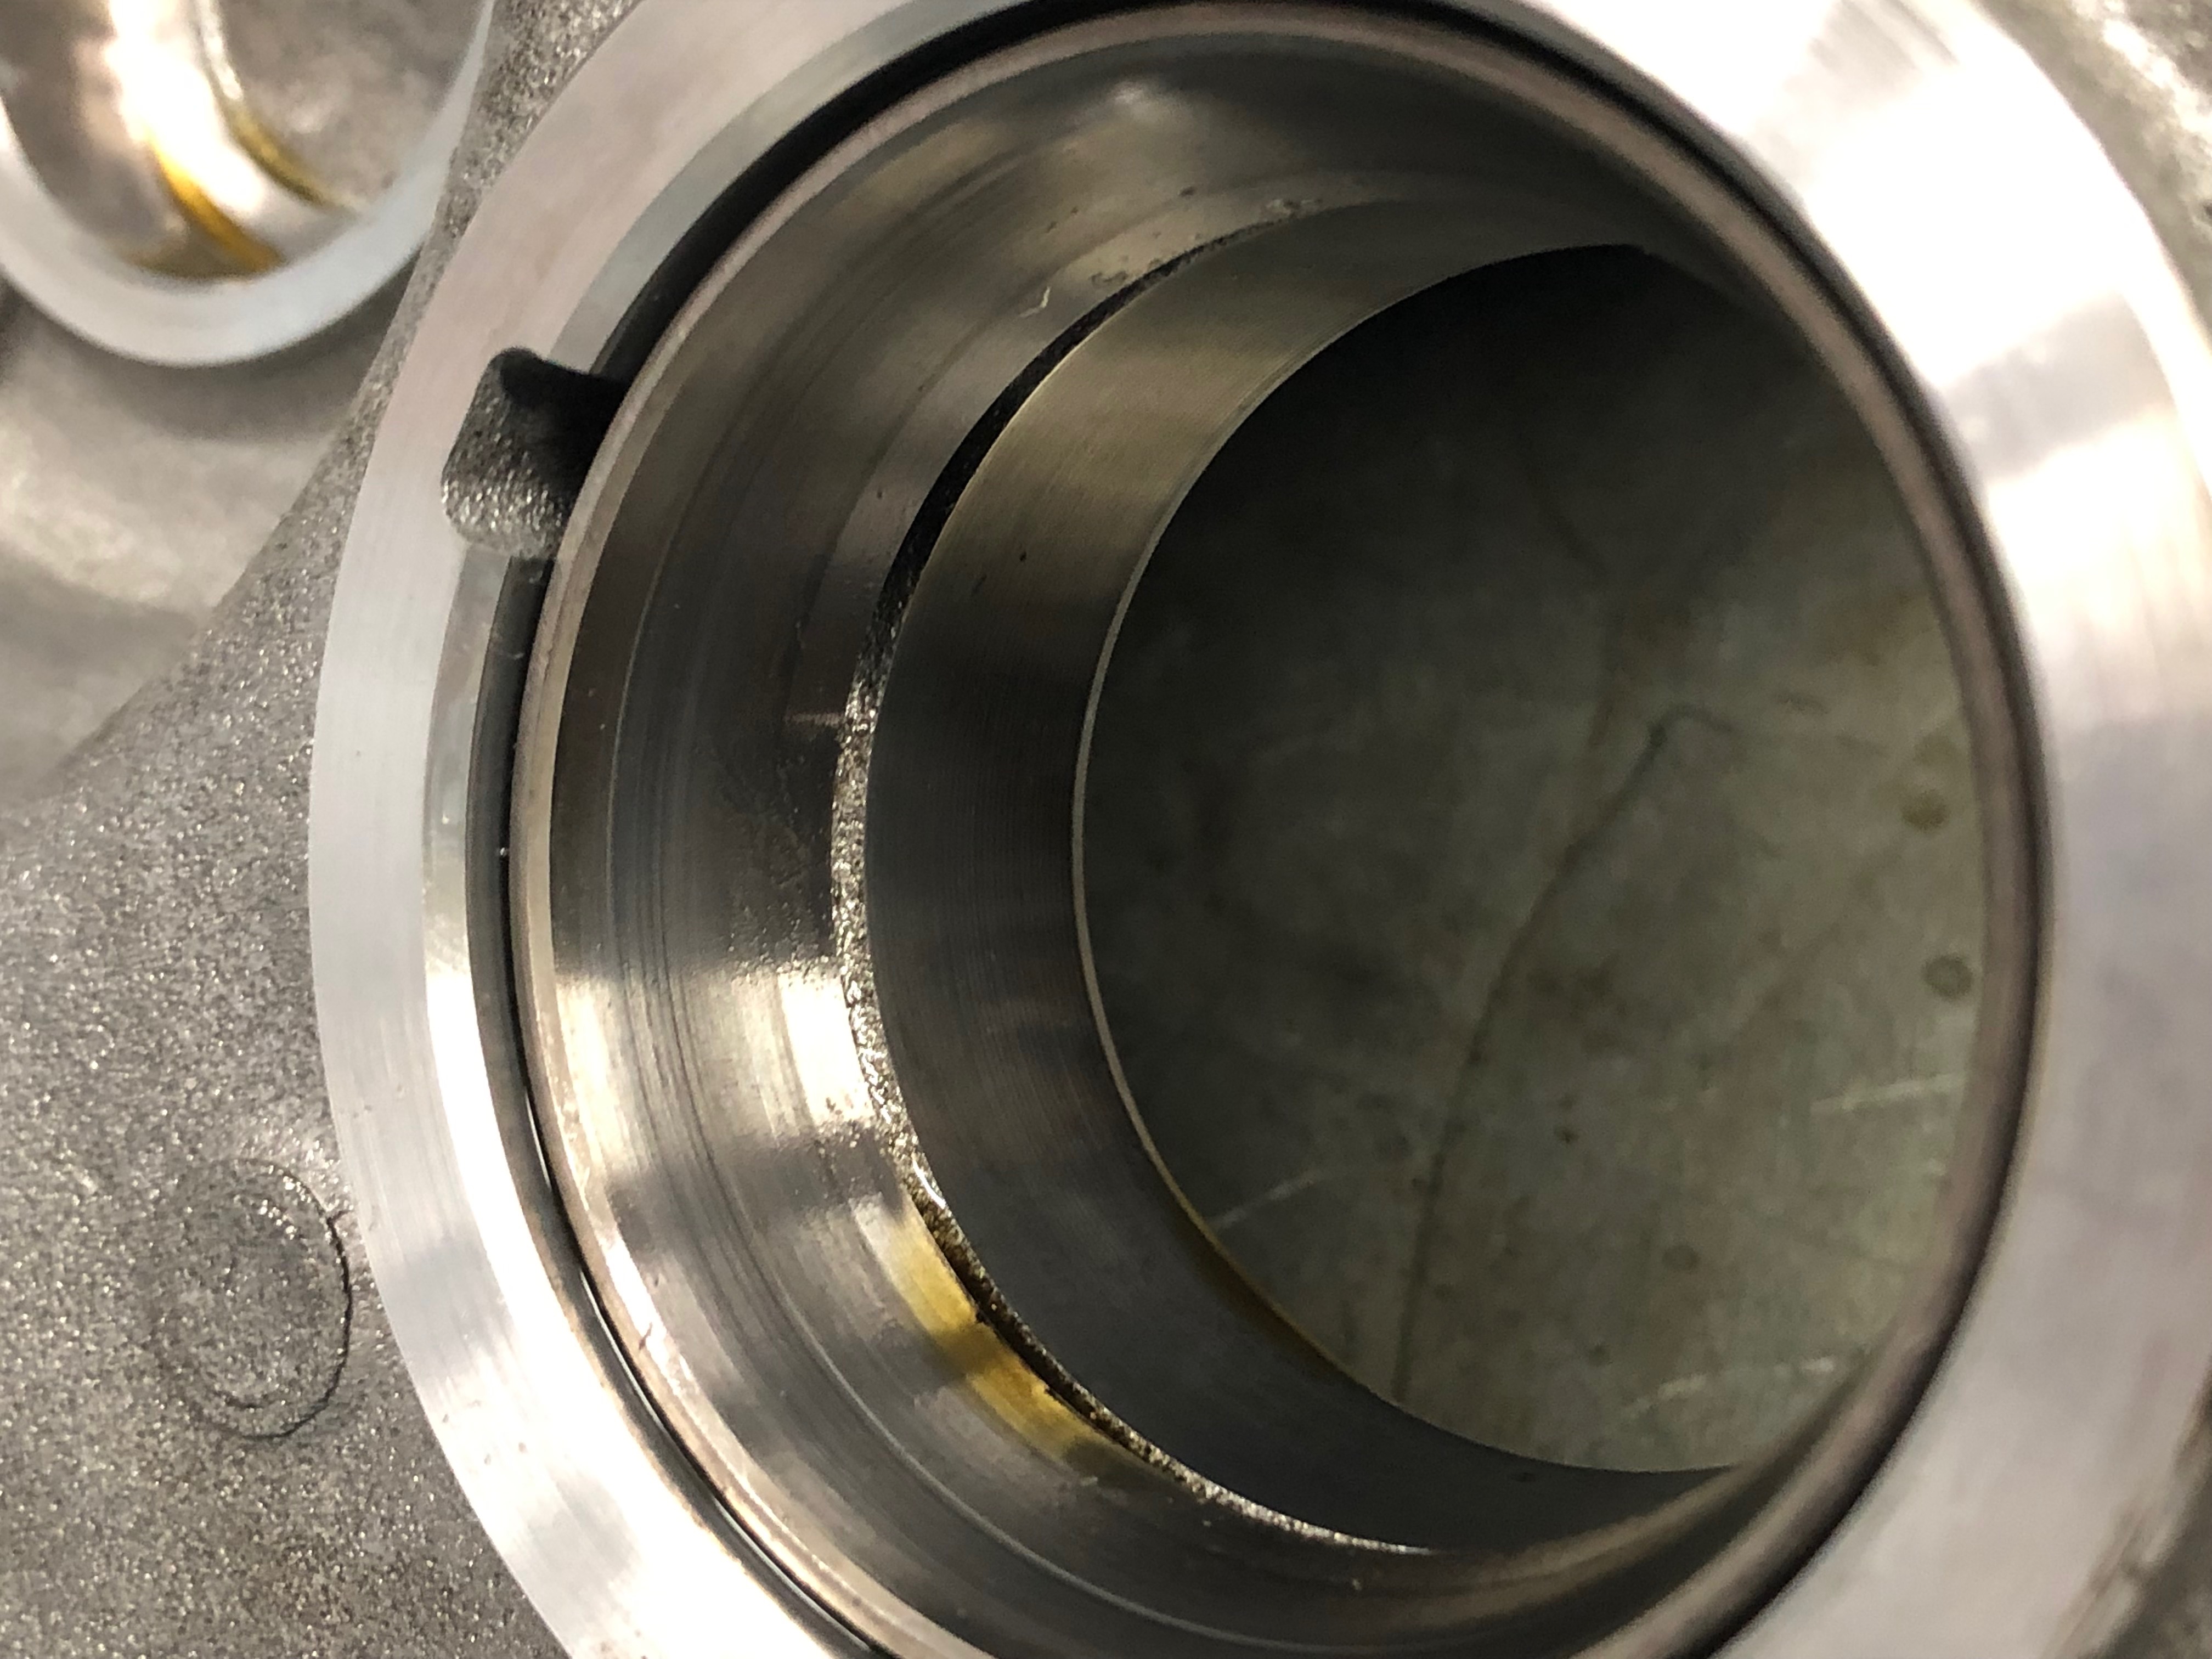
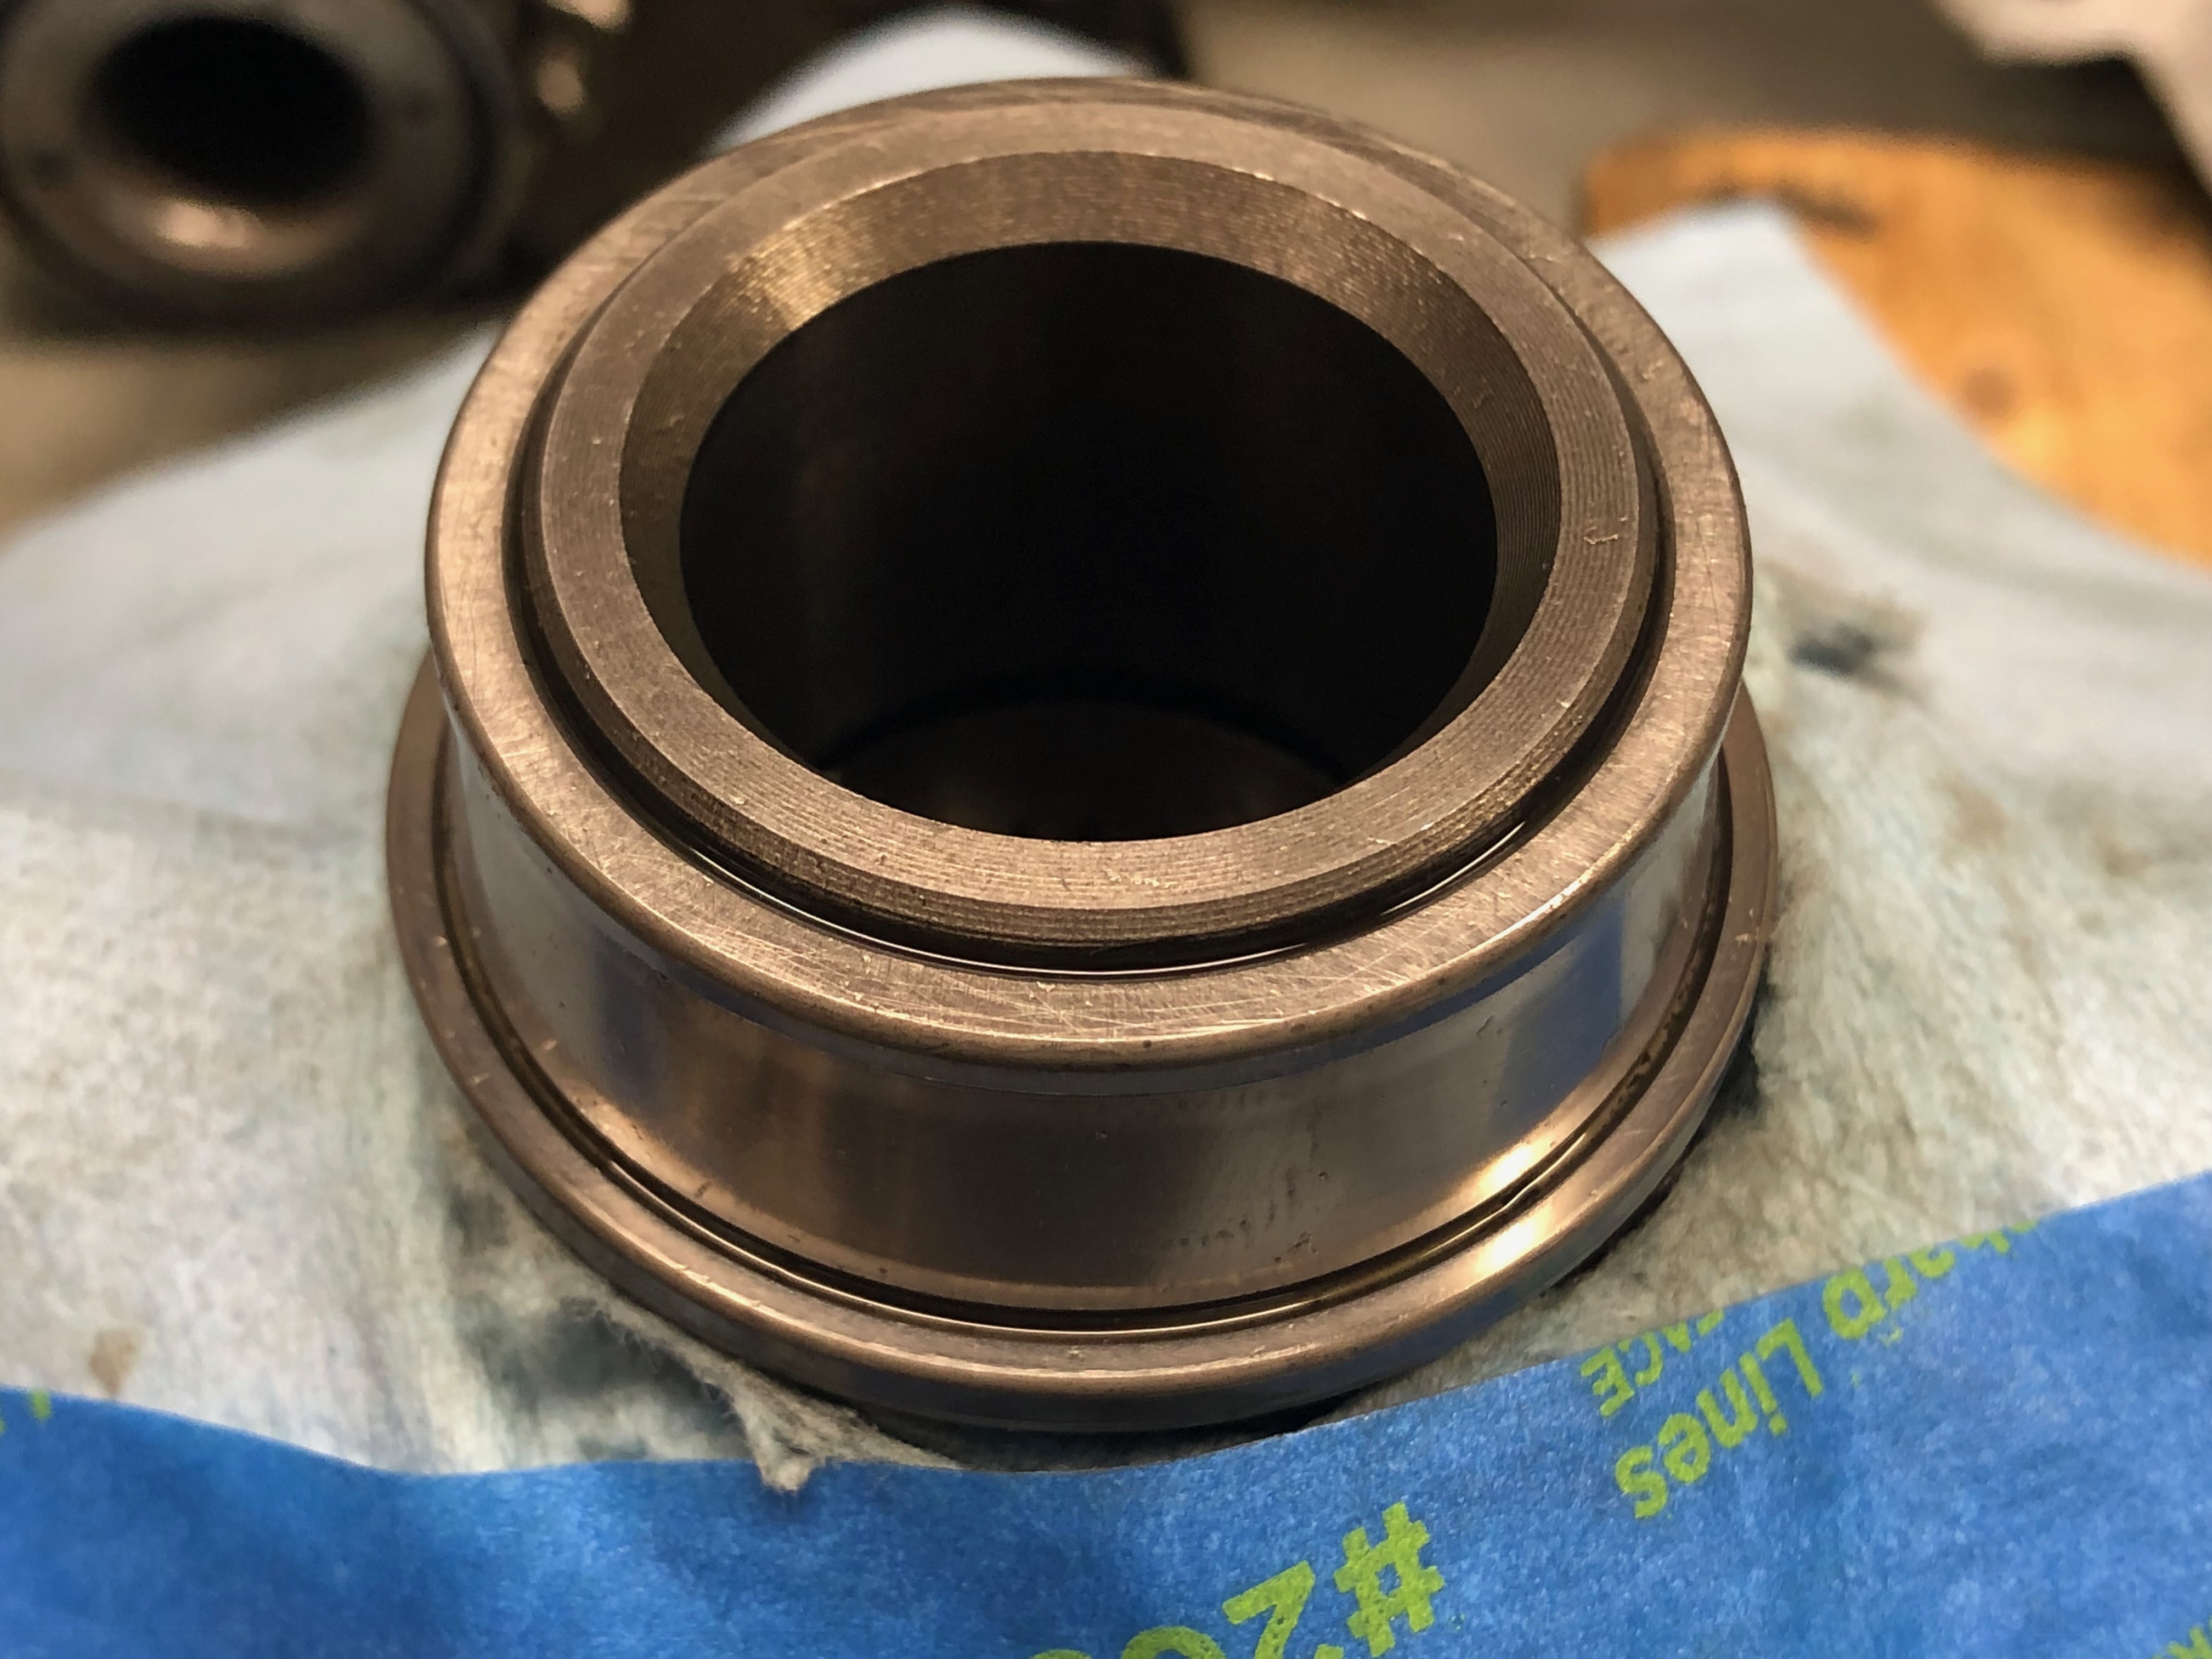
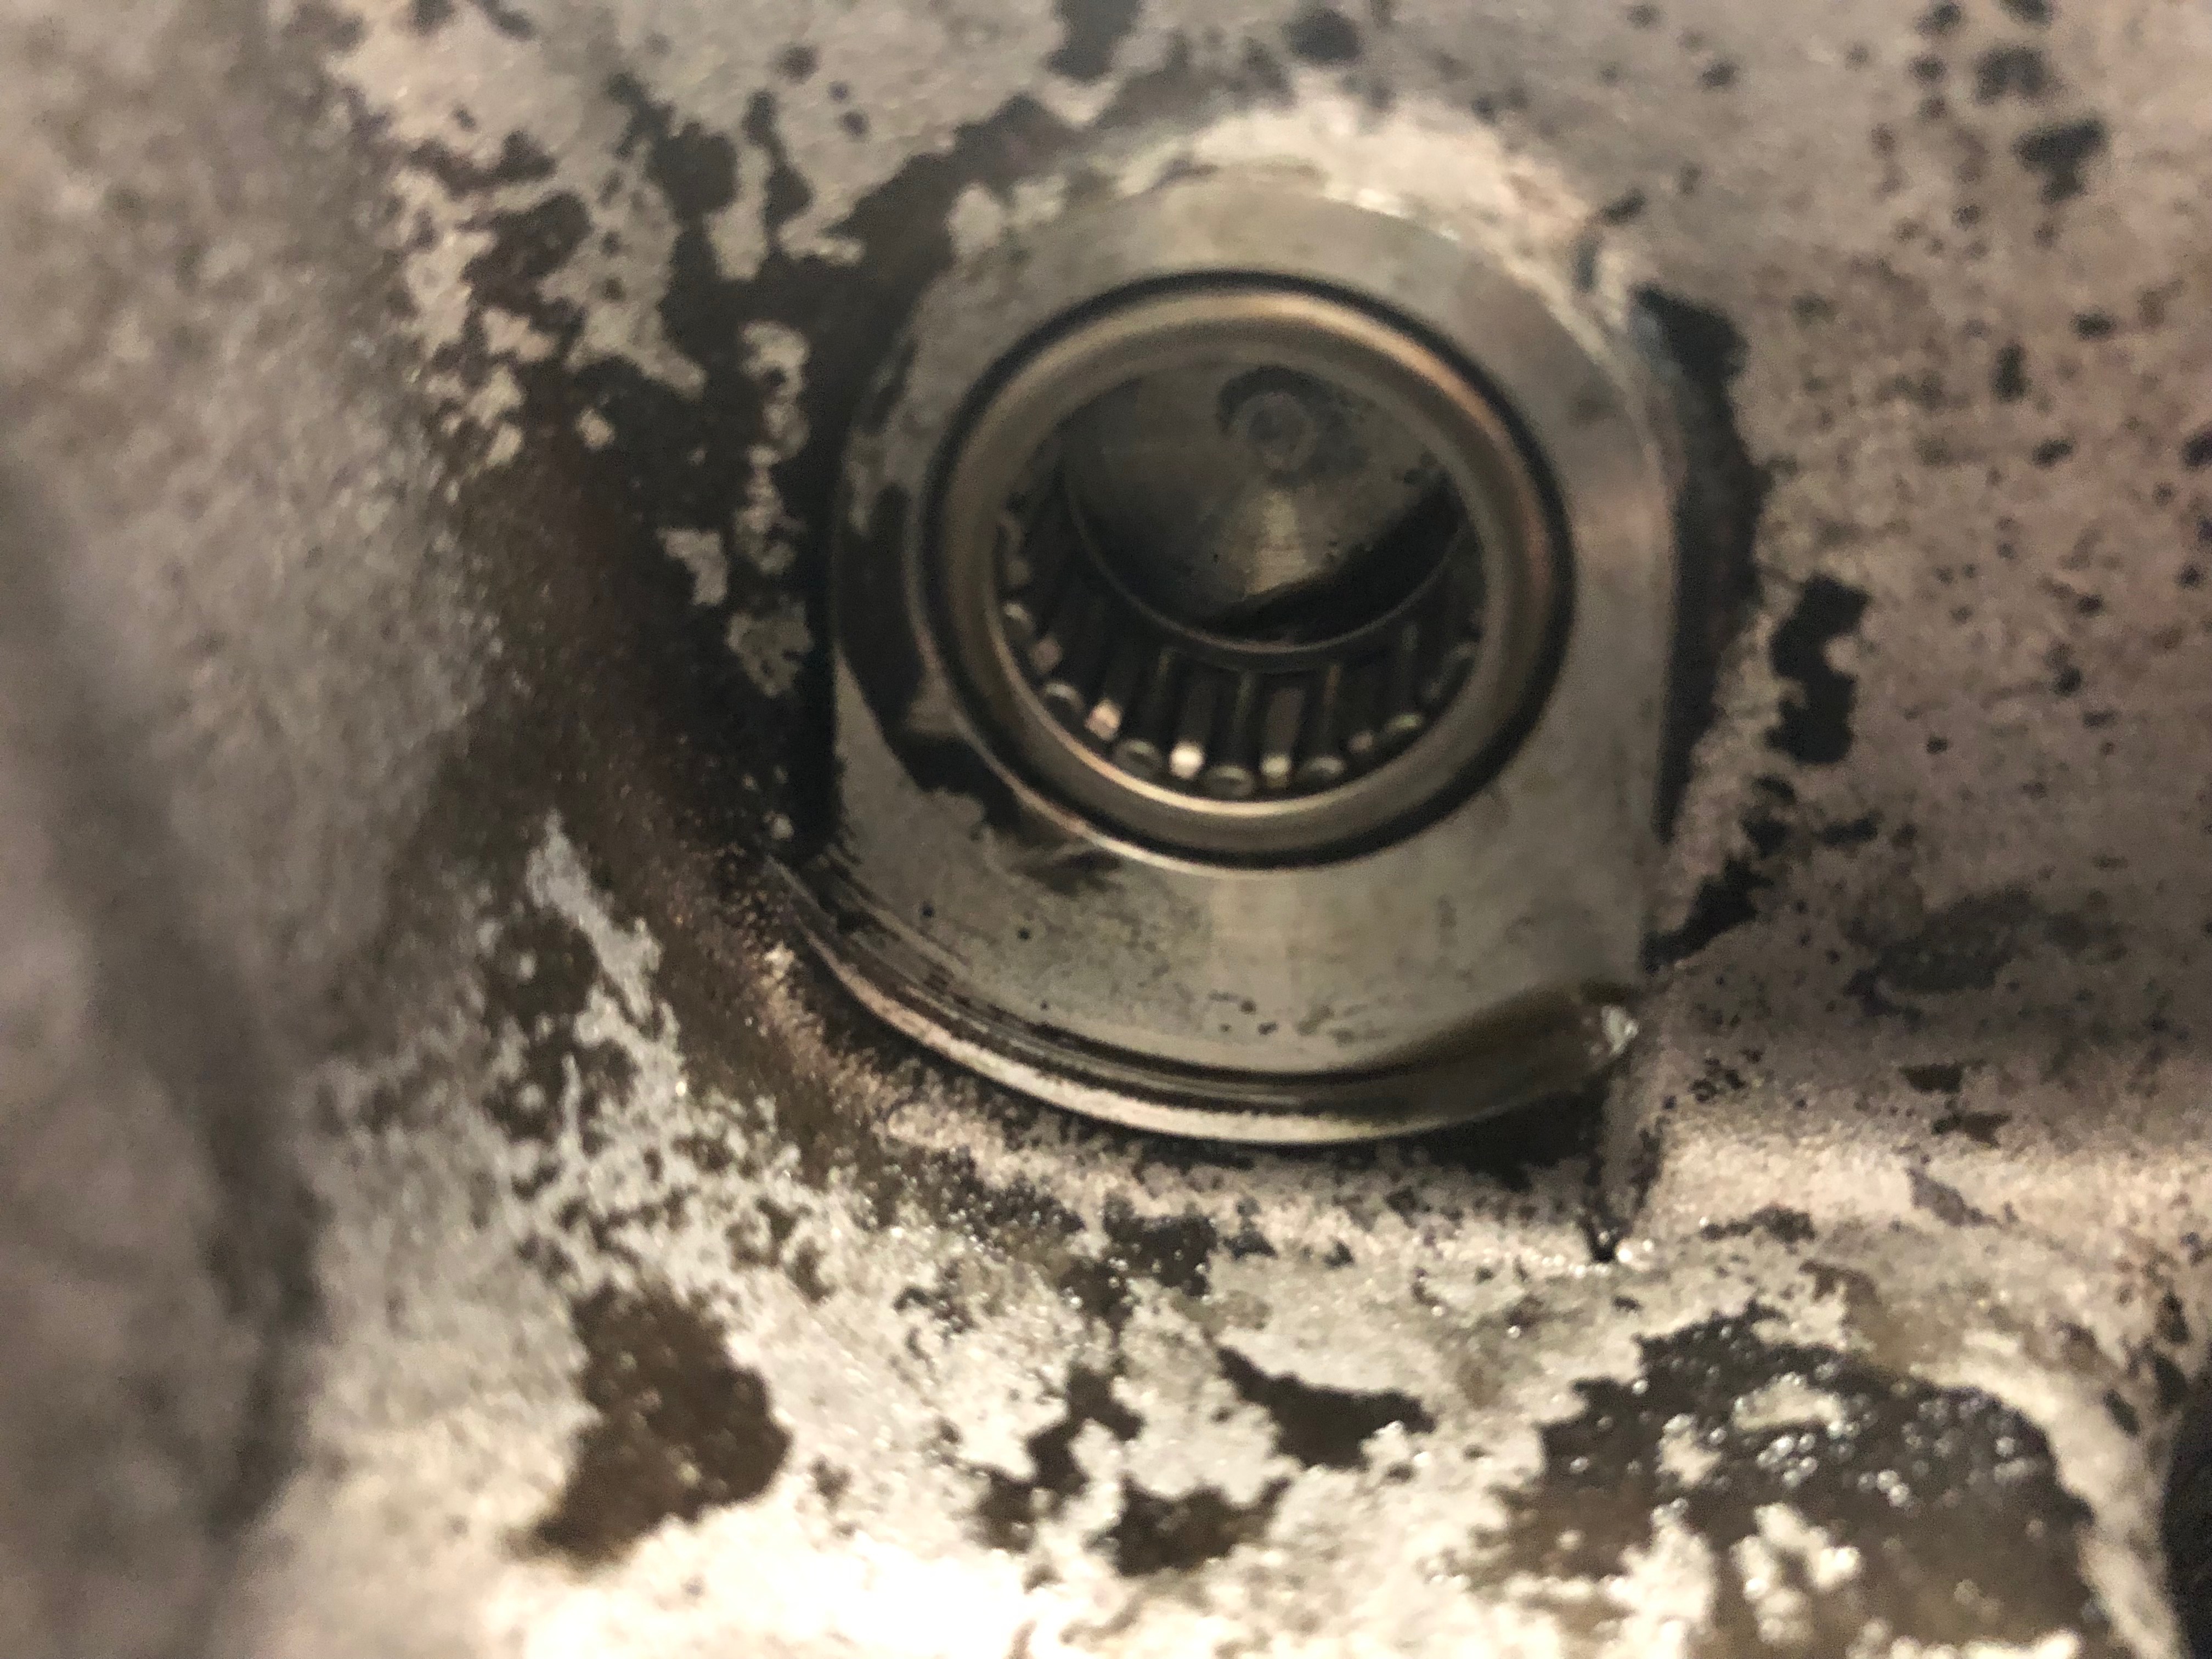
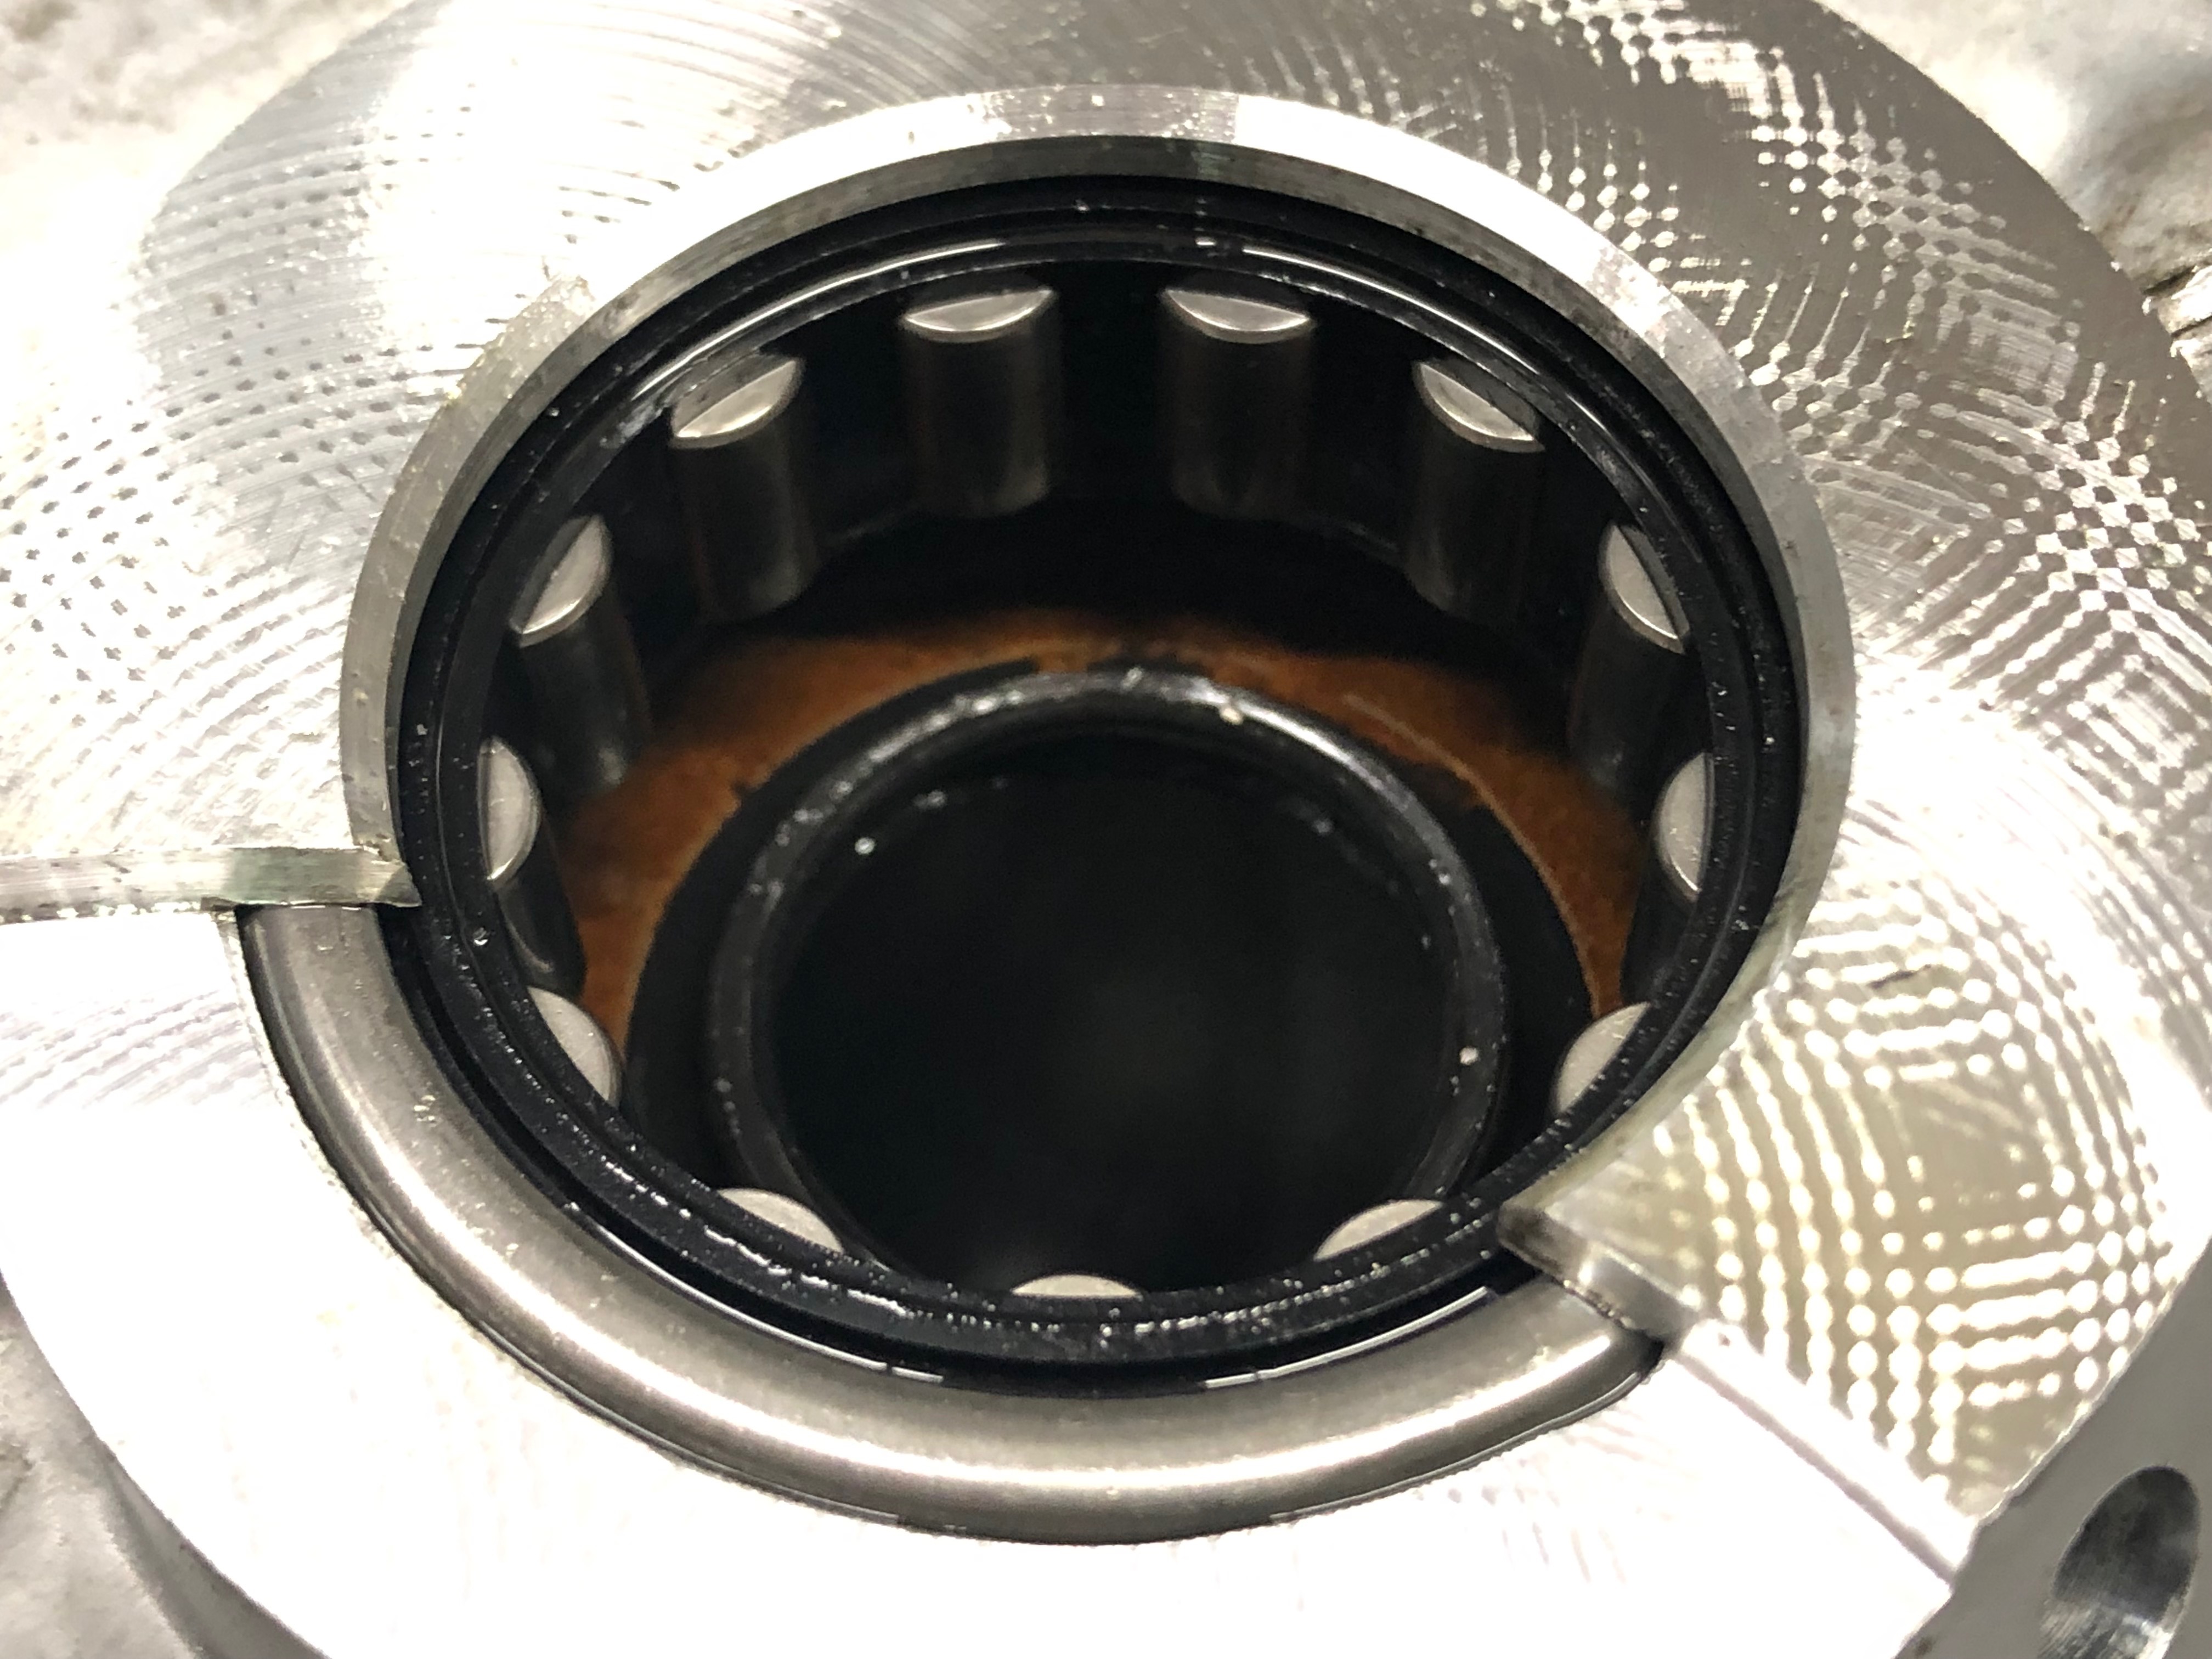
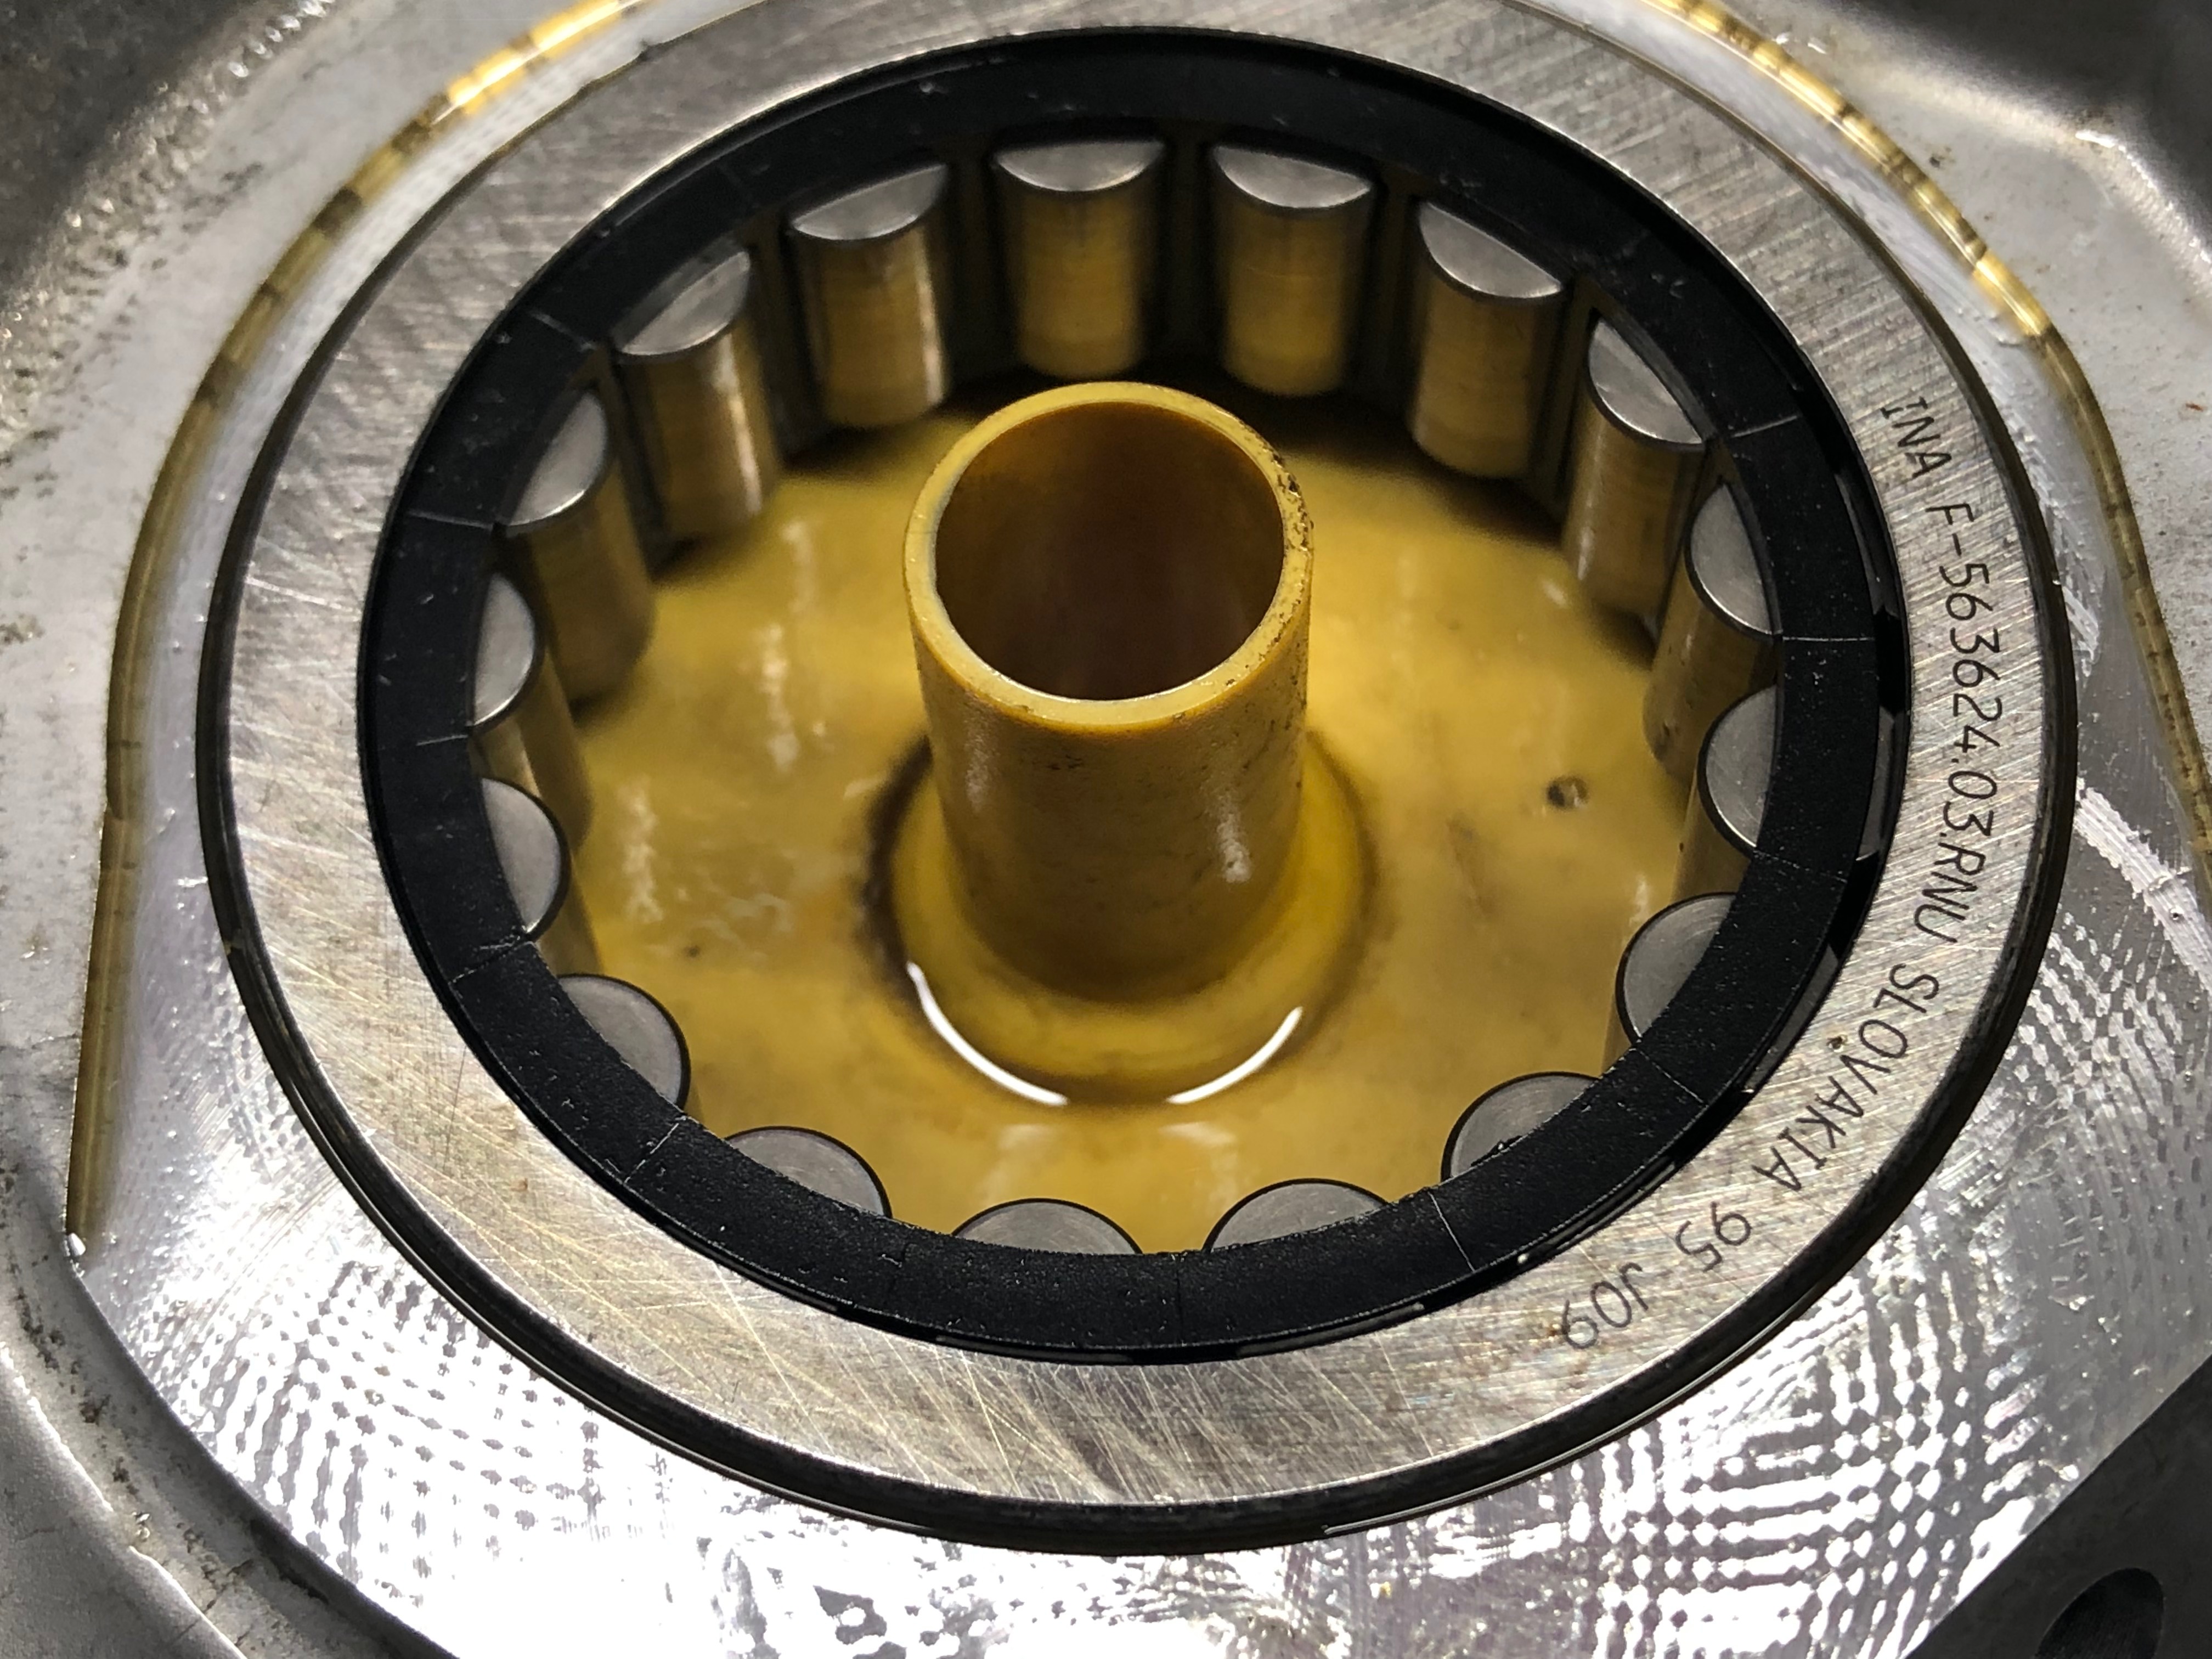
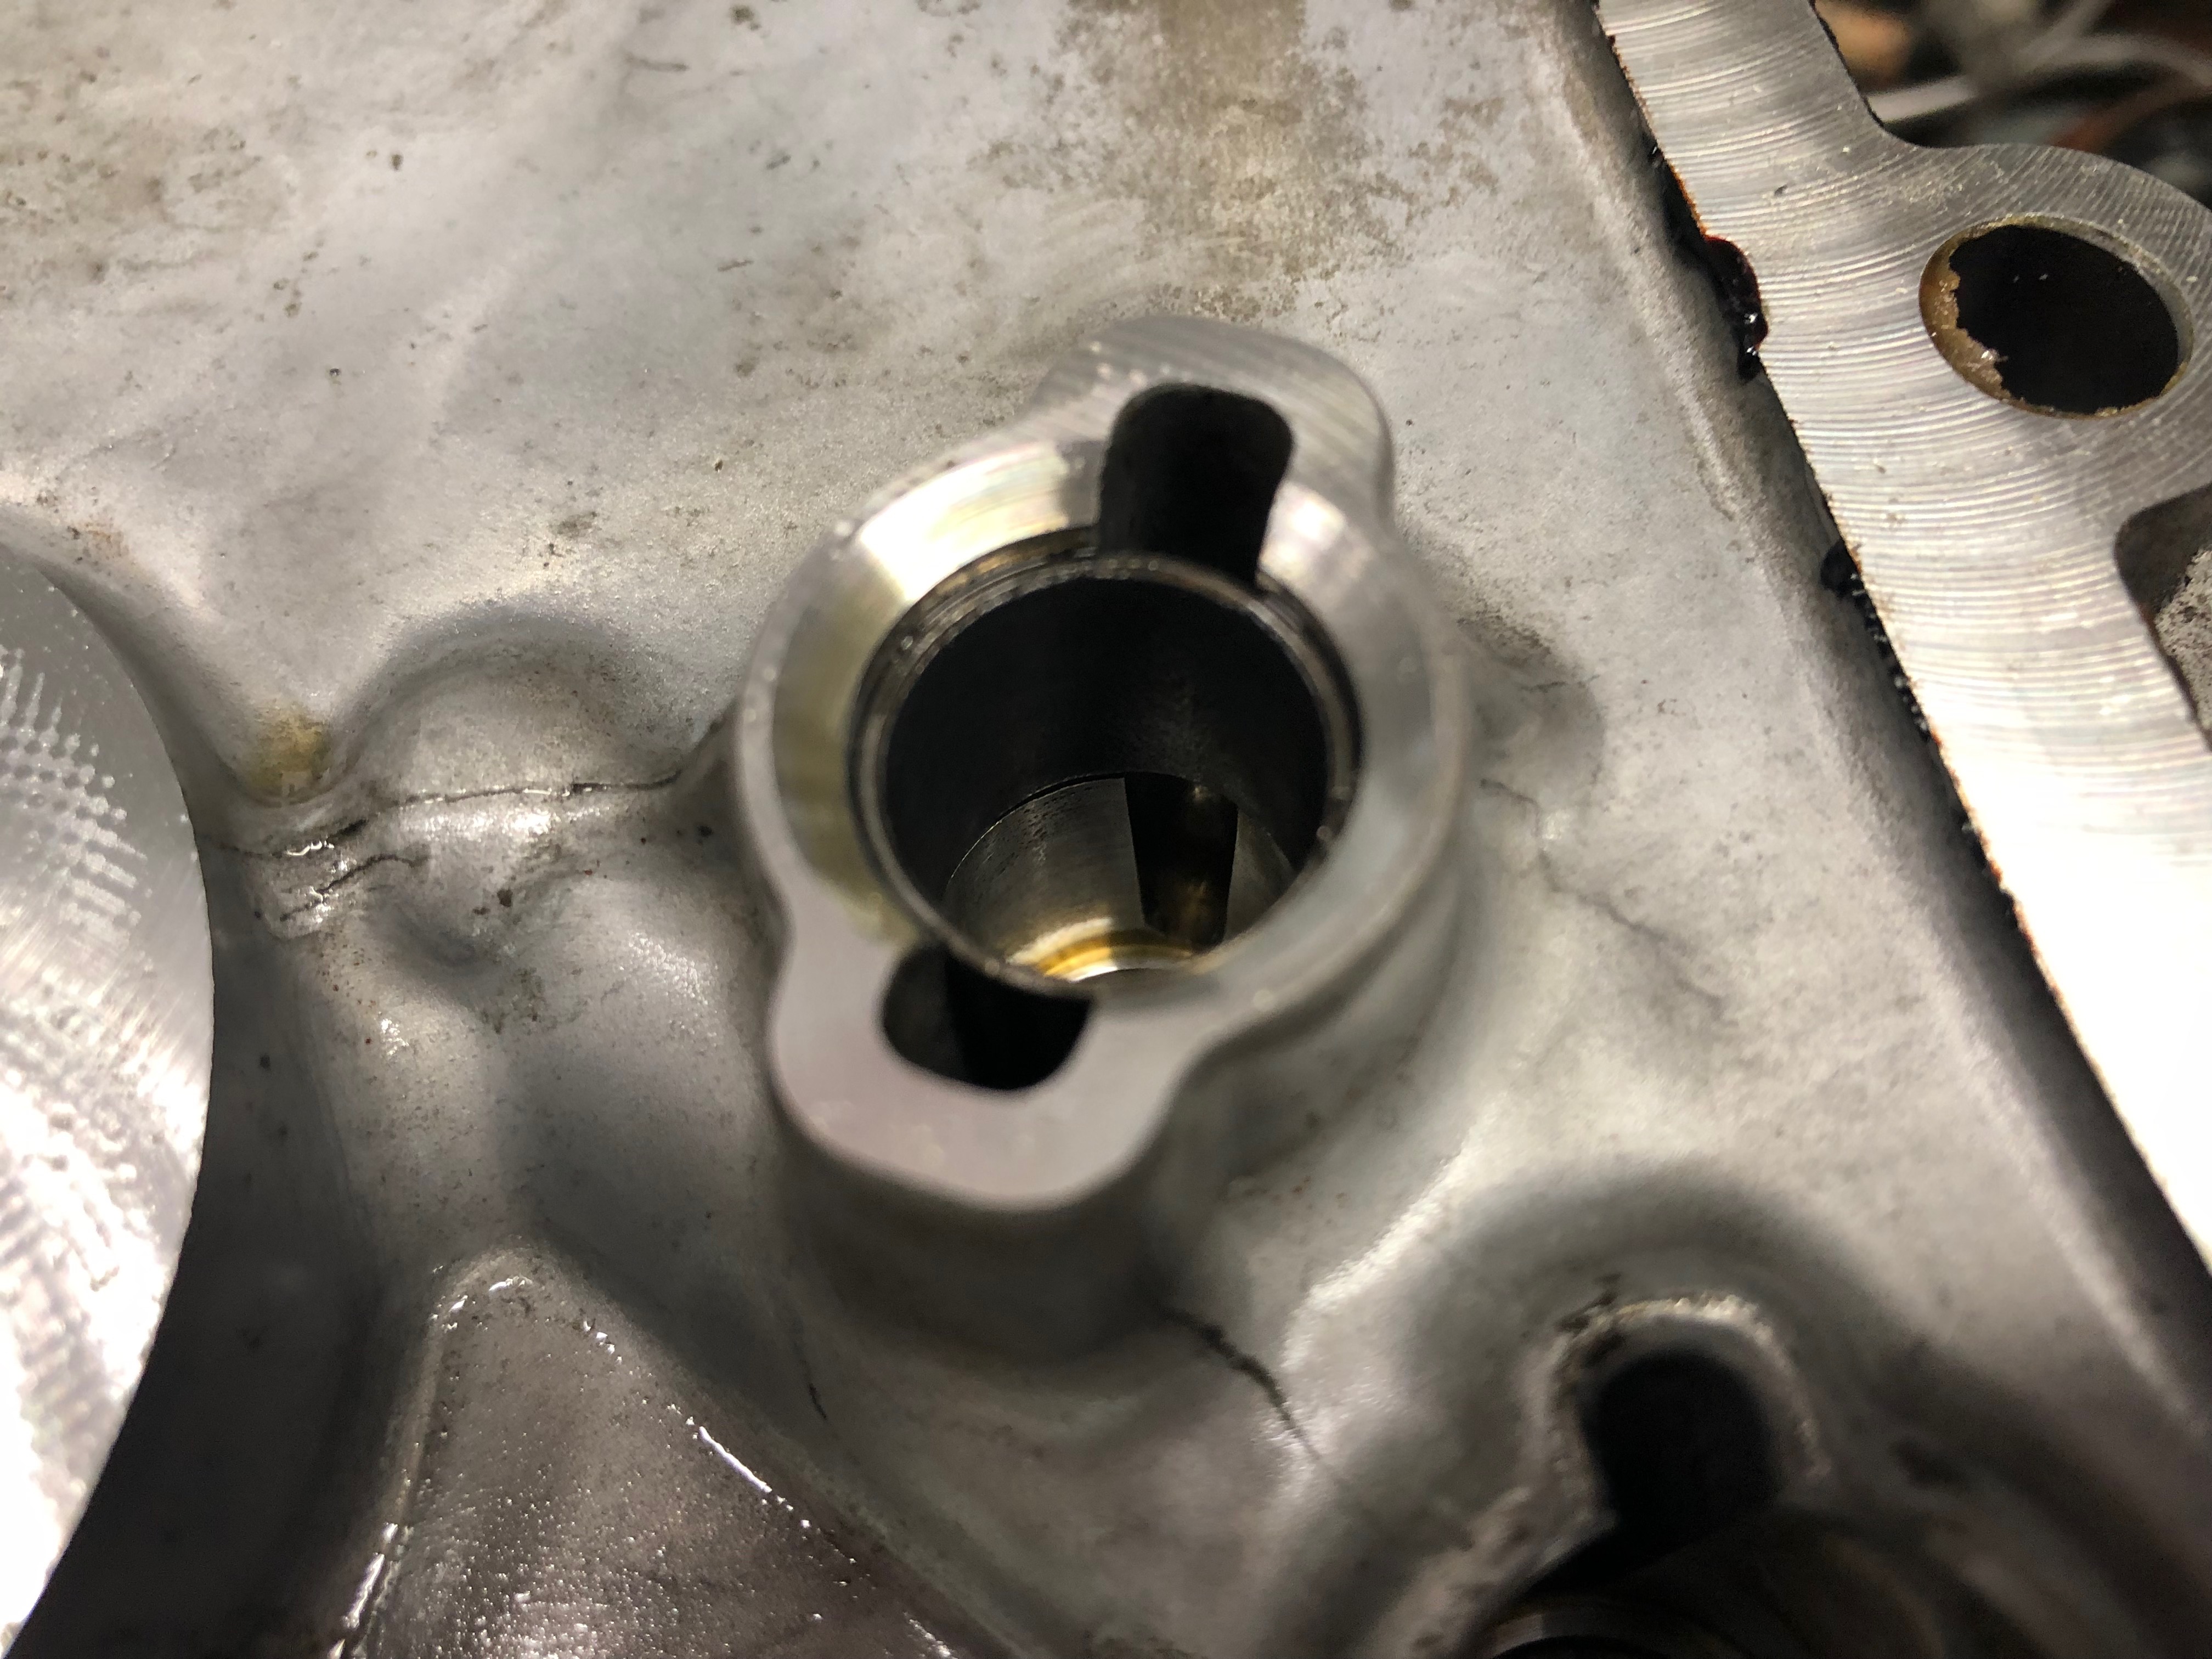
One of the differential bearing races. Note the wear on the face of it.The other side of the differential bearing race, with the roller bearings & cage already removed. Output shaft “lower” bearing race.Input shaft, “lower” bearing race.Shift selector shaft needle bearing.Input shaft, “lower” bearing. The brown/black piece in the center is the oil seal on the opposite side.Output shaft “lower” bearing. Yellow piece is the “funnel” which channels oil to appropriate galleries.One of the two bushings for the gear shift forks shafts.Output shaft and selector fork.Input shaft and selector.Throwout bearing and clutch slave cylinder.One side of the secondary output shaft.And the other side of the secondary output shaft.
I’m not an expert by any means, but I consider myself proficient with mechanics and processes. I’ve replaced plenty of items on my vehicles over the years from timing belts, water pumps, alternators, starters, AC compressors, throttle bodies, mounts, wheel bearings, etc. I have watched many automotive videos for years covering repairs and diagnostics, including complete multi-hour transmission videos, of which I have watched several. I felt confident that I could give this job a good go. I figured that the bearings that I thought were “worn” would be the ones I would need to replace and the others could be left alone. This silly, silly idea was my first major mistake.
So I set out to replace the bearings that I felt were the most suspect. I also planned on replacing the clutch, flywheel, pressure plate, clutch slave/throw-out bearing, and nearly all of the bolts that the Ford manual dictated should be replaced during the procedures. This would include the “lower” input & output shaft bearings (note that I say “lower” and “upper.” These are designations I came up with for my own reference as I was doing the job. The reason being, when you split the trans case, and lay it on the bench, the two shafts (output and input) are standing upright. The “upper” bearings are attached to a plate that bolts to the trans case. The “lower” bearings are roller bearings; a race is attached to each shaft and a cage with rollers is installed into the trans case.) as the “upper” bearings seemed fine to me. (my second big mistake) I would also replace both differential bearings (conical roller bearings), the shift selector fork bushings (2x), shift selector shaft (roller bearing) and associated bolts.
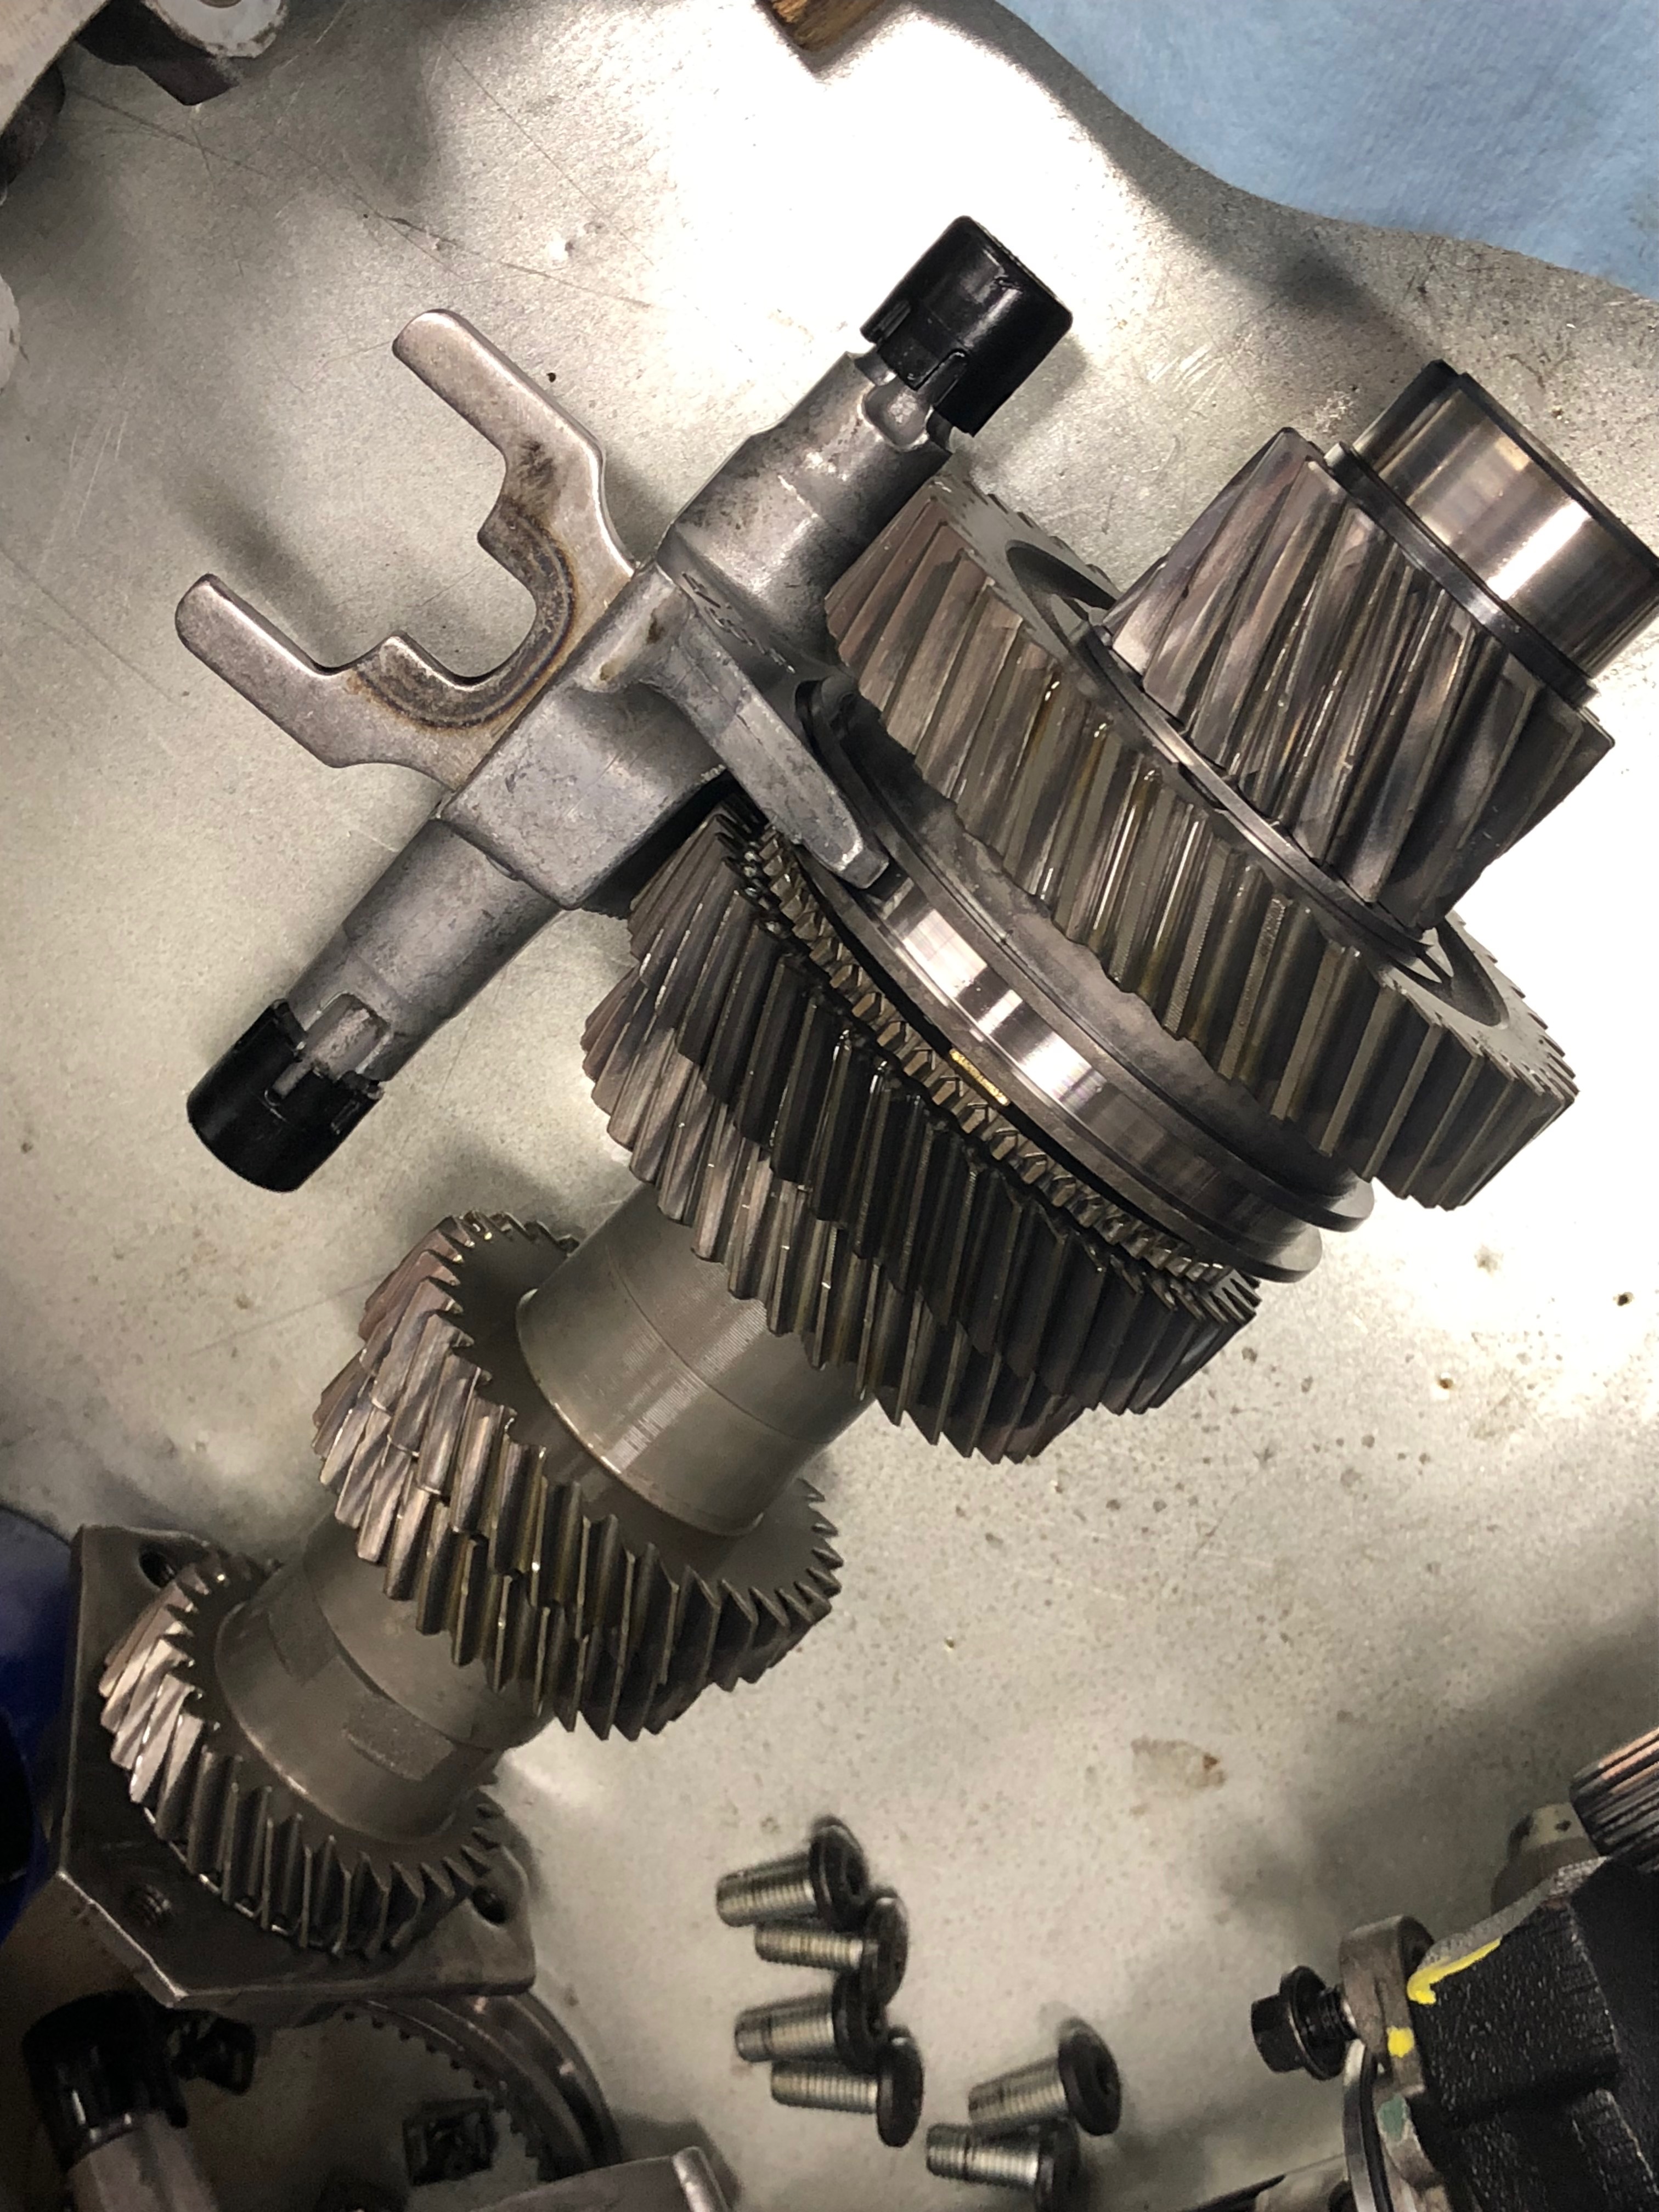
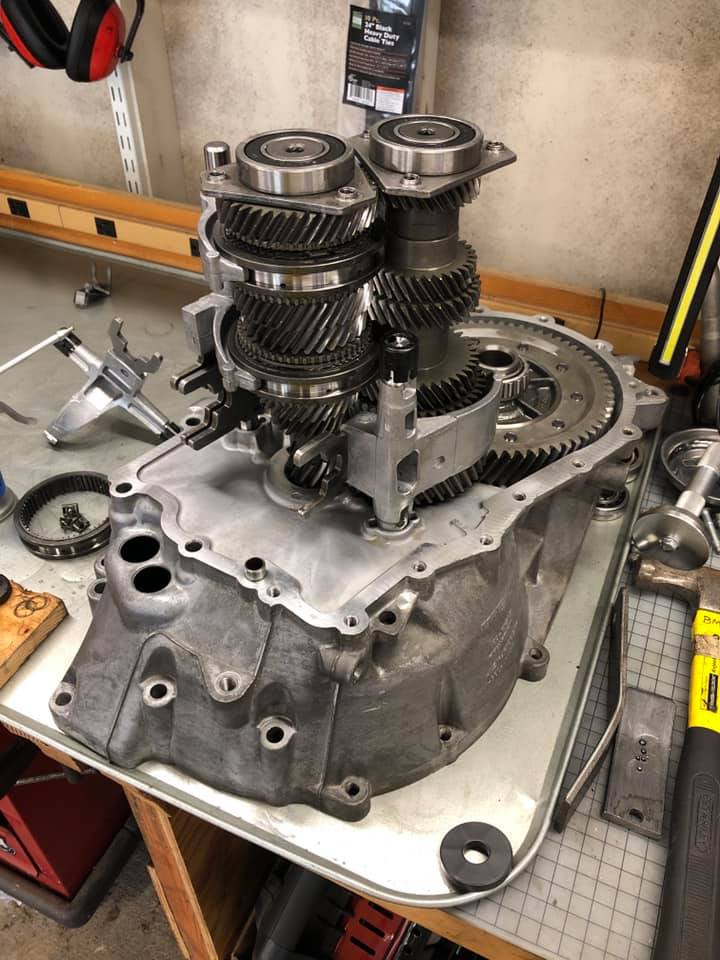
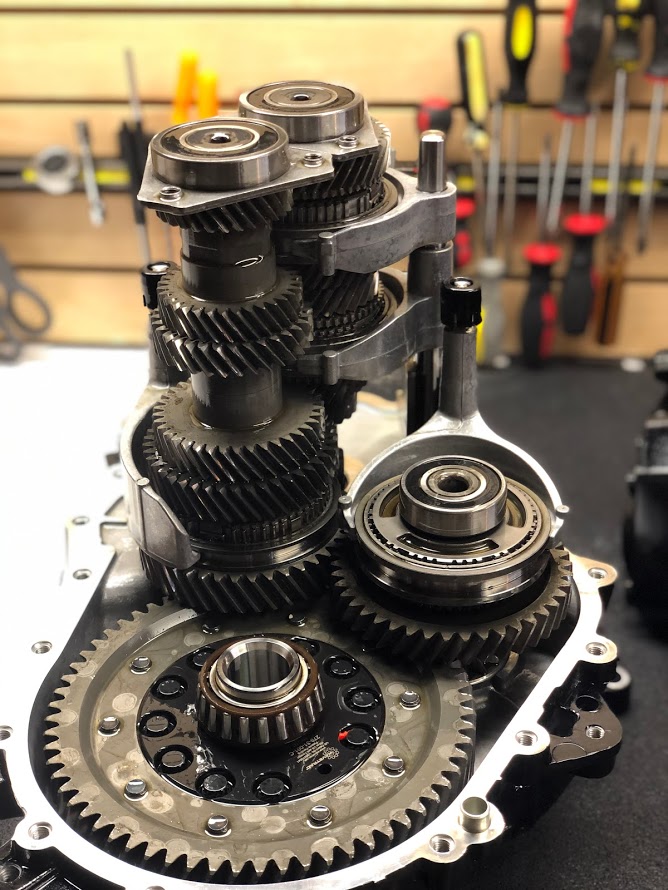
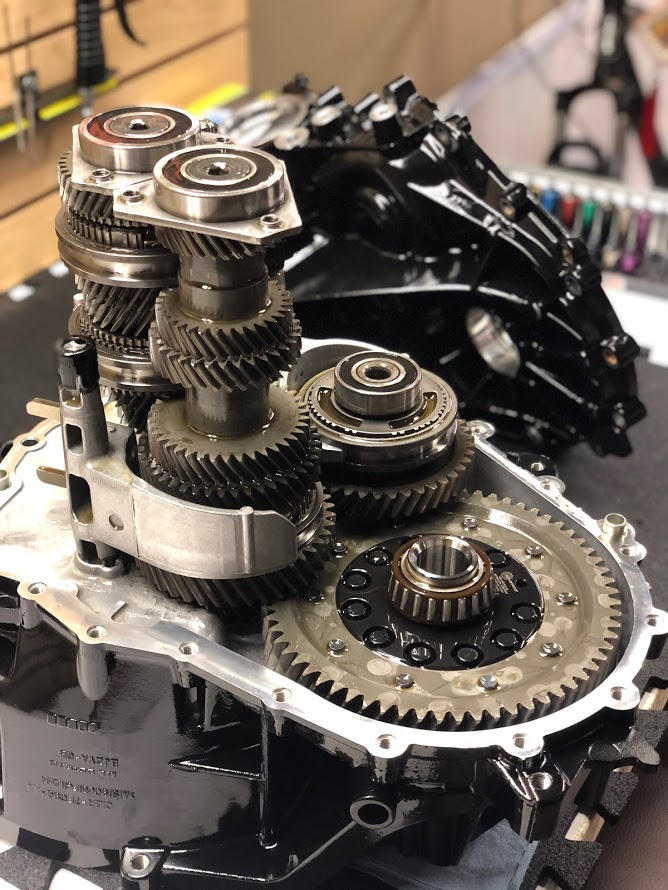
What I refer to as the “upper” bearings are atop the two shafts in this photo. and include the plate with three holes. “Lower” bearings are at the bottom of each shaft.
One of the most challenging things throughout this process has been the sourcing of parts. Sometimes it’s easy. Sometimes it requires reaching out to one of seven dealerships in the nation that happens to have the one part you need. Sometimes the supplier delays your shipment for a month, waiting for something to come in. Sometimes the part arrives and it’s damaged. Sometimes you have to order parts from Europe. I have experienced the gamut; good and bad. I will never again wonder why the shop is taking a long time to fix my car when they say they are waiting on parts. Now I understand. Here is a list of the parts I purchased for the build. I included tools, fluids and other things I felt would be helpful. For those who are doing this on your own, I’m assuming you have a solid set of your own common tools, fluids, etc. so I’m not listing any of those.
I spent days poring over the Ford Parts website, the OEM shop manual, various forums, watching videos, studying photos, visiting 3rd party parts sites cross referencing part numbers and diagrams; what did I learn? It’s a complete shit show. There is no good one-stop-shop when it comes to parts. If you do a rebuild job like this, you will have to deal with shifting supplies, dead ends, great and terrible customer service. I found that some parts are easy to come by and will arrive in a matter of days. Generally, Ford dealerships rocked and were able to get parts in a day or three. 3rd party site, while cheaper, all seem to have the same problem – they’re at the mercy of Ford’s supply chain, which is mediocre at best. If there’s a delay, it gets passed on to you, and then some. Navigating the parts code system is a challenge. I found that I would often have the Ford Parts site open, with the OEM shop manual up, a few 3rd party sites AND Google for additional searching. With all of these sources I was able to pick out the parts I needed for my build and order them.
But then there were the availability issues. You see, Ford doesn’t get many requests for parts needed to rebuild the 6-speed manual transmission out of a 6th generation Fiesta ST. So, what happens. Supplies dwindle and become more scarce. Those that do exist languish on warehouse shelves and oxidize or corrode. In some situations they are on “LONG TERM BACKORDER-NO ETA” which basically means: “good luck, pal. Maybe Ford will restock some day, but otherwise, sorry!” It’s tough. Here’s where things got really tricky for me. When I placed my first order which included the bearings for the output shaft and the differential, all of my sources came back with the same backorder message. No stock anywhere. I called all over the place and came up empty. Backorder, no ETA. What to do? So I figured I could just pull the parts number off of the bearing and get it from Timken, INA, etc. Right? Sort of.
The problem is that over the years some of these bearings come and go. Parts numbers change or like with Ford, become more scarce. For the missing bearings, I searched and searched and searched. Most hits were random Eastern European websites that I could barely understand let alone trust with my credit card info. After reading bearing catalog after catalog and trying desperately to cross reference the numbers with dimensions I had taken off of the bearings I took using my digital calipers, I finally found what I thought were matches. I then started to home in on the parts numbers from Timken & INA. With a bit of luck I managed to find both elusive bearings available at 123Bearing.com. This French company has a great website with a nice selection of bearings and more. I ordered and had my bearings in hand (from FRANCE) only a few days later. This was literally ten times faster than the parts I ordered from a US 3rd party site. (a story for another day.)
I started to remove the bearings from the transmission. Some were easy, some were a real challenge. I purchased a set of bearing separator/puller, pilot bearing pullers, a heat gun and more, all of which were crucial in the process. I also purchased a steering wheel puller set and some impact driver bits from Amazon. I had another pilot bearing puller set, some snap ring pliers, seal installer set and a few other tools on loan from friends. All of them were used. The two differential bearings were on pretty tight. For one side (the one close to the diff housing) I used a bearing separator to pull the race off. For the bearings in the trans housing, I used a punch (per the shop manual). For the two bushings, my friend Randy came up with the solution. We used a length of bicycle brake cable wrapped around the bushing and attached to a slide hammer. This made quick work of the small bushings which were otherwise elusive. (I spent about an hour trying to get them out in other ways.) Getting the bearings off of the output shaft was tricky and required using the Dremel to notch the race and pull it off with a separator. The input shaft was much easier and the bearing separator made quick work of it. (for both input & output, don’t forget to remove the snap ring inside the race first.)
Touching on what was my biggest mistake at this point, which was *not* replacing *all* of the bearings in the transmission at this point. I chose to replace the ones I thought were bad or suspect. In retrospect, I should have replaced all of them, and here’s why. Once I did get all of my parts in and installed all of them, put the whole transmission back together and reinstalled it into the car, put the sub-frame on and all of the associated parts I got to fire it up and see how I did. THE BIG MOMENT. Guess what? The problems were still there. All of them. The transmission still made the same rattling and whirring noise. Why? Well, remember those “upper” input and output shaft bearings? I chose not to replace them. And on the test drive, with the trans back in and the car up on jack stands, my friend and I put a small bit of load on the trans and could then hear specifically where the noise was coming from. Right on the side of the trans case, where the input and output shaft “upper” bearings are. So nothing for it, the trans had to come back out. This time I was going to replace all of the rest of the bearings, which is what I did.
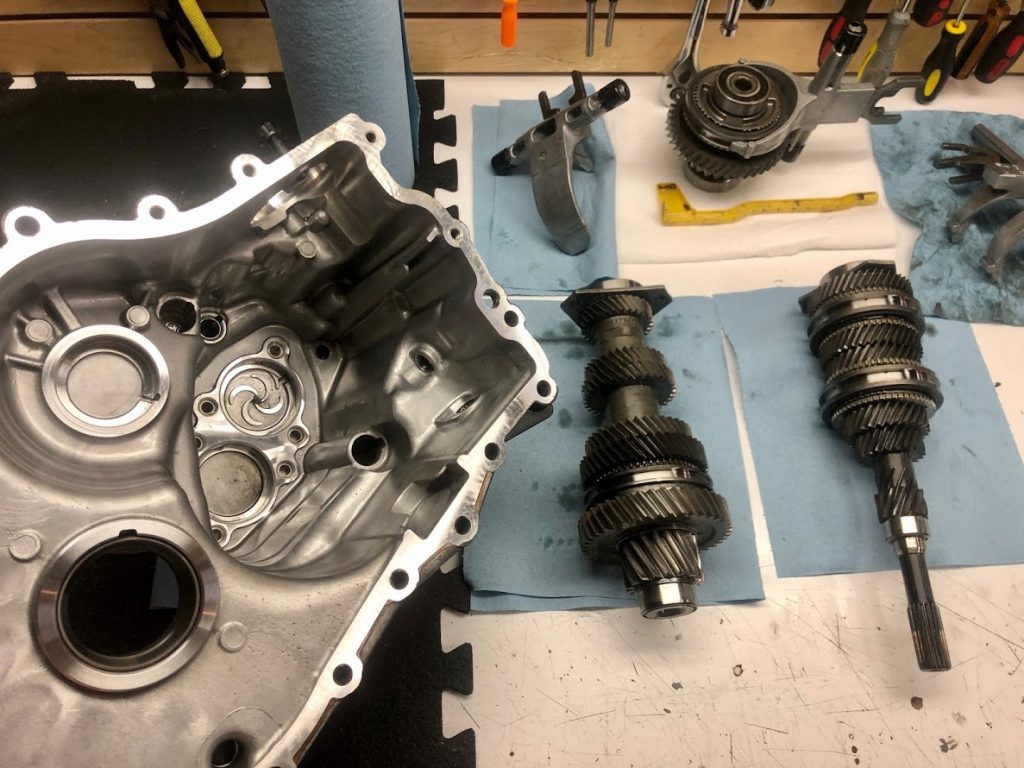
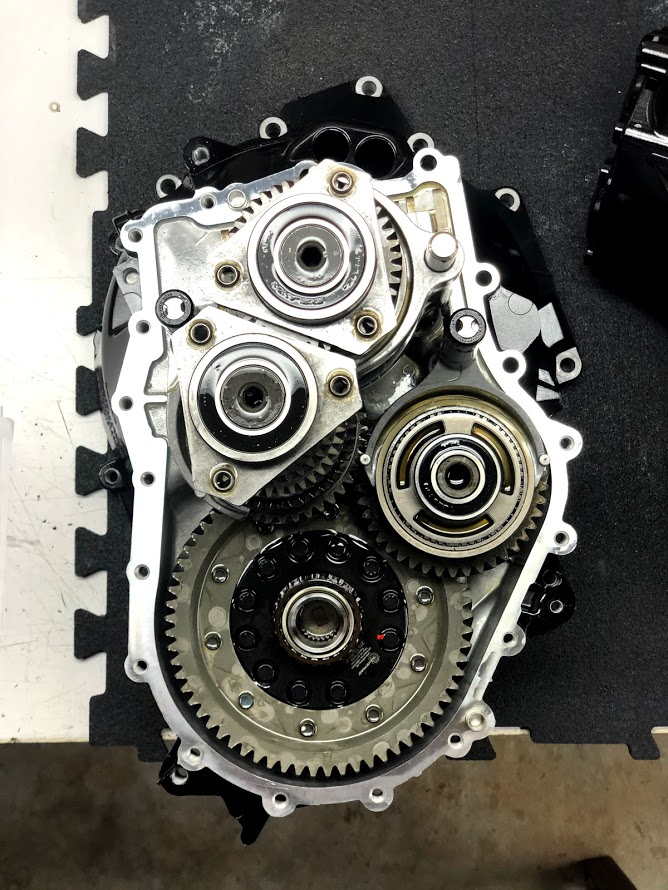
Back out it comes. Hello, again.Trans split in half again, the sealant cleaned off, ready to be disassembled again.
This time I was determined to replace every bearing in the trans. I was going to do the input and output shaft “upper” bearings, the needle bearings on the shafts, buried below the gears – everything. Removing the trans went quite a bit faster, AND I did not remove the sub-frame to get it out. That’s right, folks, you do not need to remove the sub-frame to get the trans out. It all went faster and sourcing parts was going smoothly except for a few bearings and some of the gears. Removing the gears from the Output shaft is tremendously difficult. I would recommend that you hire a capable shop and have them press the gears off. Nothing short of a 20 ton press, a very large bearing separator, an oxy acetylene torch and hammer. Especially the last two sets of gears that need to be pressed off – they are a bear!
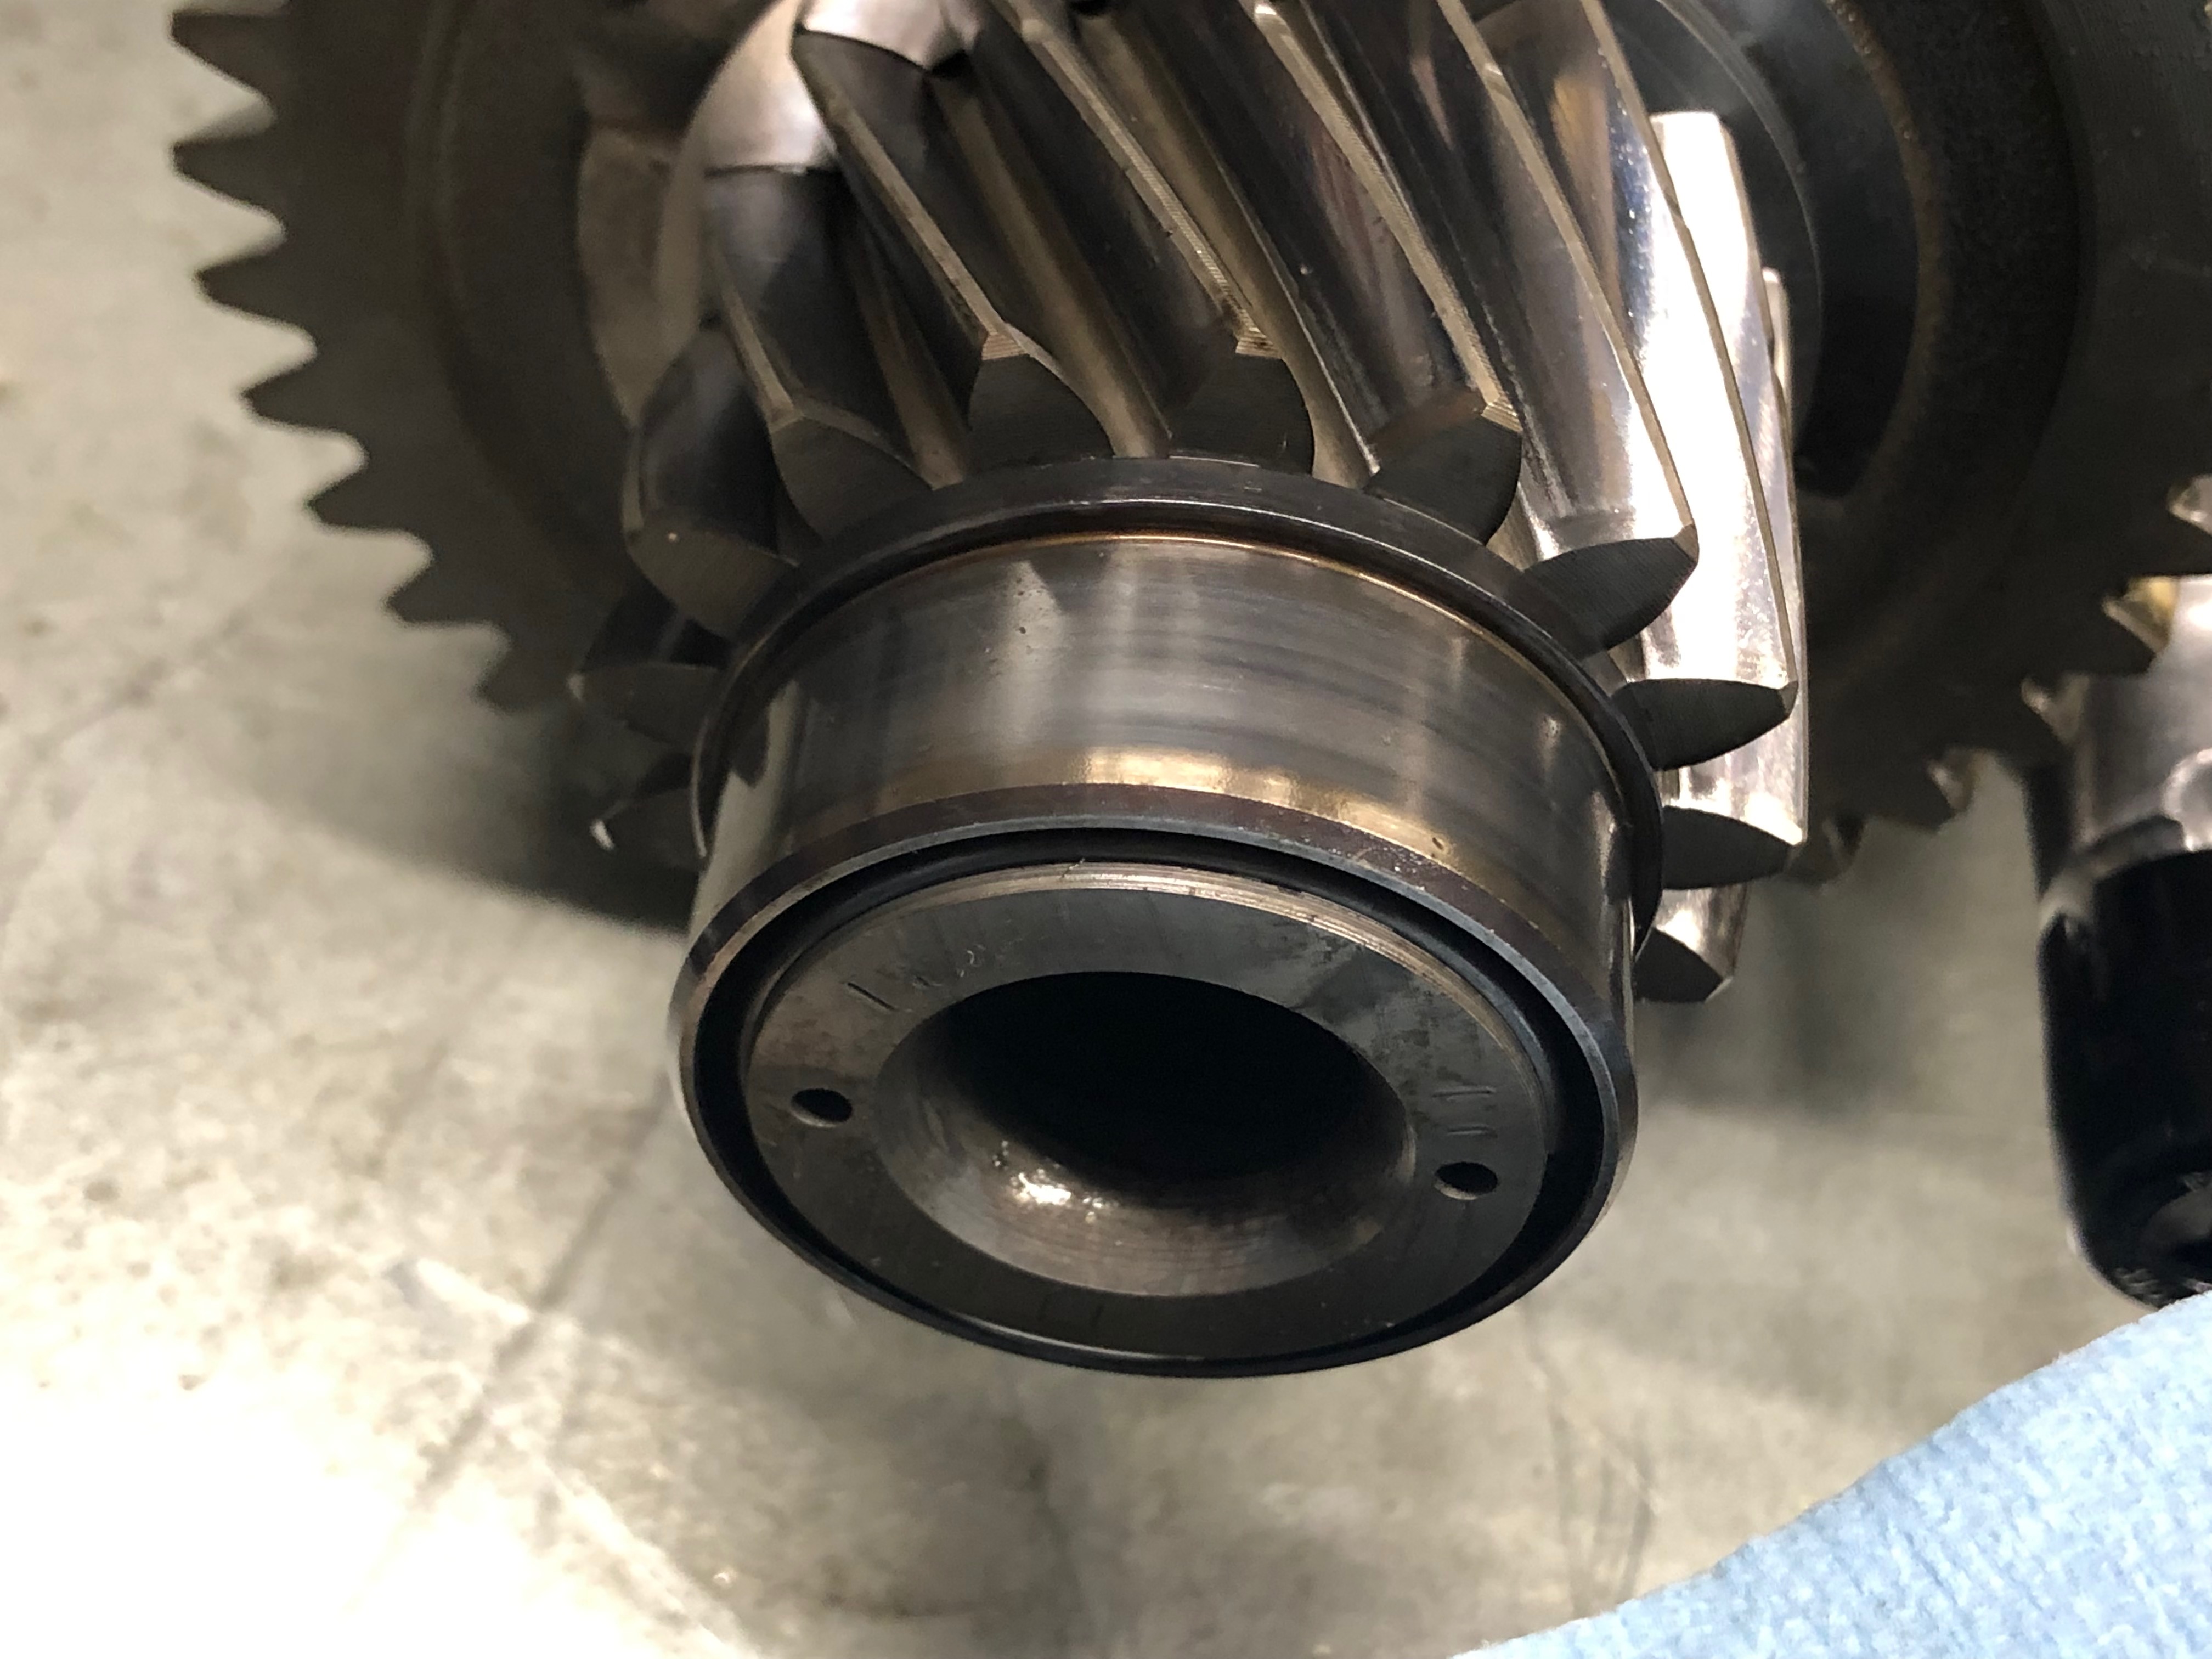
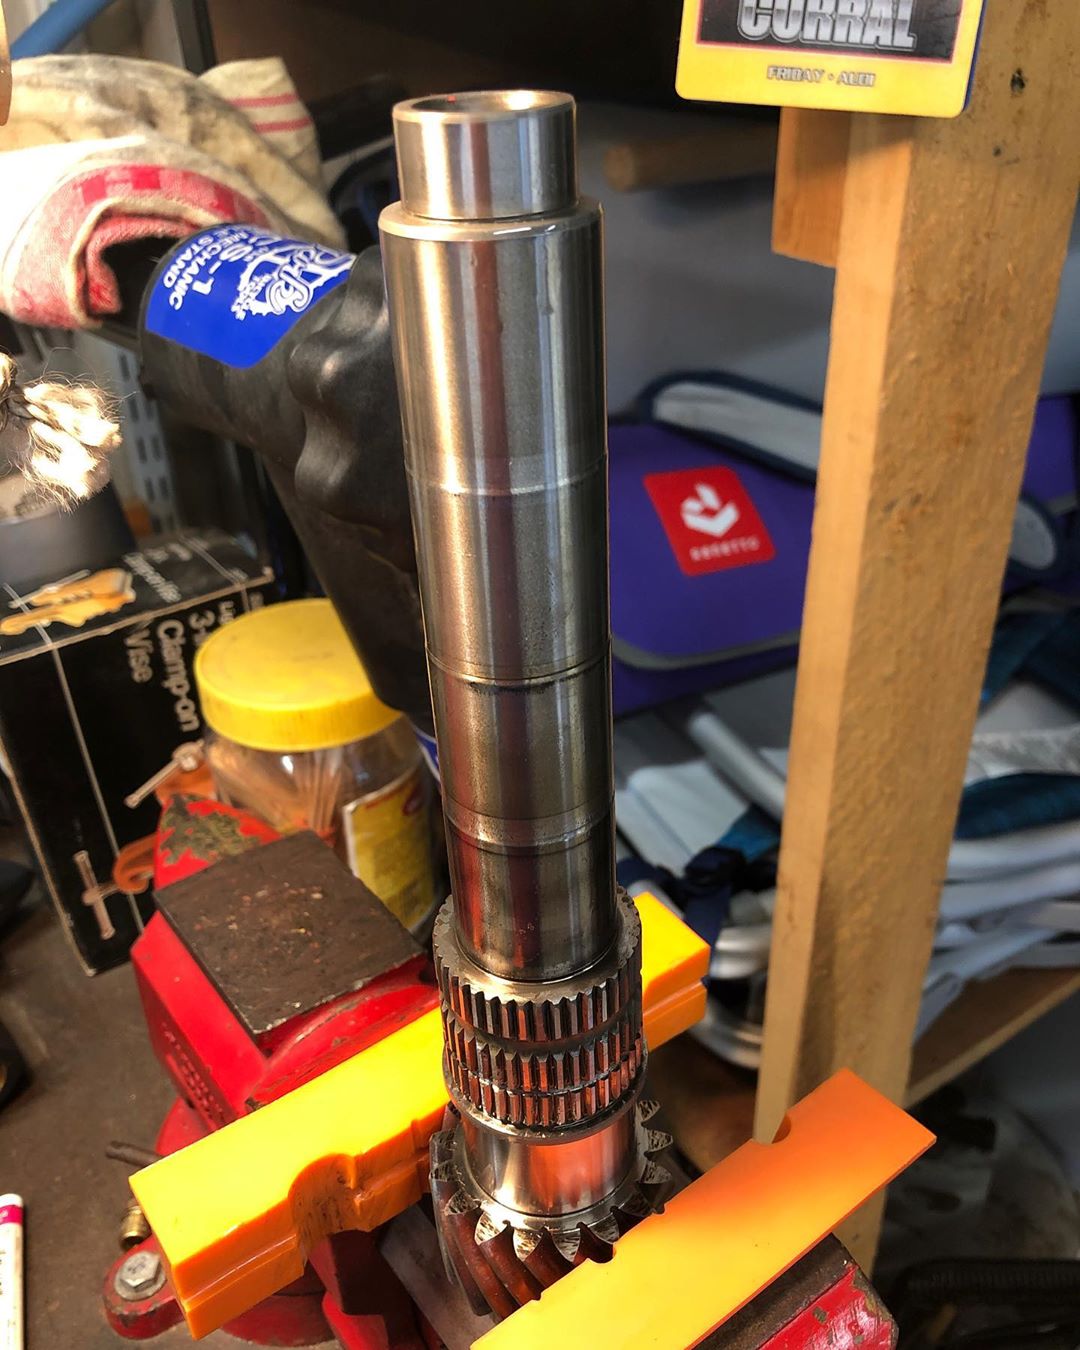
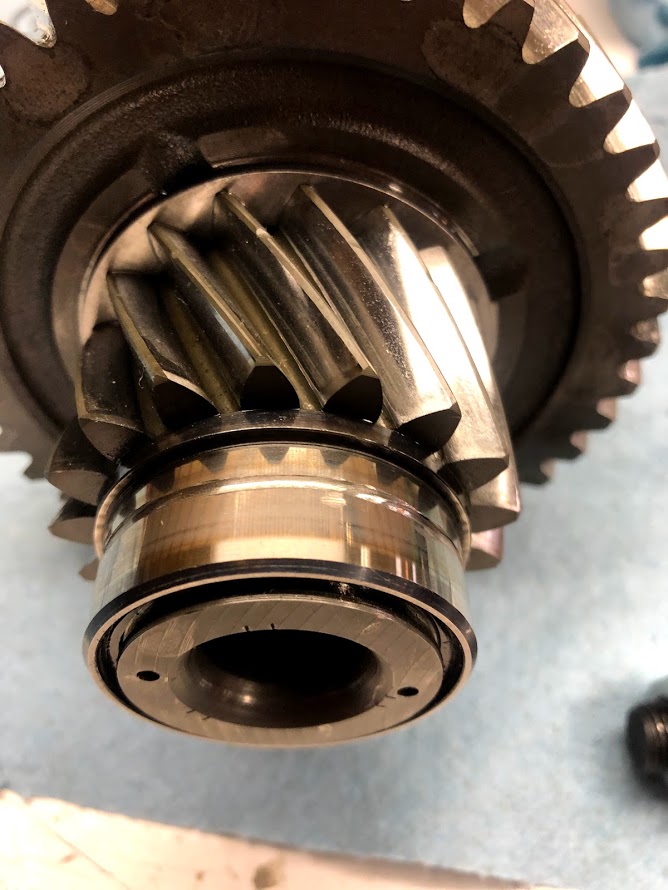
The output shaft, after I had finally removed all of the gears and bearings, ready for reassembly. FINALLY. Note: each one of those four tiers on the shaft is where a gear is pressed. It’s tight quarters!
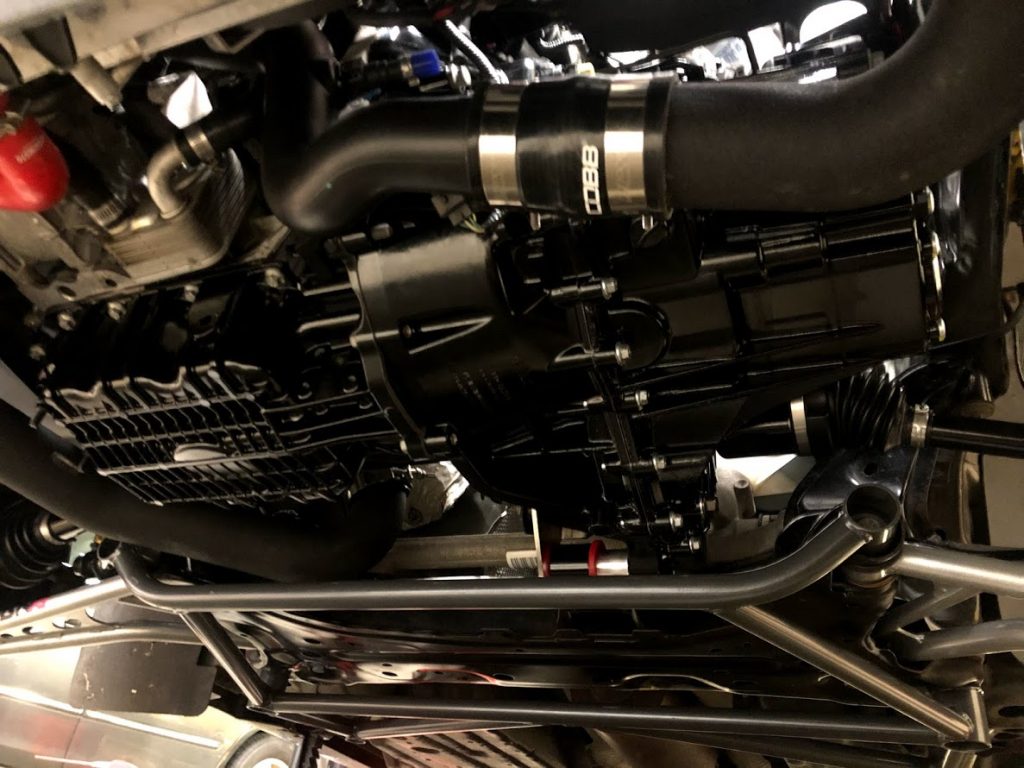
Following along with the OEM manual for the reassembly and reinstall is fairly straightforward especially having gone through it once before. So now, the big moment, part 2. Time to fire up the car for the first time, again. For me, it was a let down at first. I got the car all back together and called Randy to be there to assist and witness. We kept the front of the car up on jack stands so as to let the front end free wheel while we tested it out. When I fired up the car, disappointment. The front wheels spun with the car in neutral and clutch in! Letting the clutch out didn’t help. Only some resistance from the transmission. Putting it into gear made it worse, as it would stutter and stall out. I threw up my hands and was pretty upset. I figured I screwed something up. I hopped out of the car in a fit of despair and proceeded to begin clearing space to put the car on one side of the garage so my wife could finally have her parking space back. I was bummed.
But Randy was not moved. He is much more patient than me. He was pondering the shift linkages and other things and decided to give it another shot. This time, after a moment of the wheels spinning, they stopped, and in neutral, did not spin. Shifting into first gear, they spun. Second, spun. Third, spun. And so on. It seemed to be working! We took it out for a test drive and you know what?
IT VERKED
Hallelujah. We drove it around town, did a few mild pulls, it was perfect. No noise, shifted normally (although I suspect the linkage is a bit out of alignment and needs adjusting, as some of the gears are a little wonky going in & out – nothing major, just minor adjusting; I did not perform the OEM-recommended service procedure to adjust the linkages.) We figured that the reason things were so bad on first star was because oil had not found its way into all of those friction surfaces on the gears. They were probably binding and as the gearsets spun, oil worked its way into the various galleries and set stuff free. And the bearing that was bad? Yeah, it was the input shaft bearing. The top one. The one I didn’t think needed replacing. Well, you have to learn somehow.
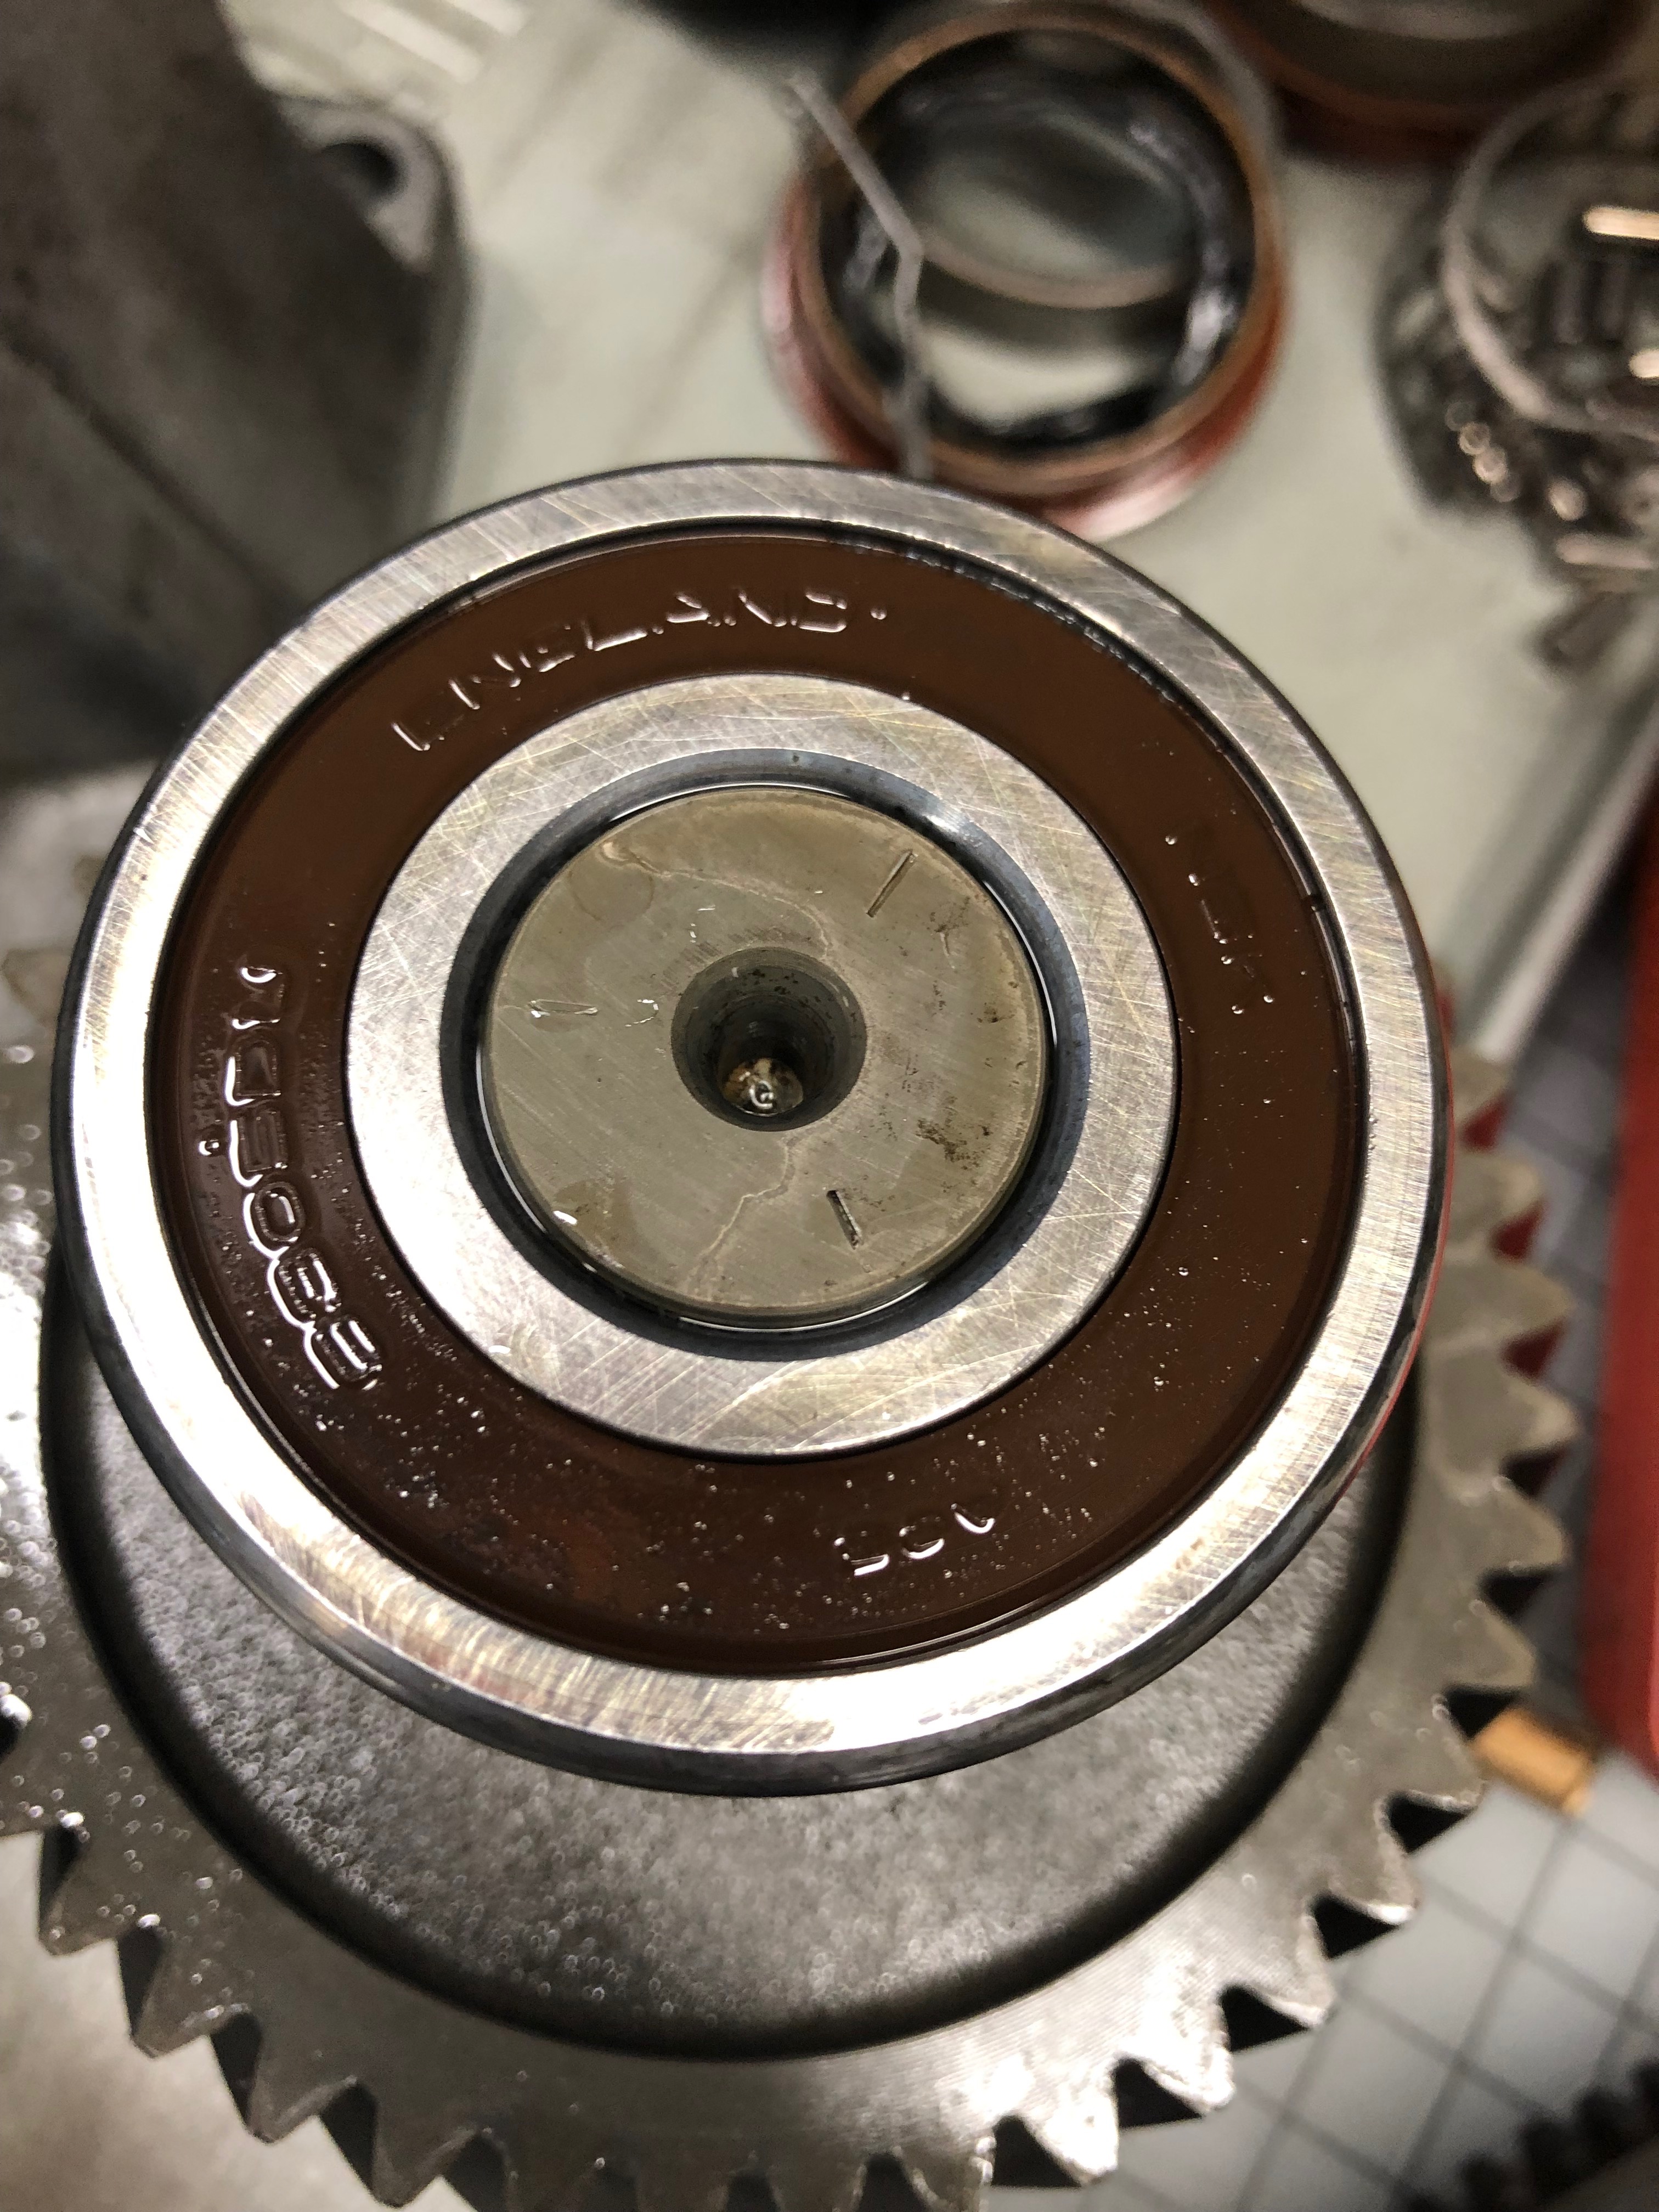
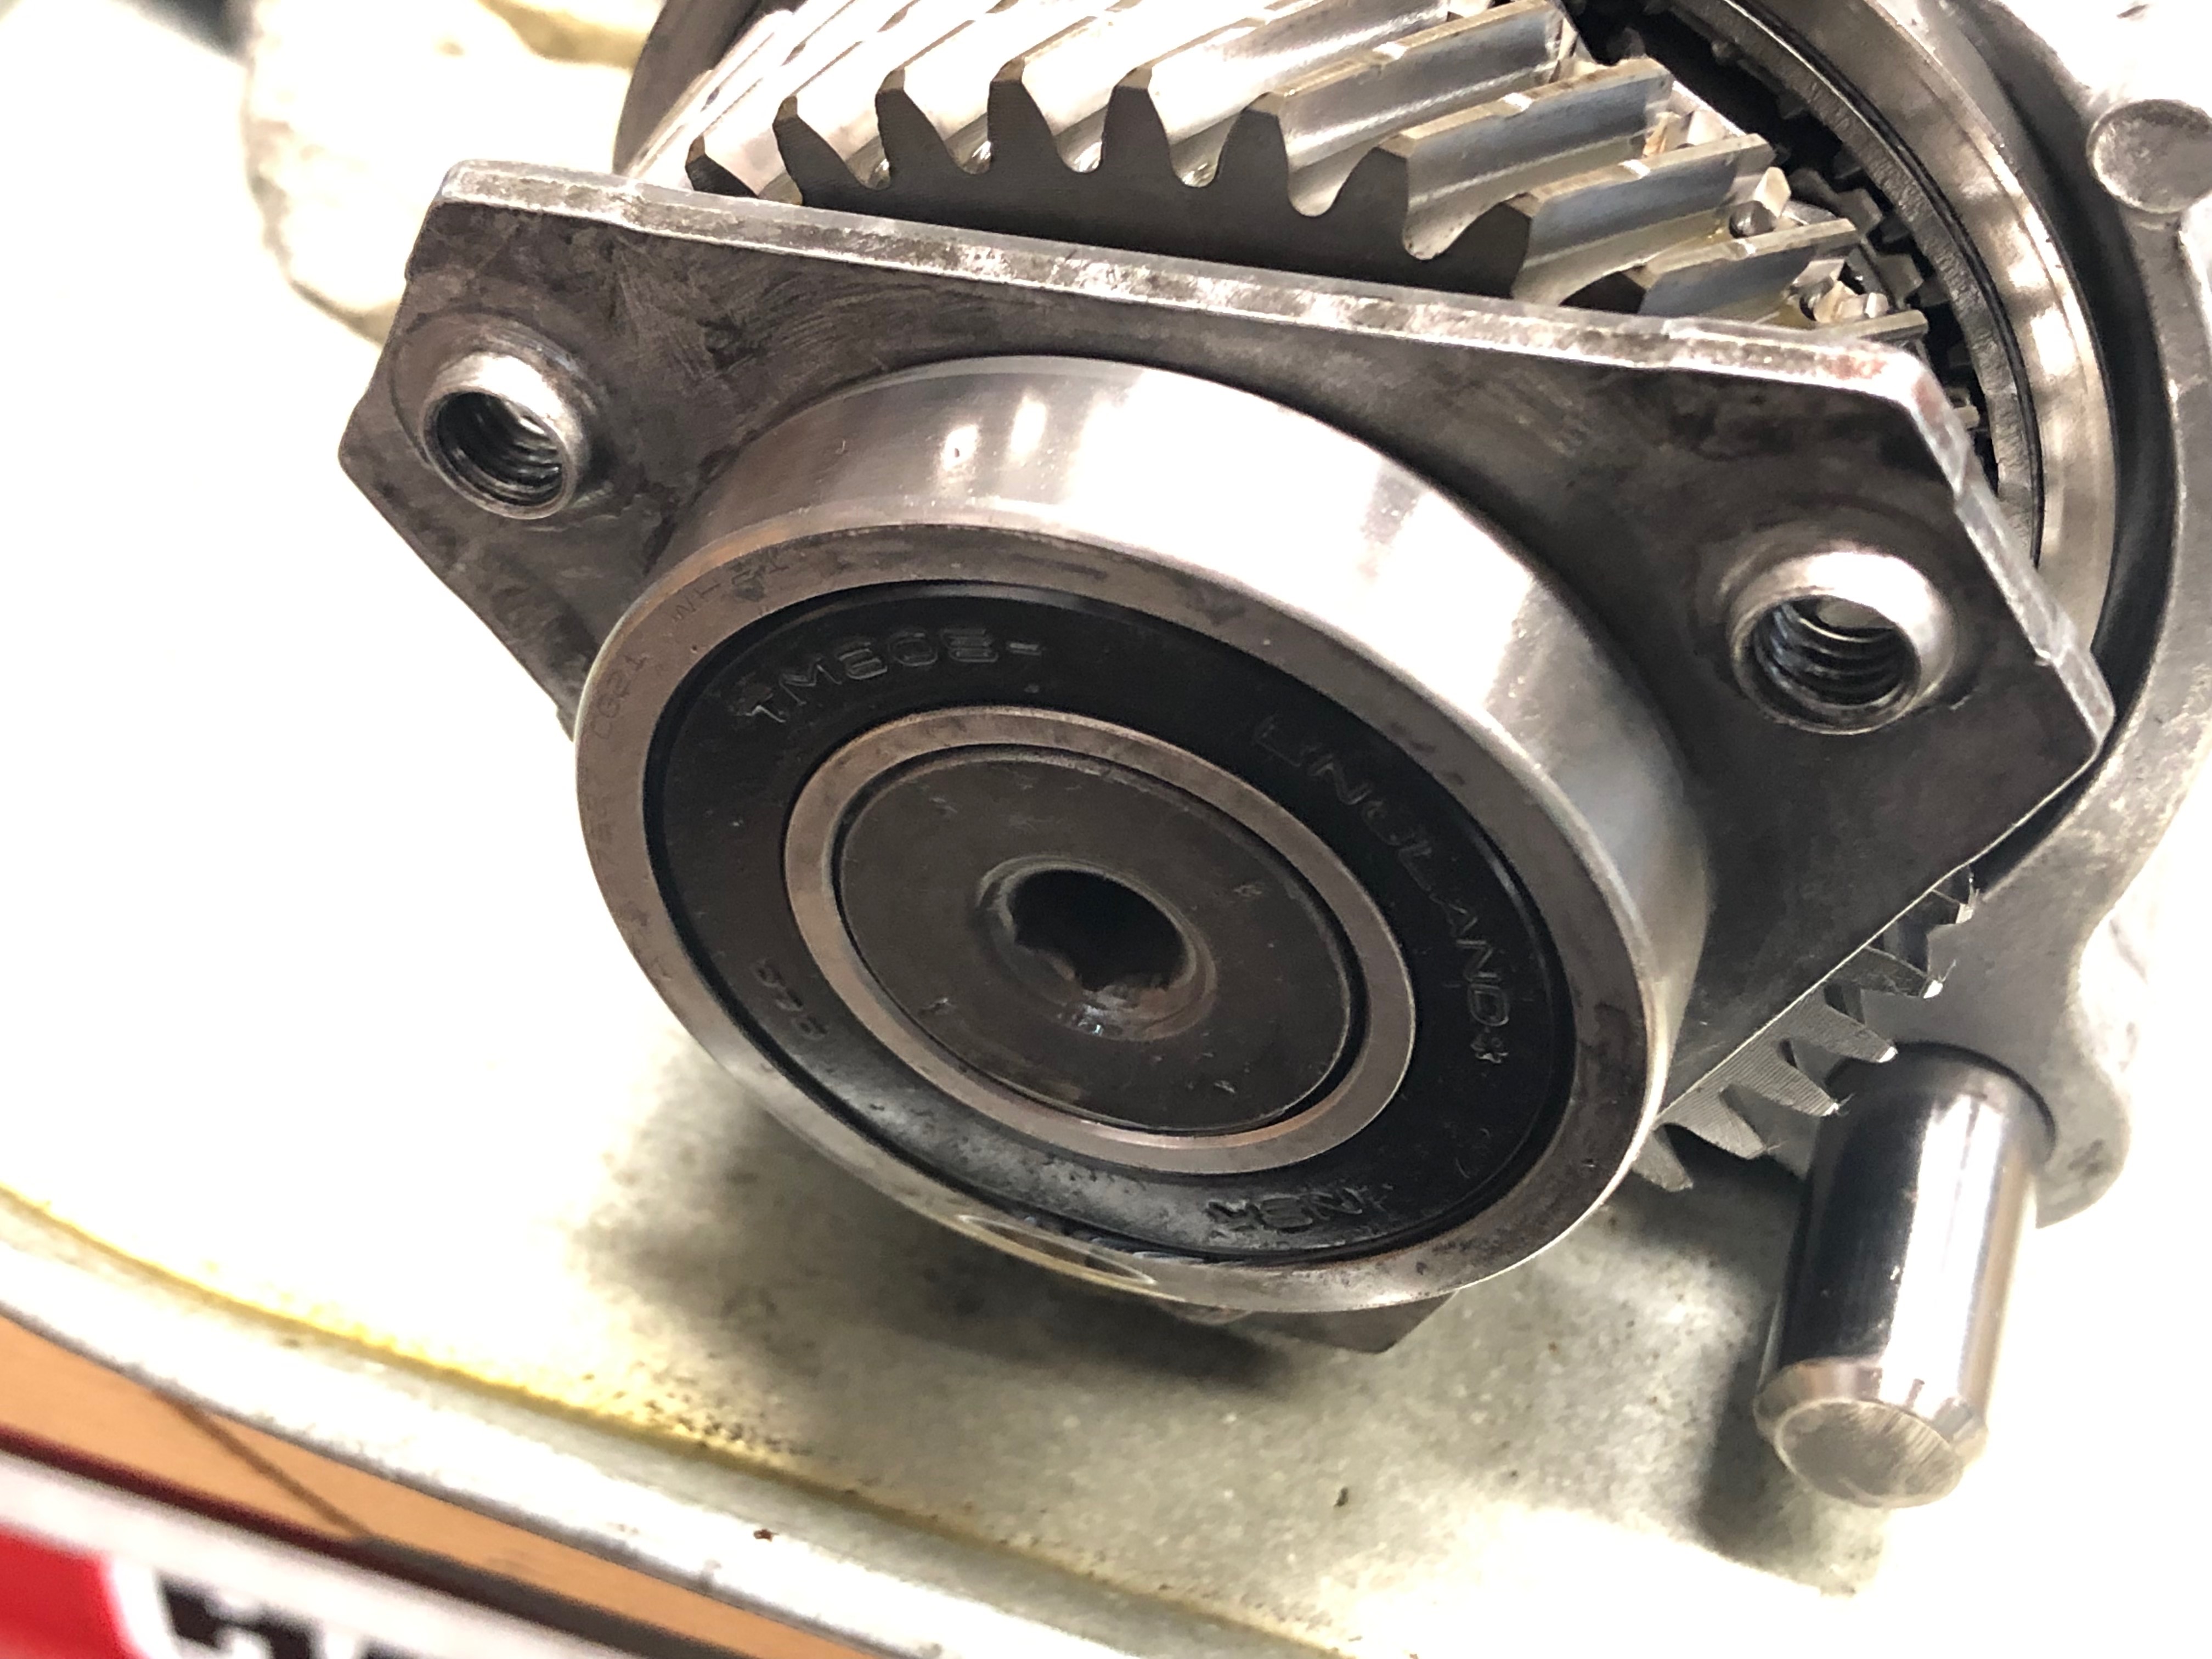
The input shaft bearing that needed replacing. This probably would have been the only thing that absolutely needed replacing. 🙁
I didn’t make any videos. I didn’t feel like documenting all the steps with photos. Most of the time in the garage, I was there to get shit done and would be focused on not screwing something up. That being said, I’m providing all the documentation here for you to use in the hopes that it helps someone tackle this job.
First up is my parts list. If you are looking for parts (and what tools and supplies you will need) here you go! (NOTE: UPDATED 7/9/23- Input Shaft Bearing part number update)
The following is a collection of files from the OEM manual that I have annotated with my comments on each step of the process. I highlighted areas where you need to pay particular attention and how I got the job done.
So I hope this helps you on your journey to rebuild the transmission. I learned a lot in this process on what works and what doesn’t. Lots of folks have asked if I’d do it again, and I think that I would provided I had the time and means to do so. But honestly, if I broke the transmission again, I may just replace it with a Clarke unit that has a warranty and is built to a much higher quality level. If you have any questions, comments, etc., please don’t hesitate to reach out to me! ben.sullivan75 *at* gmail.com
GOOD LUCK!
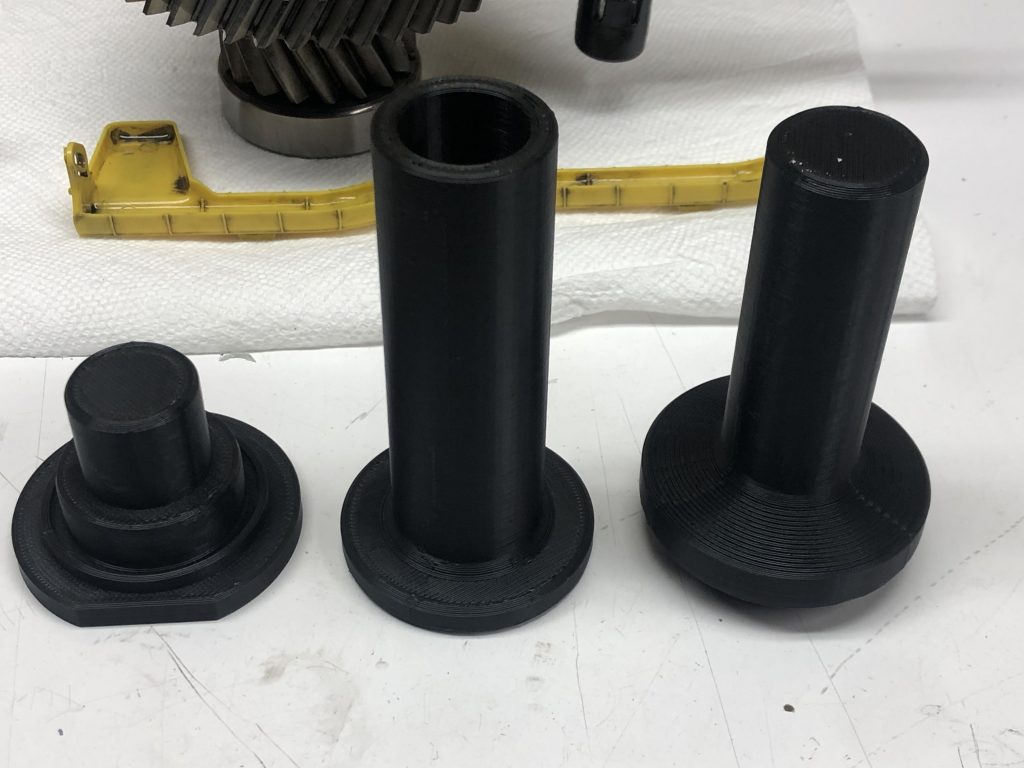
BONUS: 3D Printed Tools!
A generous reader, Foster B, purchased the necessary Rotunda tools and made 3D models of a few of them. He offered to share them so I’m posting the files here for anyone who’d like to give them a try. Dropbox link below which includes the STL files plus a few reference photos. Thanks, Foster!
UPDATE 5/21/22: Link updated. Including two NEW files for your rebuild project! From Foster B:
I don’t remember if I included the shift tower cover or the driveshaft seal cover last time. These are two models I made to help aid in;
a: keeping oil from leaking out when you pull the transmission and are moving it around
b: I like to get the transmission into place without the shift tower, as it gives you much more wiggle room, but I dropped a socket at the hole, and somehow it wedged itself in the case in such a way that I couldn’t get it out. That cover might save you from doing a bunch of extra work.
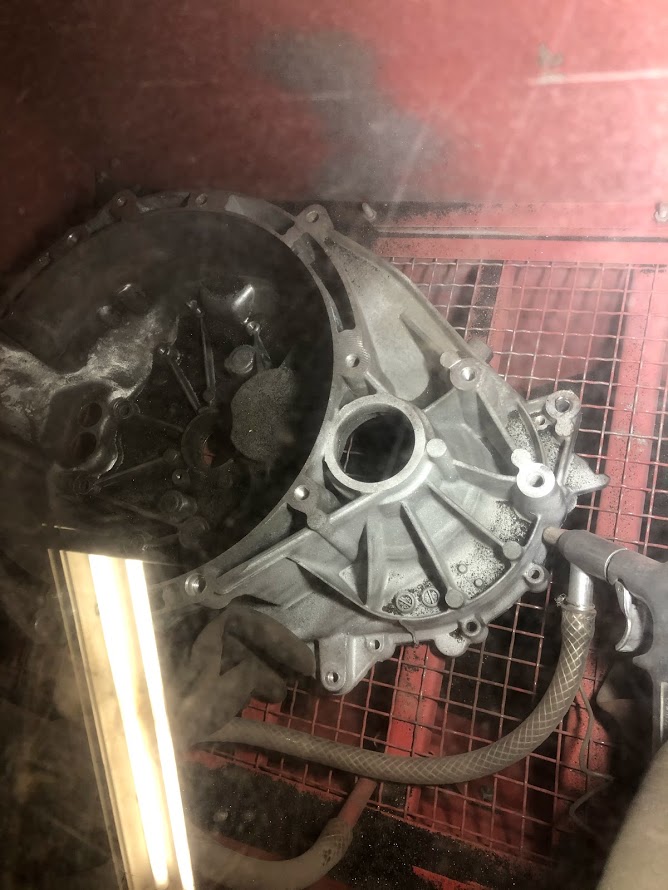
BONUS: Foster B. shared some photos from his epic rebuild. His project included 3D scanning the internals for an upgrade build, blasting and painting the case (looks great!) as well as an ARP hardware upgrade for the case bolts. He successfully rebuilt his trans, has many hard miles on it already, and has some really cool projects coming up! Thanks, Foster! Enjoy:
Mmm, LSD
Pulling the notched race
Dremel a notch in the race
Measuring diff end float
Blaaaaaaack! Looks hot.
Reassembly
Reassembly
Reassembly
Sandblasting the case
ANOTHER BONUS – MORE TOOLS!
Man, this community is really cool. Another reader, Juan E., reached out and shared a couple 3D printed tools he designed and created to make the job easier. Enjoy!
Also, I designed a couple more 3d printed parts that I needed. That I will link if you want to add to your blog. One is for the differential bearing install tool and the other is a clutch alignment tool.
A friend recently asked “if you could buy any car, what would it be?” Well that’s like asking a parent which child is their favorite. (it depends) For me, there are so many cars that I adore for so many reasons. But if you pegged me to the wall and told me to spill the beans, I guess here’s a pretty good list of what I’d pick.
What would I buy? Well that’s a tough question all around. A few of my “tops”:
Land Rover Defender http://en.wikipedia.org/wiki/Land_Rover_Defender
These are one of my all-time favorite vehicles. They stopped selling them in the USA in 1997 because they couldn’t be fitted with airbags and other safety features without serious modifications. They are amazing vehicles. Pure offroad delight.
1971 Saab 99 http://en.wikipedia.org/wiki/Saab_99
My parents had this car growing up. They picked it up in Sweeden, drove it all over Europe and had it shipped home. It was a really neat car and I still love ’em.
GMC Sierra 1500 http://www.gmc.com/sierra-1500-pickup-truck.html
There is something great about climbing up into the cab of a big pick up truck, knowing you could go anywhere and carry anything and tow the house right off the foundation.
2012 Subaru Impreza WRX STI Limited http://www.subaru.com/vehicles/impreza-wrx/index.html
I had a 1995 Legacy Outback and loved the thing to death. I have always loved the WRX STI’s too. They are just solid, fun cars.
BMW Z8 http://en.wikipedia.org/wiki/BMW_Z8
A modern classic. Rare and elegant. I would love to tour the country, or Europe, in one of these.
2002 BMW Z3 M Coupe http://en.wikipedia.org/wiki/BMW_Z3
This special edition of the Z3 was bonkers in its design and just completely bonkers. I love the wacky shooting brake style.
This weekend I will be at the Great Scale Model Train Show, held quarterly in Timonium, MD at the State Fairgrounds. It’s a great show and a place you can find lots of model RR related stuff at great prices. My model RR club, the Rockville Model RR Society, will be there as well with about 3+ tables worth of items for sale (see photo above). The club is liquidating many items it has had in storage. Me, well I’m selling lots of items I myself have had for many years and have no use for anymore. Hope you can make it out and if you do, say HI!
Recently, digging through old files on my backup drive I came across this gem, ca. 1990:
Wing Commander 1 PASSWORDS
WEIGHT OF A RLARI-18000
SAFE SPEED IN AN ASTEROID FIELD-250
MAX RANGE FOR FF MISSILE-12000
MAX RANGE FOR AN IR MISSILE-8000
VELOCITY OF THE DART DF MISSILE, IN THE RAPIER BLUEPRINTS-FF& IR ESK-9500
AGE OF MANIAC-23
FRONT ARMOR OF THE FRALTHI-28
LAZER CANNONS MAX RANGE-4800
DF MISSILE ESK-11000
TIGERS CLAW LAUNCHED IN-2644
On a whim, I Googled Wing Commander and found the app & a DOS emulator. Both worked and within minutes I was back on the Tiger’s Claw fighting the Kilrathi. I just loved this game (and WCII) so much.
Most of you are aware that we have moved. Then again I don’t really know who the audience here really is, so let’s assume that all my wonderful friends and family are tuned into this blog, awaiting each post with bated breath. Sound good? April 15, nigh eight years to the day we moved into our first house on Thornden Rd., we left Rockville for the town of Brookeville, MD which is about 20 minutes to the North via Rt. 28 & 97. Kris in particular had been looking for houses avidly on Redfin and other real estate sites. She pored over listings, checking a few times a day for months, looking for possible places for us to relocate to. The whole thing happened so fast and furious and we’re so thankful that we came out on the other side nearly unscathed.
Rockville had gotten a bit to clogged for us. The city is growing and traffic in and around just keeps getting worse. Intersections that several years ago were just a bit difficult are now nightmares most rush hours. Our neighborhood saw more traffic and the overall flavor of the area just didn’t appeal to us. We had done research on the elementary school and made the decision years ago to find a new one for our kids. It just didn’t match up with what our expectations were and what our own personal ideas were for where our kids would have their education. We decided a few years back to send them to Oakdale Christian Academy for preschool & kindergarten which worked out nicely because it gave us a rough time frame to consider moving. And now, the time had come. There were also some wonderful tax incentives being offered which we knew would expire soon if we didn’t take advantage of them and that turned into a big motivator for us too.
Our decision was guided by a few factors. Schools, housing costs, neighborhood, accessibility to name a few. We discussed moving to places as far away as California and as near as elsewhere in Rockville. Ideas of moving up to New England or Delaware didn’t pan out after we realized the complications with family proximity (we want to stay near our folks, who are mainly in the DC area) and house values. Also, job markets haven’t been to hot lately so that was unappealing to me particularly since I have an excellent job which I’ve been at for over twelve years. (for those of you keeping score, that’s more than a third of my life) We couldn’t really afford to move into Potomac, which was also high on our list. Despite housing prices coming down quite a bit the P-mac market stayed relatively out of our range. Virginia was also an option but that was the opposite direction of our friends and family. Moving up Rt. 270 also was an option, but the idea of moving into one of the really crowded neighborhoods along the exploding corridor didn’t appeal to us. I also didn’t want to move WAY up North to, say, Frederick county.
Olney/Brookeville appealed to us in many ways. The land out there is underdeveloped. There are still working farms out there (yes, a few dairy, but mostly turf, but hey! I’ll take what I can get) with just incredible amounts of park land and opportunities for exploration. The schools are great, the neighborhoods are bursting with children and the area overall is very friendly. There’s a laid-back feel to the area that many of the other nearby towns don’t have. Olney/Brookeville is isolated – it’s sort of in the middle of a triangle between 270/495/29. It has proximity to DC/Frederick/Columbia in different ways. It sort of leans in a few different directions, which means it offers opportunity for work and commuting. (more on this in a later blog post) The houses are relatively new (aside from the ancient farmhouses dotting the area), infrastructure is good, cost is reasonable for the region and when were looking the market was favorable for us. It also allowed us to keep decent proximity to our family and friends in the area which we really liked. So this became our target.
Selling our house was a rough process to begin. I have to be honest, Kris really fronted this effort from the getgo. She lit the fire under my ass to get the house sold, she had the get-up-and-go to start things moving and then keep them rolling. All of the years of watching home improvement shows on TV was about to pay off. Like a force to be reckoned with she swept through the house, planning out a course of attack for each room and area. What was going to stay, what would go into storage (thanks Mom & Dad!), what needed repainting, what needed removal, what needed dressing-up, and so on. She had a really good eye for staging the house and set about doing so in as much of a frugal manner as was possible and what a job she did. In a period of a few weeks she had the house read to go on the market. And so we did.
Our realtor, Beth League, was a client of Kris’. She had cared for Beth’s father and they had forged a friendship over the time she worked with him. Beth was wonderful from the get-go. She really helped us take baby steps from the beginning and not get overwhelmed with the process as a whole. She started by outlining the rules of the game, talking about how things work and explaining what we could and couldn’t do. I fired a ton of questions at Beth and she was able to give me good answers across the board, something that is important to me. If someone who is in a service position blows me off I tend to do the same to them. It’s not worth wasting my time unless it’s a very special person. She did a great job and maintained that throughout our time working with her. We filled out a lot of paperwork, got the house listed and went to bed. Mind you this was right in the midst of what would be dubbed the “snowpocalypse” when we received over 2′ of snow! Our house wasn’t exactly “show quality” at that point. The trees were bent, there was an 8′ high pile of snow at the base of the driveway alone. You could hardly see the place from the street! Ice everywhere, pathways carved out of snow around the house, sore backs and worn-out lungs. But, the inside of the house was immaculate.
Maggie had moved out weeks before to keep hair & dust down. We were on high alert. A regimen of cleaning up dishes quickly, vacuuming, neatness, care and upkeep was the norm. We had just got used to it. So when the snow storm came right when we planned to list the house it was kind of a bummer for us. We had to push it back a couple days which was a bummer since we were so jazzed to get going, but we pressed on and the house went live on Wednesday night. The call came in on Thursday morning that we had got an offer. And it was a good offer. We scheduled time with Beth to go house hunting in the snow on Saturday and to sit down with the seller’s agent on Friday evening to review the contract. It was happening so fast. After reviewing the contract, we really felt good about it and we were ready. All the stars were aligning, now we just needed a house to move into.
Why is Metro so broken? That’s a question best left for the pundits and the blowhards. For me, it’s a few things.
No through trains. If I want to get from Wheaton to Crystal City, I have to stop at every single one of the 15 stops between those stations, including a transfer. In many major cities like NYC there are “express” trains that skip stops in order to take those who are traveling long distances to their destination faster. Locals. Expresses. It’s basic public transport logic, right? Well, not for Metro. Apparently the ridiculously elaborate and fancy designed system is too good for express trains. Way to plan for the future, Metro. There are no express trains that I know of on the Metro system. As a result my train ride today took just over one hour on the rails. This includes waiting for trains to clear platforms and the train stopping at my station (Crystal City) and the doors not opening. No announcement, no warning, the doors just didn’t open. The train continued to the next stop where I had to transfer and ride back to my stop.
Lack of coverage. As far as I’m concerned the DC Metro area screwed the pooch back in the 50s when they decided to rip up the DC Traction rails and convert to buses. Much of the old DCT system rode on dedicated right of way, that is to say that it didn’t have to contend 100% with the flow of traffic as the buses do. Of course the system had its own problems and much of it did in fact run on city streets with cars. But what troubles me is how we have reached a quite saturated suburban population as far as infrastructure load is concerned, yet we have no right of way left. In order for Metro to get a train line in place now it involves years and years of money wasting deliberation and meetings. And then there’s the astronomical costs. It’s ridiculous that these people actually argue with people. What happened to eminent domain? Putting in public transportation projects is something that must be done. Do it.
Cost. I had to break this one down for you a bit. Now keep in mind that I like driving. I like being in my car. I’m a big gearhead. I like to be able to open and close the window. To turn the music up or down. To put the heat or the AC on. I don’t mind traffic that much and I sit in traffic nearly every day. My commute usually takes from 40-60 min door to door driving from Rockville, MD to Crystal City, VA which is ~18 miles. I pay for parking, which costs $7.75/day. My car does about 24 MPG which roughly comes to $4.16/day in fuel costs. That’s $11.91/day so far. This does not include the cost of wear-and-tear on the vehicle, which I’d have to figure separately *. I walked from my mechanic’s shop to the Wheaton, MD Metro at about 7:38am and arrived at my office at about 8:53am. That’s 1:15 total travel time door to door. Cost round trip today is $8.90. So the way I see it, for a few bucks more per day I get to roll down the windows, keep my hands clean, turn up the music and enjoy the breeze. No bums to breathe at me, no rude boys to stare. No tourists to get in my way (GET OUT OF MY WAY). No freaks. I don’t have to squish myself into the sardine can seats and I get to come and go as I please from the office.
It’s a no-brainer for me. No wonder Metro is struggling so badly. Putting too much money into a super-fancy system, poor route design, trains that go no where. Astronomical costs (it’s a good thing I didn’t have to pay $10 to park for the day at a Metro lot) don’t help. Unreliable trains and broken escalators abound. Until the system gets its shit together and starts to put their service first, they are never going to succeed.
* The astute among you will notice that I left out a key item in my car’s daily cost. The operational costs. This includes wear-and-tear, depreciation, insurance, etc. GSA has a figure of ~$18/day for my vehicle which I think is a little high. For one, I don’t really see the need to include the depreciation value of my vehicle as I don’t see it as an investment, per se. I didn’t purchase the car to make any money, I bought it to perform a task. However, like any tool used to perform a job, it still has a value. But I’m not sure the depreciation costs need to be figured here. Anyway, this does bring the daily costs of my commute quite a bit higher, but the freedom of driving still supersedes doing the Metro dance for me .


